Communication
Communication is a pivotal tool used everyday in your association to foster and maintain valuable relationships. ChamberMaster/GrowthZone offers the ability to communicate via email, SMS text, fax and print.
Contents
- 1 E-mail Setup
- 2 Email Sending Options
- 3 Archive emails (record) in the database even when not logged in
- 4 Communication Tasks
- 5 Quick Guide to Sending an Email
- 6 Creating a Letter
- 7 Viewing and Recording Communication History
- 8 Mail Merge
- 9 Remove Unwanted Headers & Footers
- 10 Creating a Signature Block
- 11 Email Designer
- 11.1 Designing Your Newsletters
- 11.2 Template Settings - Global
- 11.3 Standard Tools
- 11.4 Custom Tools
- 11.4.1 Add a List of New Members to Your Newsletter
- 11.4.2 Add a List of Member Anniversaries to Your Newsletter
- 11.4.3 Add a List of Upcoming Events to Your Newsletter
- 11.4.4 Add a List of Job Postings to your Newsletter
- 11.4.5 Add a List of Hot Deals to your Newsletter
- 11.4.6 Add a List of News Releases to your Newsletter
- 11.4.7 Add a List of Blogs to your Newsletter
- 11.5 Email Designer Common Tasks
- 12 Managing Quarantined Emails
- 13 Storing Documents - Cloud Drive
- 13.1 Storing a personal document for use later
- 13.2 Storing a document to share with other staff
- 13.3 Storing files for members to access
- 13.4 Storing files that can be attached to an email or accessed through a URL
- 13.5 Storing images that are used in emails or other locations the editor is used
- 13.6 Reasons emails don’t get to members
- 13.7 Ideas for Developing Communication Content
- 13.8 Create and format your own output in the ChamberMaster/GrowthZone editor
- 13.9 Copy and paste from Microsoft Word
- 13.10 Insert link to PDF file (or other file type)
- 13.11 Save Microsoft Publisher files as a graphic file and insert into editor
- 13.12 Copy and paste output from another HTML program (like Constant Contact)
- 14 Integrating Constant Contact
- 15 Using and Integrating MailChimp
- 16 Other Communication Tools
- 16.1 Web Leads
- 16.2 eReferral
- 16.3 Push Notifications
- 16.4 Working with Blogs
- 16.5 Smart Text
- 17 Sample Automatic Emails Sent Out by ChamberMaster/GrowthZone
- 18 FAQs on Emails, Letters, and Labels
- 19 Help Documentation
E-mail Setup
Unsubscribe Options
An Internal Disclaimer message may be configured to include on all Mass Emails or ALL Emails that are sent from ChamberMaster/MemberZone. Included in the disclaimer is a link that will give your members the option to un-subscribe from emails.
- Click Setup
- Click General Options & Settings.
- Expand the Email Server Settings section and scroll to the Public Disclaimer.
- You may edit the message as desired, but the link to un-subscribe should not be altered.
- Add Public Disclaimer to all Emails - select this option if you want to include the disclaimer on ALL emails generated through ChamberMaster. This will include emails sent via Groups, Email to multiple members and individually sent emails. If no selection is made, then the public disclaimer will only be included on Mass emails.
- Allow Unsubscribe from ALL Emails - select this option if you wish to allow recipients to un-subscribe from both mass emails and individual emails. NOTE: This would un-subscribe them from emails sent for billing purposes.

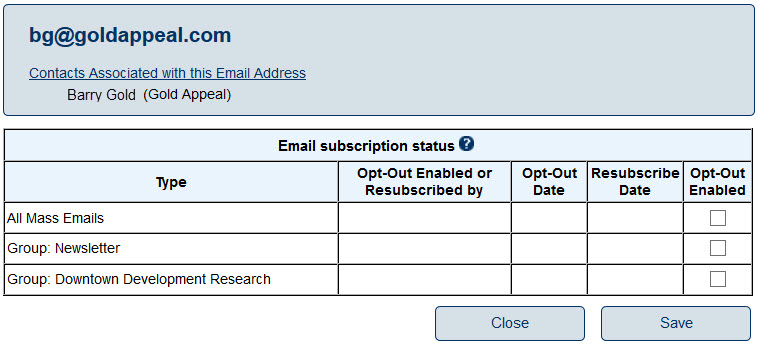
Managing Opt-outs
Member - Unsubscribing from Group Emails
When a mass email is sent to a group, clicking the link in the disclaimer will allow the recipient to continue to receive emails for the group, opt-out of the group emails (NOTE: If the group has been configured to dis-allow opt-outs, they will be prompted to contact your organization), or to join additional groups.

Member - Unsubscribing from Mass Emails
A mass email (by definition an email sent to more than one person) may be sent through the communications tab, by selecting Email to Multiple Members, or it may be created when sending Event Invites, etc. The public disclaimer will be included on these emails, and the recipient will have the ability to opt-out of all mass emails, subscribe to other lists, or continue to receive emails. Note: The recipient would continue to receive emailed billing transactions and any other emails sent to them individually.

Member - Unsubscribing from ALL Emails
If you have selected Allow Unsubscribe from ALL Emails and included the public disclaimer on all emails, the recipient will have the ability to un-subscribe from all email communication whether sent from a group, a mass email (such as event invitations) or individually. This will include billing related emails.

|
|
NOTE: The Email Notifications (Additional Setting for Staff Admin) under Association Employees/Reps will be sent whether the member elects to unsubscribe from mass emails or all emails. The email sent to staff indicates what type of unsubscribe it was (Mass or All). |
Staff- Re-subscribing Members
A member's subscription status is indicated by the ![]() icon through-out the software:
icon through-out the software:
- On a Group's roster Tab
- To resubscribe the member:
- Click the
 icon. A list of all the groups the member is subscribed to will be displayed.
- Deselect the check-box for the groups to which you wish to resubscribe the member.
- Click Save.
- Click the

- On the Rep tab, Group Participation List

- To resubscribe the member:
- Click the icon. A list of all the groups the member is subscribed to will be displayed.
- Deselect the check-box for the groups to which you wish to resubscribe the member.
- Click Save.
- Click the
- When sending an email, if the member has unsubscribed it will be displayed in the email

Manage Unsubscribed Emails Report
You can view a list of all members who have unsubscribed from emails, and resubscribe them from the Manage Unsubscribed Email report.
- Click Communications in the left-hand menu.
- Click Manage Unsubscribed Emails in the Monitor and Manage Communication section.

To resubscribe a member:
- Click the Manage Subscriptions button.
- Enter any part of First Name, Last Name or Email Address of the Rep to re-subscribe. The system will search for and find the appropriate rep.
- A list of the the groups the rep belongs to will be displayed allowing you to resubscribe.

Staff - Enter Email Opt-Out requests on behalf of your members
If a member calls in and asks to be removed from all emails, you can now enter the opt-out selection for them. Access Communication ➝ Manage Unsubscribed Emails and select Manage Subscriptions. You may also opt a member BACK-IN if they desire.
Also available under that selection you'll find a list of all unsubscribed email addresses where you may click the email address and deselect the Opt-Out checkbox for any selection where the email address should be re-subscribed (a feature that has been available for quite some time already).
Email Relay Service
In Outlook (or whatever email program you use), include your association's unique archive address as a BCC. The software will receive the email, and look at the address sent/replied to and place it on the communication history of the associated member. Emails with addresses that are not recognized will still be archived but placed under Communication -> Manage Unmatched Archive Emails where you can go to view and manually match them to the appropriate member.
_in_the_database_even_whe-Communication.1.004.2.jpg)
In the example above this email will be recorded on the member record that has the email address of Joshua.johnson@gvpiping.com
Find your association’s domain address under the Email Server Settings section under Setup -> General Options and Settings.NOTE: Must be logged in with Administrator permissions

Notes:
- To use the archive feature, you must be sending the email from an email address that is listed as a staff email address under Setup -> Employee/Reps.
- Emails forwarded or cc'd to archive@youraname when multiple members/reps in your database share the same recipient address will be recorded in Communication --> Unmatched Archive Emails.
- In cases where there are two reps with an identical email address that belong to the same member, it will be recorded on that member’s history.
- In cases where two reps with identical email address belong to two different members, the archived email will still go to the unmatched archive email list.
|
|
Caution: The archive@ email address should only be included in the bcc line when you are using outlook outside of ChamberMaster/MemberZone. If you are selecting the Edit with Outlook option from within the software, it is not necessary to include. If you do include in the bcc, the system will attempt to "double-archive" which will result in an error indicating the message has not been received, when it actually may have. |
Email Sending Options
Once email recipients are selected in ChamberMaster/GrowthZone, there are two methods of sending the email.
- Using ChamberMaster/GrowthZone's built in email tool.
- Using Microsoft Outlook (if installed on your computer).
Depending on your needs, you may choose to send some email directly from ChamberMaster/GrowthZone and some from Microsoft Outlook. Each method has its own strengths.
Advantages to Sending Email with ChamberMaster/MemberZone
- Easy access if already logged in
- Gives access to current addresses in your database
- Ability to create “mail merge” emails
- Ability to embed attachments as links
- Ability to use templates
- Ability to schedule the email for future delivery (for users of the Plus edition or greater)
Advantages to Sending Email with Outlook
- Access to additional email addresses not in your database
- May add additional CCs and BCCs
- Familiarity
Both methods of sending email will record in the Communication History. See Recording Communication History for more information.
|
|
NOTE: This selection will open whatever the email program is set as the default for your web browser. Whatever email program opens when you click on a “mailto” link is the email program that will be used when you click Email with Outlook.. |
Archive emails (record) in the database even when not logged in
In Outlook (or whatever email program you use), include your association's unique archive address as a BCC. The software will receive the email, and look at the address sent/replied to and place it on the communication history of the associated member. Emails with addresses that are not recognized will still be archived but placed under Communication -> Manage Unmatched Archive Emails where you can go to view and manually match them to the appropriate member.
See Email Relay Service for information on finding your association's domain address. Find your association’s domain address under the Email Server Settings section under Setup -> General Options and Settings.NOTE: Must be logged in with Administrator permissions
Communication Tasks
A Task may be selected when sending an email or creating a Communication entry. It identifies (for internal use) the subject or category of the correspondence that is being created. All communication may be filtered by Task to view communication across all members that relate to one task.
Add a New Communication Task
- Click Setup in the left-hand navigation panel.
- Click Correspondence Categories in the Member Options section.
- Enter New Category Name for your new task.
- Click Add Category.

|
|
NOTE: You can also create new tasks/categories "on the fly" from any members communication tab by clicking on the Tasks/Categories hyper-link in the Member Correspondence section. |
Quick Guide to Sending an Email
Send an email from the software
- Locate one of the screens mentioned in Communication Basics and click the email selection.
- If applicable, select Email with ChamberMaster
- If sending from the Communication module using New Email to Multiple Members or Form Letters, you will need to select the desired recipients first.
- Create the email and click Send Email Now or Send Email Later (Available only for those with Plus or greater edition).
- ChamberMaster will send the email immediately or at the scheduled time and record it on the Communication tab of the member’s record.
Note: All emails sent from ChamberMaster/MemberZone are sent BCC to the recipients.
Send an email using your own email program but through the software
- Locate one of the screens mentioned in Communication Basics that is marked with an * (asterisk) and click the email selection.
- Select Email with Outlook.
- If sending from the Communication module using New Email to Multiple Members, you will need to select the desired recipients first.
- Create the email using features and selections from your own email program and send the email.
ChamberMaster will automatically record the email on the Communication tab of the member’s record. Emails sent in this manner will be sent to the -selected recipients as BCC recipients. You may add your own personal CCs or BCCs as desired. This email will be recorded on the members’ communication history. Initial replies from the recipients will also be recorded as long as nothing is changed in the email header such as the Send to:, Subject line etc. Consider the record of the reply as a bonus and not something that can be relied on.
NOTES:
- Due to email size limitations imposed by many ISPs in battling spam, the email editor displays an email content size indicator that updates as you type. It also displays the maximum email size left available. Since email addresses also use some available byte size, ChamberMaster determines this maximum remaining email size after addressees have been selected.
- The recommended method of sending documents to your members is by linking to them within the body of the email rather than by appending them to your email message. ChamberMaster provides unlimited storage space for any documents which you would like to upload and link to in your email messages. See Adding an Attachment.
- Note that ChamberMaster limits both the individual attachment size and the total communication size for email messages sent via the communication module. The total communication size is calculated as: number of recipients x (message size + attachment size) = total communication size.
- The primary factor in staying under the size limits is the number of recipients to whom you are sending the message. This means that "in a pinch", dividing the recipient
Send a Mass Email
- Click Communication in the left-hand menu.
- Click New Email to Multiple Members.
- Select desired recipients. NOTE: Addresses selected under the Add Members heading will use the contact information found on the General tab of the member’s record. Addressees selected under the Add Representatives heading will use the contact information found on the Reps tab of the selected individual rep.
- Note any details of the email addresses displayed:
- Invalid email addresses have been quarantined. This provides you with a notification that invalide emails address were found in your database. You can click on the View Quarantined Emails link to view a list of the invalid email addresses.
- Contact has no email address - if this notification is displayed, you may click on <<edit address>> in the Email Recipients list to add the email address OR click the remove link to remove the recipient from the list.
- Email occurs multiple times - if this notification is displayed, you can click the remove link to remove the duplicates from the email recipients list.
- Click Edit with ChamberMaster or Edit with Outlook (if you wish to send this email using your own email program)
- Compose the email message.
- Click Send Email Now or Send Email Later (Available only for those with ChamberMaster Plus).

|
|
NOTE: If you choose to send a copy to yourself, an attachment will be automatically included with the names/emails of all recipients. This attachment is only sent to you, not the recipients. With that in mind, be cautious if forwarding the mail to others. |
Schedule an Email
Available only for those with ChamberMaster Plus or greater
- Locate one of the screens mentioned in Communication Basics and click the email selection.
- If applicable, select Email with ChamberMaster.
- If sending from the Communication module using New Email to Multiple Members or Form Letters, you will need to select the desired recipients first.
- Create the email and click Send Email Later.
- Select the desired date and time for the email to be sent.
- Click Schedule.
- Click OK.

ChamberMaster will send the email at the scheduled time and record it on the Communication tab of the member’s record.
To view the scheduled email to edit or delete, click Communication in the left hand menu, and click Manage Scheduled Email Messages.
Edit the content or change time of scheduled email
- Click Communication in the left hand menu.
- Click Manage Scheduled Email Messages.
- Click Edit to edit the content or change the delivery time.

Delete a scheduled email
- Click Communication in the left hand menu.
- Click Manage Scheduled Email Messages.
- Click Delete to remove the email from the delivery schedule.
If the email scheduler is not successful in sending the email to the email server, you will see a message next to the failed message “Scheduled delivery failed, please reschedule.” If you have taken care of sending the email through another means, click Delete. If you wish to schedule or send the email now, click Edit. Make desired changes and either Send Email Now or Send Email Later. If the error message continues to appear after attempting to re-send, contact support@growthzone.com
View Past Scheduled Emails
You may view emails that have been scheduled to ensure that they actually were scheduled. If you’d like to reschedule the email, you may do that here as well.
- Click Communication in the left hand menu.
- Click Manage Scheduled Email Messages.
- Click the Past Scheduled Emails tab.
Send an Email using an Email Template
- From the send email screen, click the
 icon, in the editor toolbar.
- Click Pre-Defined Templates.
- Click the desired template. The Email Text (body of your email) will automatically be populated with the template.
- Make any desired changes to your email.
- Click Send Now or Send Later.

Send Communication by Delivery Preference
A single communication piece may be sent out to members by their preference of delivery: mail, fax, or email. When using the Preferred communication type Communication -> Form Letters the appropriate output will be developed for each recipient based on the member’s database fields. If addressees are selected as individual reps (by choosing the selections in the Add Representatives section) the preference as specified on their Reps tab in the Contact Preference field will be used. If addressees are selected as member companies (by choosing the selections in the Add Members section) the preference will be determined automatically according to the information specified on their General tab. If an email address exists, this will be the automatic first preference. If no email address exists, a complete mailing address would qualify as the next preference. Fax would be the last automatic preference. See FAQ How is the Contact Preference Used on the Reps tab?
- Click Communication in the left-hand menu.
- Click Form Letters.
- Select desired recipients. NOTE: Addresses selected under the Add Members heading will use the contact information found on the General tab of the member’s record. *Addressees selected under the Add Representatives heading will use the contact information found on the Reps tab of the selected individual rep.
- Select Preferred Communication Type as the way to Distribute By:
- If applicable, click remove next to those identified under Preferred Communication Type as having no contact info, duplicate, or invalid info.
- Click Continue and compose the content of the letter.
- Step 1 - Create Mailings - this allows you to create print letters.
- Click Print Letters, choose your Print Options selections and click Continue to print your letters.
- Close the letter-printing windows and return to the letter composition window.
- Step 1 - Create Mailings - this allows you to create print letters.
- (Optional) Click Print Labels and complete the Mailing Label Options selections and click Continue.
- Close the label-printing windows and return to the letter composition window.
- Click Continue>>Faxes
- Step 2 - Faxes - this allows you to fax the letter to those whose preference is to receive communications via fax.
- NOTE: Fax communication is not faxed directly from within ChamberMaster. Instead, ChamberMaster produces the output that may either be printed and inserted into your own fax machine or downloaded and saved to a file that may be imported into popular fax software programs like WinFax Pro. ChamberMaster also supports a number of Internet Fax services. Contact support@growthzone.com to see if your provider is supported.
- Make any modifications to the fax output.
- Click Print Fax Content. Read more information on fax output options.
- Close the print fax content windows and return to the letter composition window.
- Click Continue>>Emails.
- Step 3 - Emails - this allows you to email the letter to those whose preference is to receive communications via email.
- Make any modifications to the email output. Make sure to type a subject line. Add attachments and links as desired.
- Click Send Email.
- Step 3 - Emails - this allows you to email the letter to those whose preference is to receive communications via email.

Send Communication Based on Custom Report Criteria

Creating a Letter
- Click Communication in the left-hand menu.
- Click Form Letters.
- Select the desired recipients.
- Select Mail Only in the Distribute By: section.
- If applicable, click remove if mail address(es) have been identified as having no contact information, duplicate addresses, or invalid addresses.
- Click Continue.
- Click Print Letters, complete the Print Options. Make sure to check the box to Save letter to communication log and type the desired communication log title.
- Click Continue.
- You may Print Preview to view the formatted output and remove unwanted headers and footers if applicable.
- Close the letter-printing windows and return to the letter composition window.
- Click Print Labels
- Complete the Mailing Label Options selections.
- Click Continue. Preview the labels on-screen is desired.
- Click Print. In the Print window that appears, ensure that Page Scaling is set to None.
- Close the label-printing windows and return to the letter composition window.
- Click Close.

Create Mass Mailing Labels
Single labels for a particular member are available in the Members module on the General tab, the Reps tab, and the Communication tab. |
Selections for printing mailing labels for multiple members are found in the Communication module (Form Letters) and the Reports module (Mailing Labels). The Reports module selection gives additional options specific to mailing labels that are not available when printing labels in the Communication module, such as a selection to download the labels and view a postal code summary. |
1. |
Click Reports in the left-hand menu. |
2. |
Click Mailing Labels in the Common Reports area. |
3. |
Add those that should have a label printed using one or more methods in the Settings area. See Figure 1-12. |
4. |
Select other desired mailing label settings. |

5. |
Click View/Print Mailing Labels. |
6. |
The selected labels will display. |
7. |
Insert the labels into your printer and click Print from the File menu or other desired method within your browser window. |
8. |
In the Print window that appears, ensure that Page Scaling is set to None. For specific selections based on your version of Adobe Reader, see “Proper settings for label output”. |
9. |
After selecting the desired local printer, click Print. |
10. |
Click Close |
1. |
Click Communication in the left-hand menu. |
2. |
Click Form Letters in the Correspondence area. |
3. |
Select the desired addressees from the selections in the designated blue area. See Figure 1-13 below. |

4. |
Select Mail Only in the Distribute By area. |
5. |
Click Continue. |
6. |
Click Print Mailing Labels. |
7. |
Select the desired mailing label options. |

8. |
Click Continue. |
9. |
The selected labels will display. |
10. |
Insert the labels into your printer and click Print from the File menu or other desired method within your browser window. |
11. |
In the Print window that appears, ensure that Page Scaling is set to None. For specific selections based on your version of Adobe Reader, see “Settings for label output”. |
12. |
After selecting the desired local printer, click Print. |
13. |
Click Close |
Settings for label output
Labels printed through your software will first display on your screen in Adobe Reader, allowing you to preview the resulting labels before sending to the printer. However, one selection in the print dialog box must be changed from the default to allow proper control of label placement. This selection looks different based on the version of Adobe Reader that is installed on your own computer.
Page Scaling should always be set to None or 100% or Actual (wording varies depending on Adobe version). When Page Scaling is set to anything other than None (or the above identified choices), your labels may print off the labels or “slide” down the page as they print. You may say the labels shift or have improper alignment.
- Tip: Sometimes your browser will open the PDF in a “mini reader” instead of using the Adobe program which doesn’t allow you to change these settings. You’ll need to disable these mini-readers in order to allow the software to control the label output properly. Watch a video to understand how this works.
- Chrome Users: type in chrome://plugins and press Enter. Then disable the Chrome PDF Viewer and the Adobe Reader. See this page
- Firefox Users: Select Options from the Tools menu. Click Applications tab and search for Adobe and also for PDF. Change each selection to Use Adobe Reader.
- Internet Explorer Users: Select Manage Add-ons from the Settings menu. With Toolbars and Extensions selected change the Show drop-down to All-Add-ons. Then set the Adobe PDF Reader to Disabled.
Your Adobe Reader version will determine what this setting will look like.
Adobe Reader v. 8.0

Adobe Reader v. 7.0

Adobe Reader v. 6.0

Create/Send Fax Output
1. |
Click Communication in the left-hand menu. |
2. |
Click Form Letters. |
3. |
Select desired recipients. |
4. |
Select Fax Only as the way to Distribute By: |
5. |
If applicable, click remove next to those identified under Fax Only as having no contact info, duplicate fax #, or invalid fax #. |
6. |
Click Edit with ChamberMaster. |
7. |
Create the fax output. |
8. |
Click Print Fax Content and/or Download Fax List. Read more information on fax output options. |
1. |
Click Communication in the left-hand menu. |
2. |
Click Form Letters. |
3. |
Select desired recipients. |
4. |
Select Fax Only as the way to Distribute By: |
5. |
If applicable, click remove next to those identified under Fax Only as having no contact info, duplicate fax #, or invalid fax #. |
6. |
Click Edit with ChamberMaster. |
7. |
click Add/Remove Attachment. |
8. |
Select Append your file to the email directly. |
 Figure 10-3a
9. |
Click Continue. |
10. |
Click Browse… to locate the desired fax attachment file. |
11. |
Click Attach. |
12. |
Click Return. |

13. |
Click Send Faxes via . . . |
HTML preview screen |
Templates |
Search and Replace |
Undo and Redo |
Strikethrough text |
Superscript and subscript |
Insertion of tables, divider lines, symbols, special characters, and emoticons |
Paste text with or without formatting |

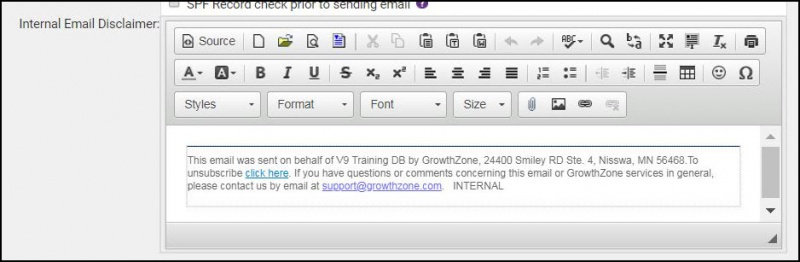
Email Disclaimer
1. |
Click Setup in the left-hand menu. |
2. |
Click General Options and Settings. |
3. |
Open the Email Server Settings area. |
4. |
Edit the desired disclaimer |
5. |
Click Save. |
Internal Email Disclaimer: appear on emails sent from inside the database, typically emails sent from you to your members. Disclaimers do not appear on the bottom of emails sent using the “Send with Outlook” selection |
Public Email Disclaimer: appear on emails that are generated by visitors that access your public website and click links that send emails to you or your members. For instance the “Request Info” link found on the members’ public information page. |

Adding an Attachment to an Email
There are three options available for adding attachment to emails.
- Upload your attachment file to the ChamberMaster server and include a link to that file in your email: This is best practice. Increasingly when users send email attachments, ISP spam filters are identifying these innocent but potentially large attachments as spam. Consequently these emails and attachments never make it to their intended recipient. With ChamberMaster/MemberZone, you have the ability to upload your attachment to the server. Once the file has been uploaded to the ChamberMaster server and selected, a link is generated and automatically placed inside your email allowing the recipient to click to receive their attachment.
- Include a link within the email to a file hosted on your chamber website: This option allows the sender to create a hyperlink to documents or URLs located on other servers. A custom email link may also be generated using this selection. This selection is the same as the Insert/Edit Link icon available in the rich text editor, on the editor tool bar.
- Append your file to the email directly. The is the traditional way of sending attachments. This selection will send the document with the email, and is not recommended.
Explained below are the steps for option 1, which is the recommended selection to reduce problems when sending through your ISP.
Upload your attachment file to the ChamberMaster server and include a link to that file in your email
- On the desired email, click the Add/Remove Attachment button.
- On the Add Email Attachments screen, Upload your attachment file to the ChamberMaster server and include a link to that file in your email. is enabled by default.
- Click Continue. The Add an attachment dialog box will display.
- Enter the Text for Attachment Link:. This will be the text that appears in your email.
- Click the Browse button. Documents previously uploaded to the server will be displayed.
- Click the desired file and click Select.
- OR
- Click the Choose File button, to browse to the desired file on your local system. Browse to the file, select your file and click Open. Then click the Upload button. Once uploaded, click the file and click Select. The URL of the document will be populated in the Attachment File URL: text box.
- Click OK.


Your link text will now be populated in your email.
Helping your Members with Email Links
When receiving an email that contains embedded hyperlinks (links), the recipient may have trouble accessing the links due to settings prohibiting these links within their own email program. Many email programs disable access to these links by default in an attempt to alleviate phishing threats from un-trusted sources. To successfully open an embedded email link, the recipient may need to turn on the access to email links, either temporarily for a single email or globally for all emails. The instructions below are when using Microsoft Outlook 2003 or 2007 but other email programs may contain similar selections. Contact your email software provider for specifics related to your particular email program.
Possible error displayed when trying to open a link in Microsoft Outlook 2003

1. |
After clicking the disabled link in the email, click Click here to turn on links in the Information bar above. See Figure 2 below. |

2. |
Click Turn on Links (not recommended). |
3. |
Click the link within the email again. |
1. |
Before opening the email that has the links, click Options from the Tools menu. |

2. |
Click Junk Mail on the Preferences tab. |

3. |
On the Options tab, click to clear the check box Don’t turn on links in messages . . . |

4. |
Click OK. |
5. |
Click OK. |
6. |
Open the desired email and try clicking the links again. |
Possible error displayed when trying to open a link in Microsoft Outlook 2007

1. |
After clicking the disabled link in the email, click This might be a phishing message . . . (not recommend) in the Information bar above. See Figure 7 below. |

2. |
Click Enable Links and other functionality (not recommended). |
3. |
Click the link within the email again. |
To turn on email links for all emails (Microsoft Outlook 2007)
1. |
Before opening the email that has the links, click Options from the Tools menu. |
2. |
Click Junk Mail on the Preferences tab. |

3. |
On the Options tab, click to clear the check box Disable links and other functionality in phishing message. |

4. |
Click OK. |
5. |
Click OK. |
6. |
Open the desired email and try clicking the links again. |
Inserting a graphic
Insert a graphic within communication
1. |
When your cursor is positioned where the graphic is desired within the editor, click Insert/Edit Image |
2. |
Click Browse Server. |

3. |
Browse to the desired file and click it to select. See Figure 4-2 below. Or you may upload a new file to the ChamberMaster server by clicking Browse, browsing to the desired file, click to select, click Open, and then click Upload. Then you may click the desired filename to select it. |

4. |
Make any desired changes on the Image Properties screen and then click Continue. See Figure 4-3. |

Modify an existing graphic (graphic size, borders, alternative text)
1. |
Locate the graphic that you desire to edit on the editor screen. |

2. |
Right-click the graphic. |
3. |
Click Image Properties. |
4. |
Make desired changes. See Figure 4-3 in the previous section “Inserting a Graphic within Communication”. |
5. |
Click OK. |
Remove an existing graphic (from the editor screen)
1. |
Locate the graphic that you desire to edit on the editor screen. |
2. |
Right-click the graphic. |
3. |
Click Cut. |


1. |
Click Allow access if necessary. |
Remove a graphic (from the ChamberMaster server)
1. |
Within the editor, click Insert/Edit Image |
2. |
Click Browse Server. |
3. |
Click the X at the end of the desired graphic to be removed from the ChamberMaster server. See Figure 4-5. |
-Communication.1.035.2.jpg)
4. |
Click OK. |
-Communication.1.035.3.jpg)
5. |
Click Close. |
Viewing and Recording Communication History
Communication history for your members is automatically logged on the Communication'tab of the member’s record when emails are sent. eReferrals are automatically logged as well. Phones calls can manually be added to the log. And when letters or fax output is printed you can include an entry in the history if you choose. Other actions trigger an entry such as membership application approvals and invoices (Integrated Billing only).'
View history communication history
Communication history can be viewed for a single member or viewed for the entire membership at once. See more on how to create the entries in the history.
View history for a single member
- Select the desired member in the Members module.
- Click the Communication tab.

1. |
Click Communication in the left-hand menu. |
2. |
Click Member Contact Report. |
3. |
Select desired filters and click Refresh Listing. |

1. |
Find the communication history using one of the ways listed above. |
2. |
Hover over the Subject title of the entry that you wish to view. |
3. |
The contents of the entry will display immediately in a pop-over window. |
1. |
Find the communication history using one of the ways listed above. |
2. |
Click the title of the desired item in the Subject column. |
3. |
Click Delete. |
1. |
When viewing the communication history, click Reports and select Print Summary Report or click Print Detailed Report. |
2. |
Follow the on-screen steps to print the output. |
1. |
When viewing the communication history, filter the history as desired. |
2. |
Click Reports and select Download Detail Report. |
3. |
Follow the prompts on your screen to either open or save the Comma Separated Value (.csv) file. If the data is displayed immediately, you may wish to select Save from the File menu to ensure this data is available for viewing at a later time. |
Working with Email Templates
Your ChamberMaster/MemberZone software provides a wealth of pre-defined templates that you may use as designed or that you may customize to meet your business needs. You may also create your own templates from scratch as needed.
Using email templates allow you to quickly and easily create, write, and send emails without having to start from scratch or starting at a blank screen. By using email template, you will save time and also ensure a consistent look and feel for your organization.
Available Pre-defined Email Templates
The table below lists the pre-defined email templates available to you.
| Template | Description |
|---|---|
| Announcement: Introducing Member Information Center | Send if you are introducing the MIC to all of your members – or even just new members. |
| Automatic Monthly Payment Invitation | Send if using Integrated Payment Processing, and you wish to inform your members that they can sign up to have recurring fees automatically charge to a credit card or bank account. |
| Automatic Payment Confirmation | Send this email to your reps to confirm that you have set them up on automated recurring billing. |
| Benefit Summary Reminder eMail | Send this email to your members to remind them of their benefit packages and what they have available. |
| Create Log-in Account Invitation | Send this email to invite reps to create their log-in accounts. Can be used after analyzing which reps have not yet created accounts. |
| Encourage Advertising of Events | Send this email if you want to encourage your members to add their events to your calendar. NOTE: Events may be added by those members who have rights to do so, and you may or may not require approval. |
| Encourage Deal Posting | Send this email if you want to encourage your member to post hot deals. NOTE: Deals may only be posted by those members who have rights to do so, and you may or may not require approval. |
| Encourage Job Postings | Send this email if you want to encourage your members to post job postings via the MIC. Note: Job Posting may be posted only by those members who have rights to do so, and you may or may not require approval. |
| Encourage Posting of Deals, Jobs, News, Events | Send this email if you want to encourage your members to post deals, job postings, news & events via the MIC. This email template can be useful for new members just learning of the capabilities of the MIC. |
| Encourage Submitting News Release | Send this email if you want to encourage your members to post News Releases in the MIC. Note: Job Posting may be posted only by those members who have rights to do so, and you may or may not require approval. |
| Remind how to Login to the Member Information Center | Send this email to members if they have forgotten how to login to the MIC. Useful if you have identified members who are not logging in. |
| Thank You for Joining | Send this email to new members to thank them for joining. The email template also includes information on how to log into the MIC |
| Update Your Member Listing | This email template reminds the member to login into the MIC to review and update their information. The template includes the information that you currently have in the database for them to review. |
Customize and Save Changes to an Existing Email Template
The pre-defined email templates may be customized to meet your business needs. Once you have customized, you will save the template back as a new template or document for future use.
- From the send email screen, click the
 icon, in the editor toolbar.
- Click Pre-Defined Templates.
- Click the desired template. The Email Text (body of your email) will be automatically populated with the template.
- Use the Rich Text Editor functions to modify the template as needed.
- Save the template by clicking the
 icon in the editor tool bar.
- Enter a Name for the new template.
- (Optional) Enter a description for the new template.
- Select one of the following save options:
- Save the text as a new document: Select this option if you wish to save the template as a document, which allows you to retrieve the template at a later time, make modifications, and save it as the same document (over-write the previous document). NOTE: When you save a template as a document, it will only be available to the user who created the document.
- Update an Existing Document: Select this option if you would like to save your changes to an existing document.
- Save the text as a new template: Select this option if you wish to save as a new template. NOTE: Templates may not be updated, any time changes are made to a template, you will save as a new template.
- Click OK.

Create an Email Template from Scratch
- From any send email screen, create the Email Template in the Email Text area. You may use all of the rich text editor functions. See Working with the Rich Text Editor for instruction.
- Save the template by clicking the icon in the editor tool bar.
- Enter a Name for the new template.
- (Optional) Enter a description for the new template.
- Select one of the following save options:
- Save the text as a new document: Select this option if you wish to save the template as a document, which allows you to retrieve the template at a later time, make modifications, and save it as the same document (over-write the previous document). NOTE: When you save a template as a document, it will only be available to the user who created the document.
- Update an Existing Document: Select this option if you would like to save your changes to an existing document.
- Save the text as a new template: Select this option if you wish to save as a new template. NOTE: Templates may not be updated, any time changes are made to a template, you will save as a new template.
- Click OK.
Edit an Existing eMail Template
- Click the envelope icon in the header bar.
- Click the
 icon, in the eMail editor toolbar.
- Select the template that you wish to edit.
- Perform desired edits to the template. You may use all of the rich text editor functions. See Working with the Rich Text Editor for instruction.
- Save the template by clicking the icon in the editor tool bar.
- If saving as a template, you MUST enter a new name for the template, you will not over-write an existing template. If saving as a document you can save the changes back to the original, or you can save the template as a new template.

Create a Signature Template
Saving your signature block as a template may save time when creating correspondence. Design your signature block with any included text and graphics. You may also include items that would belong in the header such as your logo. Save it as a template. When ready to create your correspondence, first retrieve the signature block using the Choose a Template selection, then type your correspondence above your signature block.
- From any send email screen, create your signature in the Email Text area. You may use all of the rich text editor functions. See Working with the Rich Text Editor for instruction.
- Save the template by clicking the icon in the editor tool bar.
- Enter a Name for the new template.
- (Optional) Enter a description for the new template.
- Select one of the following save options:
- Save the text as a new document: Select this option if you wish to save the template as a document, which allows you to retrieve the template at a later time, make modifications, and save it as the same document (over-write the previous document). NOTE: When you save a template as a document, it will only be available to the user who created the document.
- Update an Existing Document: Select this option if you would like to save your changes to an existing document.
- Save the text as a new template: Select this option if you wish to save as a new template. NOTE: Templates may not be updated, any time changes are made to a template, you will save as a new template.
- Click OK.
Using a Signature Block
- Open the editor by selecting one of the many ways to send an email or create letters in the software.
- Click Choose a Template.
- Click the template title to select the desired signature template. Your signature block will appear.
- Type the desired communication. Your signature block will “move” down the page as you type the communication.
|
|
NOTE: If you plan to use your signature block in an email, ALWAYS select the signature block template FIRST, then compose your email. If you compose your email, then select the signature block, your email text will be over-written with the signature block template! |
Send an email using an Email Template
- From the send email screen, click the icon, in the editor toolbar.
- Click Pre-Defined Templates.
- Click the desired template. The Email Text (body of your email) will automatically be populated with the template.
- Make any desired changes to your email.
- Click Send Now or Send Later.
Send an email using a Saved Document
- From any send email screen, click the
 icon in the tool bar.
- Click the desired document. The email text will be populated with the document text.

Mail Merge
Similar to performing a Mail Merge in Microsoft Word, ChamberMaster / GrowthZone maintains the ability to insert a database field within the context of your communication piece, creating personalized, unique communication output.
Inserting a database field
1. |
Open the editor window and type any text that will be consistent for all recipients. Example: |

2. |
When you desire to insert a database field, click the Add Database Field icon. ( |
3. |
Click the plus sign ( |

4. |
Click to select the desired database field. The selected field will display in the editor window within brackets. e.g. [Company Name] |
5. |
Proceed with standard steps to complete this communication. All fields displayed in brackets will be filled with data from the member’s record. |

Sending Login Information
When creating reports and correspondence in ChamberMaster, the preview window is displayed in a browser window (i.e. Internet Explorer). Internet Explorer has a default header and footer that are wonderful when printing pages from the web, but when printing out your formal ChamberMaster reports or letters it is not usually desirable.
|
Code
|
Element the code represents
|
|
&w
|
Window title
|
|
&u
|
Page address (URL)
|
|
&d
|
Date in short format specified by Regional Settings in Control Panel
|
|
&D
|
Date in long format specified by Regional Settings in Control Panel
|
|
&t
|
Time in the format specified by Regional Settings in Control Panel
|
|
&T
|
Time in 24-hour format
|
|
&p
|
Current page number
|
|
&P
|
Total number of pages
|
|
&&
|
A single ampersand (&)
|
|
&b
|
The text immediately following these characters as centered
|
|
&b&b
|
The text immediately following the first "&b" as centered, and the text following the second "&b" as right-justified
|
Creating a Signature Block
Saving your signature block as a template may save time when creating correspondence. Design your signature block with any included text and graphics. You may also include items that would belong in the header such as your logo. Save it as a template. When ready to create your correspondence, first retrieve the signature block using the Choose a Template selection. Then type your correspondence above your signature block.
- Click Communication in the left-hand navigation bar.
- Click Email a member.
- When the editor displays, create the desired signature block.
- Hint: You might want to start the signature block with two blank lines before your actual signature lines.

- Click Save.

- Complete the Save Name/Description fields in the Save window.
- Click the Save the text as a new template. radio button.
- Click OK.


After creating the signature block, it may be used at any time when sending emails or letters. See “Using a Signature Block”.
Using a Signature Block
- Open the email editor by selecting one of the many ways to send an email or create letters in the software.
- Click Choose a Template.

- Click the template title to select the desired signature template. Your signature block will appear.
- Type the desired communication. Your signature block will “move” down the page as you type the communication.

Edit a Signature Block
- Open the email editor by selecting one of the many ways to send an email in the software.
- Click Choose a Template if you saved your signature as a template OR click the
 if your signature was saved as a document.
 - Click the signature title to select the desired signature template. Your signature block will appear.
- Make the desired changes to your signature.
- Click the Save icon to save your changes. If you are saving as a template, you will need to rename the template, if you are saving as a document, you can save as a new document or over-write the previous document.

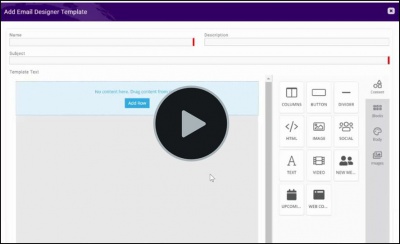
Email Designer
With your ChamberMaster/MemberZone software, the Email Designer provides you the ability to create and design your own newsletters and email templates. The Email Designer is extremely flexible and provides tools for basic content elements that you can use to create and design your newsletter. Your content will look great on all devices, browsers and email clients. We have included several templates for you, that you can update and customize as needed. Or you can simply start from scratch and create your own templates.
![]() See the Email Designer in Action!!
See the Email Designer in Action!!
|
|
NOTE: The Email Designer is available as an Add-on feature for those who have Plus, Premier, or Pro edition. For information on pricing, please reach out to engagement@growthzone.com |
Designing Your Newsletters
View Default Newsletter Templates
We have provided you with several newsletter templates that you can use as designed, or edit to suit your business needs. Many standard and custom tools are available to you for designing your templates.
- Click Communications in the left-hand navigation panel.
- Click New Email to Multiple Members.
- Select desired recipients. You may not actually wish to send the newsletter, this is simply the method to access the template.
- Click Edit with Email Designer.
- Select the template you wish to view from the Template list.

Edit Default Newsletter Templates
We have provided you with a variety of newsletter templates that you can use as designed, or edit to suit your business needs. Many standard and custom tools are available to you for designing your templates.
- Click Communications in the left-hand navigation panel.
- Click New Email to Multiple Members.
- Select desired recipients. You may not actually wish to send the newsletter, this is simply the method to access the template.
- Click Edit with Email Designer.
- Select the template you wish to edit from the Template list.
- Make desired changes to the template.
- When you have made all changes, click the Save/Manage button.
- When editing a default template, you must create a new template. Enter a Name for the template. If you are editing a template that you customized or created from scratch, you will be able to over-write an existing template.
- Click Save Template.

Create a Newsletter Template from Scratch
We have provided you with several newsletter templates that you can use as designed, or edit to suit your business needs. Many standard and custom tools are available to you for designing your templates.
- Click Communications in the left-hand navigation panel.
- Click New Email to Multiple Members.
- Select desired recipients. You may not actually wish to send the newsletter, this is simply the method to access the template.
- Click Edit with Email Designer. The last email that you were working will appear. To start with an entirely blank email template, you may need to select another template (it doesn’t matter which one) and then select Select an Email Template from the Template drop-down list. Click OK when it asks if you are sure if you want to load another template.
- Drag and drop the standard blocks and custom blocks you wish to include in your template. See further instructions below.
- Once you have created your template, click the Save/Manage button.
- Enter a Name for the template.
- Click Save Template.
Template Settings - Global
Template Body
Using the Body option, you can define the global settings for your templates, including the width of the template, the background color, default fonts to be used, link color, etc.

Standard Tools
Tools are basic content elements that are used to design your templates. Text, image, and button are some examples of the built-in tools. To start using these tools, you will simply drag them into your newsletter to add content. Content formatting options are displayed when a tool is add to your document.

Columns
Rows and columns make it easy to organize content elements, like images and text. When getting started with designing your newsletter, you may wish to use the column tool to add columns and rows first, so you can then add additional content in just the right place. Drag & drop the Column tool into your template. You will then be able to define the number of columns in each row. Add as many rows as needed, you will always be able to go back and remove rows or change the number of columns you have added to the rows.
Learn more! View a short tutorial on adding columns to your template

Text
|
|
The Text tool allows you to add the text block to your newsletter. Simply drag and drop the block into your newsletter, and type your text. Standard word processing functions are available, such as font size, alignment, etc, are available for formatting your text. The ability to insert merge fields allows for further customization, such as the recipients name or organization. |
TIPS:
- Ensure your text is easy to read, and avoid the pitfalls of using background or font colors that make your text difficult to read.
- A variety of fonts are available for your text, however, stick to standard web safe fonts, such as Arial, Verdana, Georgia, Times New Roman, and Courier. Not all fonts are supported universally, so if you’re using something niche, you may be at the mercy of having the email platform it’s displayed on change it to something else—which could potentially affect spacing, layout, and the overall look.
- NOTE: "Line Height" settings may not be honored/displayed correctly by all email programs (notably Outlook).
Add Merge Tags to Text
When working with the text tool, you have the ability to insert merge fields for further customization. Member and representative fields are available.
- Drag & Drop the text block into your newsletter.
- If needed, begin typing your text.
- Place your cursor where you would like to insert the merge field.
- Click Merge Tags and select the desired tag.

Image Tool
| A newsletter full of text can be very boring to look at, and images can be a really great way of communicating what you're about to your readers. Images can help readers to connect with the content of your email and can keep their attention focused on the right area. Use the Image tool to add images to your newsletter. Simply drag & drop the image tool into your newsletter template, then upload your image and format as needed. |
TIP:
- Because some email clients don’t display background images, ensure that your email looks good and works without images. Enter a short image description in the Alternate text field to describe any images you use so that even with images disabled, the newsletter will still make sense.
Learn more! View a short tutorial on adding images to your template
A variety of stock images are also available for you to use. Click the Images icon, to choose an image, and drag & drop it into your newsletter.

Video Tool
 |
Videos embedded in your newsletter are a dynamic way to engage your readers. Using the Video tool, you can include a YouTube or Vimeo URL to automatically generate a preview image. The image will then link to the provided URL. |
Learn more! View a short tutorial on adding a video to your template
HTML Tool
| The HTML tool allows you to add custom HTML content into your template. We recommend that only users familiar with HTML use these blocks since adding custom code to the template can affect its rendering and responsiveness. Once you have added the HTML block to your newsletter, default code "Hello world!" is displayed, click on the content block to add you HTML code. You can write your own HTML or paste in existing HTML in the code editor, then click Save Code to return to the email template. As you enter your code, an immediate preview is displayed in your newsletter. |
Learn more! View a short tutorial on adding HTML Code to your template
Divider Tool
 |
The Divider tool allows you to add styled horizontal lines that divide your content. This will help organize and add visual content in your newsletter. Drag and drop the tool into your newsletter, then click anywhere on the divider to open the editing tool. You will be able to change the thickness, length, and padding of the divider lines. |
Learn more! View a short tutorial on adding a divider to your template
Button Tool
 |
The Button tool can be used to drive your readers to action. Perhaps you want to send the reader to your events page, or event a fundraiser page. By using this tool you can send the reader to these external links. Alternately, buttons may be used to send an email, dial a phone number, or event send an SMS. Drag & Drop the button onto your newsletter, then you will be able to style to button, and configure the desired action. |
Learn more! View a short tutorial on adding a Button to your template
Custom Tools
We have provided tools custom to your association. You can include a list of your new members, a list of upcoming events, lists of hot deals, etc.
Add a List of New Members to Your Newsletter
| The New Members custom tool allows you to easily put the spotlight on your new members. You will be able to define the members displayed based on a join date range. |
Learn more! View a short tutorial on adding a list of New Members to your template
Drag and drop the new members block into your newsletter, then configure:
- The join date range
- Set container padding - this is the space that will surround the list
- The order in which you would like the members to display
- Your members can will be displayed as a bulleted list, with hyper links to the member directory. Feel free to edit the block and remove the bullet points or format in your desired way. NOTE: Note: Any formatting that you apply yourself after the members are loaded would be lost if you needed to reload the members list again for any reason (such as changing the date range).

Add a List of Member Anniversaries to Your Newsletter
| Recognize your longtime members by using the Anniversary block. |
Learn more! View a short tutorial on adding a list of Member Anniversaries to your template
Drag & Drop the Anniversary block into your newsletter, then click the block to:
- Select the anniversary and years of membership
- Use the text editor options to format your text, add additional verbiage, and other pertinent links. Note: Any formatting that you apply yourself after the anniversaries are loaded would be lost if you needed to reload the list again for any reason (such as changing the month and years.
Add a List of Upcoming Events to Your Newsletter
|
|
Promote your events using the Upcoming Events custom tool. Once included in your newsletter/email, recipients will be able to view event details and link the the event page and registration page. |
Learn more! View a short tutorial on adding a list of upcoming events to your template
Drag & Drop the Events block into your news letter, then click the block to:
- Select the events date range to be included in your newsletter
- Select Event category if desired; leaving blank will select all event categories.
- Select the whether to include the event date or not.
- Use the text editor options to format your text, add additional verbiage, and other pertinent links. Note: Any formatting that you apply yourself after the upcoming events are loaded would be lost if you needed to reload the list again for any reason (such as changing the date range).

Add a List of Job Postings to your Newsletter
|
|
Promote your members' job listings by using the Job Posting block. |
Learn more! View a short tutorial on adding a list of active Job Postings to your template
Drag & drop the Job Posting block into your news letter, then click the block to:
- Enter the active date of the job postings that you’d like to include in the newsletter.
- Choose whether to include the Member Name and category.
- Set a maximum number of job postings to display if the results on the selected active date range would be exceeded.
- Select to Order by Job Posting Title, Member Name or Category.
- Use the text editor options to format your text, add additional verbiage, and other pertinent links. Note: Any formatting that you apply yourself after the job postings are loaded would be lost if you needed to reload the list again for any reason (such as changing the active date).
Add a List of Hot Deals to your Newsletter
|
|
Promote your members' hot deals by using the Hot Deals block. |
Learn more! View a short tutorial on adding a list of Hot Deals to your template
Drag & drop the Hot Deals block into your news letter, then click the block to:
- Select the Public Active Deals As Of. The Hot Deals included in your newsletter will be those active beyond this date.
- Choose to include the member's name in the newsletter.
- Choose to include the hot deal valid dates
- Define the maximum number of hot deals to be included
- The order in which you wish the hot deals will be displayed.
- Use the text editor options to format your text, add links and merge fields
Add a List of News Releases to your Newsletter
|
|
Get more from your news releases by including them in your newsletter. |
Learn more! View a short tutorial on adding a list of News Releases to your template
Drag & Drop the News Release block into your news letter, then click the block to:
- Enter the active date of the News Release that you’d like to include in the newsletter.
- Choose whether to include the Member Name and Release Date.
- Set a maximum number of News Release to display if the results on the selected active date range would be exceeded.
- Select to Order by News Release Title, Member Name or Release Date.
- Use the text editor options to format your text, add additional verbiage, and other pertinent links. Note: Any formatting that you apply yourself after the News Release are loaded would be lost if you needed to reload the list again for any reason (such as changing the active date).
Add a List of Blogs to your Newsletter
|
|
Blogging is a great way to promote your chamber, increase traffic to your chamber website and help inform the community. Use the Blog tool to add your blogs to your newsletter. |
Learn more! View a short tutorial on adding a list of blogs and blog posts to your template
Drag & Drop the Blog block into your news letter, then click the block to:
- Select Blog posts from/through dates
- Select if you wish to include the blog Post Date
- Select if you wish to include the blog Post Summary
- If you need to restrict the lists of posts displayed, you can adjust the Maximum List Size option
- Use the text editor options to format your text, add links and merge fields. Note: Any formatting that you apply yourself after the News Release are loaded would be lost if you needed to reload the list again for any reason.
Email Designer Common Tasks
Copy/Duplicate a Block
- Click the block you wish to copy.
- Click the
 icon. A copy of the block will be placed directly below the original block.
Move a Block
- Click the block you wish to move.
- Click the
 icon.
icon. - Drag the block to the desired location.
Delete a Block
- Click the
 icon.
icon. - Confirm that you wish to delete the block.
Report on Links Inside Email
You can run a report detailing the statistics for any tracked links inside an Email Designer email.
- Click on "Reports" in your left navigation panel.
- In the "Search" box, type "Email Designer".
- Select the "Email Tracking Link Statistics" report from the right pane.
Managing Quarantined Emails
Due to increased vigilance from outside organizations that rank email sender reputation, having a clean email address list is very important to ensure all of our customers can continue to communicate reliably to their members.
To assist you in this task, a process runs on a nightly basis to scan all emails in your database for email addresses for invalid status. The following types of addresses would be considered invalid:
- Addresses where the syntax is incorrect (e.g. multiple @ symbols, extra space, etc.)
- The domain of the email address doesn't exist
- The address of the recipient no longer exists on the receiving server
- The MX record of the domain itself doesn't exist.
These are all cases where the email would never make it through to anyone.
GrowthZone has implemented processes to identify and quarantine emails that have been identified as invalid in your database, while keeping you in full control of your addresses.
Summary of New Process:
- The process runs on a nightly basis.
- An Email warning of upcoming quarantine will be sent 30 days prior to quarantine to notify you that email(s) are to be quarantined. This email is sent to those staff members who have subscribed to the Invalid Email Address Notifications notification (See Staff Email Notifications for information on subscribing to the notification). Sample Email.
- The email contains action links to:
- Re-check the email – if the email is verified, then the email is no longer subject to quarantine, and will be returned to normal status
- Change Address – this option will allow you to update the email address, and it will then be run through the nightly scan. If the email address is verified, it will be returned to normal status.
- Mark As Good – this option allows you to mark an email as good and return to normal status in the database. It will be rechecked in 90 days.
- NOTE: A new item has been added to the Task List, that will allow you to link to quarantined emails and perform the actions described above.
- The email contains action links to:
- A reminder email warning will be sent five days prior to the final quarantine of emails. Sample Email.
- One final email will be sent, on the day of the quarantine, indicating the emails have been quarantined. But, note, that staff may recheck, change or mark as good at any time, even if quarantined.
- NOTE: You can check on the invalid list at any time by clicking Invalid Emails in the Task List.
Quarantined Invalid Email Address Report
The Quarantined Invalid Email Address report provides a list of all emails that have been marked as invalid, and removed from your database. Due to increased vigilance from outside organizations that rank email sender reputation, having a clean email address list is very important to ensure all of our customers can continue to communicate reliably to their members. The following types of addresses would be considered invalid: Addresses where the syntax is incorrect (e.g. multiple @ symbols, extra space, etc.), the domain of the email address doesn't exist, the address of the recipient no longer exists on the receiving server, and when the MX record of the domain itself doesn't exist. These are all cases where the email would never make it through to anyone.
The report consists of two sections: Emails Quarantined and Will Be Quarantined. The report includes the email address, name of member or rep, the member/rep ID, location in the database the address has been removed from (clicking the location will take you to the page in the database where the email was used), reason why the address was removed, date of removal.
You can access the Quarantined Invalid Email Addresses by clicking the Invalid Emails link in the task list or through the reports module.

When an email is quarantined, an automated email will be sent to all staff that are signed up to receive email notification. All staff will be set to have this notification enabled by default. See Set Email Notifications for further details on subscribing to the notification.
Duplicate emails may be displayed in your report. For example, if you have the same email associated to a member and to a representative, the email will be displayed twice in your report. By default ALL emails in your database will be displayed in the report, including those of inactive members and/or reps. You can filter the report as needed, to display only active members/reps.
Are the invalid addresses removed from my database?
A: No. When it is determined that an address is invalid, the address is marked 'to be quarantined' in 30 days. After the 30 days, the address will be 'quarantined', meaning it will no longer appear on the member/rep record. It still can be found on the Quarantined Invalid Email Addresses report where all available actions are still possible, even after quarantine has occurred.
|
|
NOTE: Invalid email address are NOT removed from your database. Once quarantined, the address will no longer appear on the member/rep record. It can still be found on the Quarantined Invalid Email Addresses report where all available actions are still possible. |
See more details of the Invalid Email Address cleanup here.
Recheck an Invalid Email
On the Quarantined Invalid Email Report click the Re-check link next to the email address you would like to check.

The results of the re-check will be displayed, as shown below.

If the address is found to be valid, will be removed from the Quarantine list. If the address is found to be invalid, it will remain on the quarantine list.
Mark an Invalid Email as Good
After running Re-Check, if you've personally verified this address is good even though the verification system indicates it is not, we've given you an option to mark it as good and remove it from the Quarantine list. Please do not abuse this option; we want to protect your email sender reputation.

- On the Quarantined Invalid Email Report click the MarkAsGood link next to the email address you would like to mark as good.
- Review the warning information on the Mark as Good dialog box.
- If you wish to proceed, click the Mark as Good button.

Change an Invalid Email address
Using the Quarantined Invalid Email report, you can correct an invalid email address. The correction will be updated throughout their record; the current address will then be removed from the Quarantine list.

- On the Quarantined Invalid Email Report click the Change link next to the email address you would like to change.
- Enter the new email address in the Please replace email address... text-box.
- Click the Replace button.

Quarantine Tonight
Select this option to speed up the quarantine process. Address will be quarantined tonight; use when you know the address is invalid and do not wish to wait for the upcoming date.
On the Quarantined Invalid Email Report click the Quarantine Tonight link. A confirmation screen will display indicating that the email address was successfully updated and will be quarantined during the scheduled email cleanup task tonight. You will need to refresh the Quarantined Invalid Email Address report to see the updated Planned Quarantine Date on the address.
Manage Cover Letter Templates
Cover Letter Templates can be created to be included as the email sent along with your invoices. You may, for example, have a cover letter that is used when you initially send out your renewal invoices, and then a separate email template that is used when you send reminder invoices.
View/Edit Cover Letter Templates
To view/edit your cover letter templates:
- Click Setup in the left-hand navigation panel.
- Click Template Manager - Cover Letters in the Billing Section. The Layout Editor screen will, by default, display Invoice cover letters, but this screen can be used for updating cover letters for statements, credits, receipts and payments.
- Select the cover letter that you wish to view and edit from the Loaded Cover Letter drop-down list.
- Use the Rich Text Editor functions to update the template.
- To save the changes to an existing template, simply click Save. To save the cover letter as a new template, enter the Cover Letter name and click Save As.
- If you wish to set this cover letter as your system default, click the Save as default check-box.

Storing Documents - Cloud Drive
Store your documents in the Cloud Drive, a selection in the left-hand menu of your software[1], to access them anytime from any computer that has a connection to the internet and access to the database. 10 GB of storage space is available to you.
Upload files[2] to My Documents for your personal use or into Shared Documents to make them available for your entire staff.
- Storing a document for personal use later
- Storing a document to share with other staff
- Storing documents on a member’s record for archiving purposes
- Storing files for members to access
- Storing images that are used in emails or wherever the editor is used
- Locate these two tabs by clicking Cloud Drive in the left-hand menu or by selecting the desired folder from the Common Tasks tab in the Dashboard module.

- Figure: Document storage on the Cloud Drive
Storing a personal document for use later
1. |
Click Cloud Drive in the left-hand menu. |
2. |
Click My Documents. |

3. |
(Optional) Click New folder to create a folder to organize your files or double-click on the desired folder. |
4. |
Click Browse. |
5. |
Locate the desired file to upload and click Open. |
6. |
Click Upload. |
7. |
The selected file will be uploaded into your document storage. |
8. |
Access this document anytime by clicking My Documents in the Cloud Drive or on the Common Tasks tab in the Dashboard. |
1. |
Click Cloud Drive in the left-hand menu. |
2. |
Click Shared Documents. |

3. |
(Optional) Click New folder to create a folder to organize your files or double-click on the desired folder. |
4. |
Click Browse. |
5. |
Locate the desired file to upload and click Open. |
6. |
Click Upload. |
7. |
The selected file will be uploaded into your document storage. |
8. |
Other staff members may now access this document by clicking Shared Documents in the Cloud Drive or on the Common Tasks tab in the Dashboard. |
Storing files for members to access
1. Click Cloud Drive in the left-hand menu.
2. Click Shared Documents.
3. (Optional) Click New folder to create a folder to organize your files or double-click on the desired folder.
4. Click Browse.
5. Locate the desired file to upload and click Open.
6. Click Upload.
7. The selected file will be uploaded into your document storage.
8. Other staff members may now access this document by clicking Shared Documents in the Cloud Drive or on the Common Tasks tab in the Dashboard.
- Note: Only available for those with Plus edition or greater.
Storing files that can be attached to an email or accessed through a URL
Any files uploaded to the Email Attachments area in the Cloud Drive will be available to be attached to an email when sending using the software’s editor. These files are also available as public links without being sent in an email when the link is made known to the end user.
Note: The Cloud Drive tabs are only available for those with Plus edition or greater but the Email Attachments are accessible under Dashboard-Common Tasks.
1. Click Cloud Drive in the left-hand menu.
2. Click the Email Attachments tab.
3. Click Browse.
4. Locate the desired file to upload and click Open.
5. Click Upload.
6. The selected file will be uploaded into your document storage for use as attachments to emails or as a public URL.
Attaching the Document to an Email or Provide URL Access
1. Access the email editor.
2. Click the paper clip icon .
3. Click Browse and find your uploaded file.
4. Click Select.
5. Click OK to embed your file as a link or copy the Attachment File URL and give that URL to users that need to access this file.

Storing images that are used in emails or other locations the editor is used
Any files uploaded to the Email Images area in the Cloud Drive will be available to embed as an image in the body of an email when sending using the software’s editor.
Note: The Cloud Drive tabs are only available for those with Plus edition or greater but the Email Images are accessible under Dashboard-
Common Tasks
1. Click Cloud Drive in the left-hand menu.
2. Click the Email Images tab.
3. Click Browse.
4. Locate the desired file to upload and click Open.
5. Click Upload.
6. The selected file will be uploaded into your document storage for use as a graphic to embed in an email or other locations the editor is available.
Embedding the Image in an Email
1. Access the email editor.
2. Click the Image icon
3. Click Browse and find your uploaded file.
4. Click Select.
5. Click OK to embed your image in the body of the email.
Reasons emails don’t get to members
Trying to figure out why an email didn’t get to one (or a bunch!) of your members is usually confusing and frustrating. If you have ever asked one of the questions below… read on. While there are many reasons why email messages don’t make it to your members, there are several reasons that seem most common to our customers. The top three are listed below.
- "Why do some members say they don’t receive email messages that I send through ChamberMaster/GrowthZone?"
- "Why do some messages "bounce" when I know the email address is valid?"
- "Why can some members receive messages from me when I send through Outlook but not when I send out of ChamberMaster/GrowthZone?"
- "What can I do to make sure my members get the email messages I am sending through ChamberMaster/GrowthZone?"
Your chamber’s Sender Policy Framework (SPF) Record may be incomplete or missing
Because of Spam, many ISP's (Internet Service Providers - i.e. Charter, RoadRunner, AOL, Yahoo, etc…) have begun performing a type of SPAM check called a reverse domain lookup (also called an "SPF lookup") to verify that the sending IP address of a mail server is authorized to send email from your domain. In plain language – the member’s email provider is asking, "Is this email message coming from an authorized sender?" If the answer is "no" they will either reject it or filter it to your member’s SPAM folder.
- This is important for ChamberMaster & GrowthZone users because when you send email to your members from within the software we list your email address as the sender but route the message through our bulk email servers. These servers are specifically designed to help ensure the highest possible email delivery rate, but if a member’s email provider performs an SPF lookup and your chamber’s record does not list the ChamberMaster & GrowthZone email server as an approved sender, the message will most likely not get to the member.
Solution: Setup the SPF Record
The good news is that there is a quick and easy fix for this – have the company who manages your Domain Name Servers (usually your web hosting company) add ChamberMaster's email servers to your SPF Record. Free test to see if your SPF records are setup! You can easily check to see if your domain is already setup by following these 4 steps
- Click on this link - http://mxtoolbox.com/spf.aspx?command=spf
- Type the domain of your email address in the box (the part after the "@") and click "SPF Record Lookup"
- Compare the SPF record on file with the following example:
- If your SPF record is setup one of the records should look like this:

- If your SPF record is missing or does not contain the spf.memberzone.com listing, contact your "web or IT person" and have them update the record to include the mail servers. They need to add to your existing SPF record include:spf.memberzone.com
- An example of a complete SPF record with the memberzone spf included would look like: v=spf1 mx include:spf.memberzone.com mx:yourdomain.com ~all
- If you're using office 365 for email an example SPF record would look like: v=spf1 include:spf.protection.outlook.com include:spf.memberzone.com ~all

Issues with the recipient’s mailbox
Your member’s email message box may be full, the email address may be incorrect, or it may not even exist any more.
Solution: Contact the recipient
Contact the specific recipient to verify the email address or let them know that their email doesn’t seem to be working properly – they may not be aware of it and you could be the "hero" who helped them not miss that important business deal because their inbox was full!
Your domain may be "blacklisted"
To fight spam, many ISPs limit the number of emails coming from one sender in a given time period. If you exceed this limit your domain may be "blacklisted" and you will have a difficult time getting messages through to anybody.
Solution: Contact the organization that has you blacklisted
Contact any ISP’s which have "blacklisted" your domain and request that they add you to their list of safe senders or "white list". To see if your domain is "Blacklisted", Use the tool at the link below to determine if the domain you use for email is blacklisted by any of the major email servers. You may see some of them to return a "timed out message" – This response is normal. http://mxtoolbox.com/blacklists.aspx
Final thought:
Unfortunately, even if you have everything setup properly, not every email you send will get through to every member. That’s why we recommend using all the tools at your disposal to get important information to your members – email messages, website updates & banner ads, RSS feeds, "snail mail", phone calls and personal visits are all part of an effective communication plan to make sure that your members know what is happening at the chamber. The good news is that many of those tools are already available to you as ChamberMaster/GrowthZone users!
Ideas for Developing Communication Content
Create and format your own output in the ChamberMaster editor |
Copy and paste from Word |
Insert link to PDF file (or other file type) |
Save Microsoft Publisher files as a graphic file and insert into editor |
Save PDF file as a graphic file and insert into editor |
Copy and paste output from another HTML program (like Constant Contact) |
Generate and email a list of events |
Create and format your own output in the ChamberMaster/GrowthZone editor
Copy and paste from Microsoft Word
1. |
In Microsoft Word, open the desired content to be copied. |
2. |
In another window, open the ChamberMaster editor screen where you desire to copy the content. |

3. |
In Microsoft Word, highlight the desired copy and press Ctrl-C (to copy the highlighted text.) |

4. |
In the ChamberMaster window, click where you desire the content to appear. |
5. |
Click the Paste from Word icon ( |


6. |
Click inside the Paste from Word dialog box. |
7. |
Press Ctrl-v to paste your text. |
8. |
Clear the checkboxes from Ignore Font Face definitions and Remove Style definitions in order to carry the fonts and styles from Microsoft Word into ChamberMaster. |

9. |
Click OK. |

10. |
Your formatted text will appear in the editor window. Complete the email as desired. |

Insert link to PDF file (or other file type)
Insert link to PDF file (or other file type) Many pieces of communication are already prepared in other software using a template or even created by an outside company and then provided to you by the publisher. Examples of this communication may include monthly newsletters, weekly information email blasts or other regular communication pieces.
In many cases, a PDF version of the output may be provided to you by the third party or may be easily created by you. This type of file may be included as a link within your email and opened by the recipient retaining all formatting features. In fact, the PDF version may provide advantages over an embedded version (i.e. the copy and paste method) that may be appealing.
Links may be included to access a Microsoft Word document, Excel spreadsheet, or any type of file that would traditionally be sent as an attachment. However, keep in mind that the recipient of the email must be able to open the file on their end. If they do not have the program themselves or have a different version of your software, they may not be able to view the file you have referenced within the communication. Sending a PDF version of the file eliminates that issue of compatibility.
PDF (Portable Document Format) is a universal file format developed by Adobe® that preserves all the fonts, formatting, graphics, and color of any source document, regardless of the application and platform used to create it. You will find PDF a very common format which is widely used on the internet due to its platform independence.
Some cited benefits of including a link to a PDF version are that 1) the email size is kept small since the PDF file is not calculated as part of the email total and 2) the recipient may save and print the PDF separately from the traditional email printout creating nicer looking output on the recipients end.
To view PDF files you need Adobe Acrobat Reader which is downloaded free from here and is commonly loaded on most computers that access the Internet.
Many software programs, both for purchase and those at no charge, are available to create PDF versions from output of your most common applications. Newsletters or brochures created in Microsoft Word, Microsoft Publisher or other popular applications may all be saved in a PDF version using these PDF creation programs.
Once your output is in the PDF format or you have the desired attachment prepared, follow the steps below to include the document as a link within your email.
1. Open the ChamberMaster editor and begin to create the desired communication piece.
2. Click where you desire to insert the link to your document.
3. Click Add/Remove Attachments ()
FIGURE 12-7 – ChamberMaster editor ready to add attachment link
4. Click Upload your attachment file to the ChamberMaster server and include a link to that file in your email. See Figure 12-8 below.
FIGURE 12-8 Add Email Attachments
5. Click Continue.
6. Type the desired text in the Text for Attachment Link field. Then click Browse Server. See Figure 12-9 below.
FIGURE 12-9 – Add File Attachments
7. Browse to the desired file and click it to select. See Figure 12-10 below. Or you may upload a new file to the ChamberMaster server by clicking Browse, browsing to the desired file, click to select, click Open, and then click Upload. Then you may click the desired file to select it.
FIGURE 12-10 Browse to desired file
8. Click OK. See Figure 12-11 below.
FIGURE 12-11 The last step
9. The link will automatically be inserted in your document.
FIGURE 12-12 – Completed communication piece
Save Microsoft Publisher files as a graphic file and insert into editor
Save Microsoft Publisher files as a graphic file and insert into editor If you’d like to display the content of a Microsoft Publisher file in the body of your email instead of using a link to a copy of it, there is a way to do that might be helpful to know.
Inserting a Publisher doc into an Email
In general the steps will be 1) save your PUB file as a GIF file in your Microsoft Publisher program and then 2) insert this GIF file using the Insert/Edit Image selection. 1. Open your Microsoft Publisher file. 2. Select File, Save As. 3. Change the file type to GIF and click Save. If your publisher document contains multiple pages, you will need to save each page as a separate GIF file. Make sure you have selected one-sided printing by selecting that in the newsletter options. Then as you view each page, click File, Save As and select GIF. 4. Then in ChamberMaster, position your cursor where the Publisher file should be displayed. (Place a couple of blank lines at the top of the document in case you want to add text at the top later on.) 5. Click Insert/Edit Image. 6. Browse Server. 7. Click Browse. 8. Find the file and click Upload. 9. If you had a multiple page publisher document, you would need to upload each GIF in this same manner. 10. After selecting this image, it will be displayed in the body of your email. Hint: If adding text below this image, click the image once to select it, then press the right arrow once to move past the image, then press Enter. This will allow you to begin typing new text below the image instead of accidentally deleting the image by typing your new text. Since this image may not be as clear as the original, you may also want to include a link to a PDF version of this attachment. Sending a test email to yourself is also recommended. Watch a short video of these instructions: http://www.chambermaster.com/directory/include/help/Videos/Comm/pubembed/pubembed.html
Copy and paste output from another HTML program (like Constant Contact)
Being an HTML editor, ChamberMaster’s editor allows copy and paste of HTML content. Therefore it is possible to produce your communication piece in other programs, like Constant Contact, and simply copy and paste the final version into the ChamberMaster editor. Care should always be taken that the content is coming over properly but we have found it to be quite successful. Please send yourself a copy of the email first to verify that the content and appropriate links are maintained. Here is an example using Constant Contact.
- Create the desired content in Constant Contact.
No guarantees or support is available for this method from ChamberMaster but it has worked successfully for a number of chambers.
Integrating Constant Contact
The ChamberMaster/GrowthZone member management system allows you to connect to your Constant Contact account to automate updates to your Constant Contact lists based on updates made in the database. Once configured representatives that have been added to the database or specific groups will automatically be added to Constant Contact. Any reps that are disabled within in a group will be removed from their respective lists.
Constant Contact has a special pricing program for Chambers of Commerce see the details here.
Constant Contact- How the Sync Works
Representatives may be synchronized to Constant Contact automatically or manually.
Nightly Synchronization
Under the Association General Options and Settings. You can enable an automatic nightly synchronization that will occur between 1am and 6am CST. You can choose to synchronize any or all of the following:
- Automatically sync all active reps for active and courtesy members. If this option is enabled, each time the nightly synchronization is run, Constant Contact will remove all the contacts in its All Active and Courtesy Representatives from ChamberMaster/MemberZone list, and recreate the list with the information received from ChamberMaster/MemberZone in the nightly sync.
- Automatically sync membership types daily. If this option is enabled, Constant Contact will delete all contacts in its membership type lists, and replace with contacts received from the ChamberMaster/MemberZone nightly sync.
- Automatically sync groups daily. If this option is selected, all groups will be synchronized nightly to Constant Contact. You may select specific groups to be synchronized via the Group > Sync tab. When synchronization occurs, Constant Contact will (1) Remove any reps that have been disabled in the group, (2) Add any reps that have been added to the group as active group members. Groups are matched by group name. If the group does not exist in Constant Contact, it is automatically created.
See Enable Constant Contact Synchronization for further instruction on configuring your nightly synchronization.
Manual Group Synchronization
Groups may be manually synchronized from the Synch tab, within the Groups module.
When a group is manually synchronized, Constant Contact will remove all contacts in the list, and replace with the reps received from the ChamberMaster/MemberZone manual sync. Groups are matched up by name between Constant Contact & ChamberMaster. If the group doesn’t exist in Constant Contact, it is automatically created.
|
|
NOTE:
|
Enable Constant Contact Synchronization
You must have an active account with Constant Contact to setup and use the synchronization tool.
- Login to your database with administrator privileges.
- Click Setup in the left-hand menu.
- Click General Options and Settings in the Association Information (or Chamber Information) area.
- Select ConstantContact from the Newsletter Solution drop-down box.
- In the Add-On Manager area click the blue link Please click here to authorize the Constant Contact connection.
- Follow the prompts to authorize the database with your Constant Contact account. Once you have authorized connection between ChamberMaster/MemberZone & Constant Contact Authorization for this application to sync contact data to your Constant Contact account has been completed. will be displayed.
- Choose which items you would like to have automatically synchronize each night.
- Automatically sync groups daily
- Automatically sync membership types daily
- Automatically sync all active reps for active and courtesy members
- See Nightly Synchronization for further information. If you do not wish to synchronize all groups, see Selecting Which Groups to Synchronize for more information.
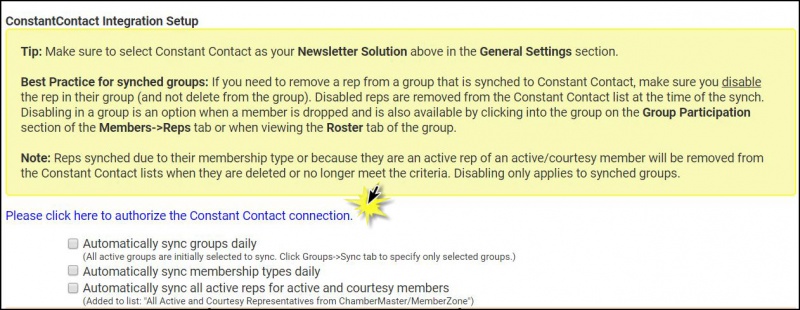
- Click Save.


|
|
NOTE:
|
Selecting Which Groups to Synchronize
Once the Constant Contact synchronization is setup you will be able to configure which groups are set to be synchronized each night. Automatically sync groups daily must be enabled in the General Options & Settings to initiate nightly synchronization. See Enable Constant Contact Synchronization for instructions.
View & Remove Groups from the daily synchronization
- Select the Groups module.
- At the top, select the Synch tab.
- All Groups currently set to synchronize will be displayed in a list when you first open this tab.
- Uncheck any that you wish to stop Synchronizing and then click Save
Set a group to start synchronizing each day
Option 1 - From the Group's General tab
- Select the Groups module.
- At the top select the Home tab.
- Click on the group name that you'd like to change the setting for.
- Check the box to "Synch this group with Constant Contact."
 Additional Options for Groups
- Click Save Changes

Option 2 - From the Synch tab
- Select the Groups module.
- Select the Synch tab.
- Uncheck Display groups set to synch only.
- Check off the groups you wish to synchronize.
- Click Save

Manually Synchronize Group(s) to Constant Contact
- Select Groups in the left-hand navigation panel.
- Select the Synch tab.
- A list of those groups for which you enabled synchronization will be displayed. For each group that you wish to synchronize, click the Synch Now button. NOTE: If you wish to synchronize groups that have not been configured for nightly synchronization, clear the Display groups set to synch only check-box. All groups will then be displayed.
The synch process is now initiated. You can view the status of the synch on the Activity report in Constant Contact.
|
|
NOTE: When a group is manually synchronized, Constant Contact will remove all contacts in the list, and replace with the reps received from the ChamberMaster/MemberZone manual sync. Groups are matched up by name between Constant Contact & ChamberMaster. If the group doesn’t exist in Constant Contact, it is automatically created. |
Manually Export Contacts to Constant Contact
If automatic synchronization is not being used, or if manual exporting/updating is desired, use the steps here to export ChamberMaster/GrowthZone contacts so that they may be directly imported by Constant Contact.
- Click Communication in the left-hand menu.
- Click Newsletters/Email Campaigns in the Other Communication Tools section.
- Click the desired “Add” selection to mark names to be exported.
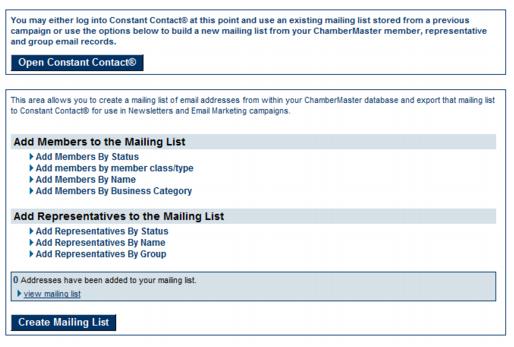 Selecting information to be exported
- A summary of your selections will appear in the blue box at the bottom of the screen. Click view mailing list to see your results.
 Summary of selections
- Remove any recipients that are not desired by clicking the checkbox in front of their name. Then click Remove Selected Items.
 Removing un-desired recipients
- Click Continue.
- Repeat steps 3-6 to add any more desired recipients.
- Click Create Mailing List when all names have been selected.
- The Database will allow you to download and save these names in a file that may be imported into Constant Contact. Follow instructions on the screen to save the file with your desired name and location. Remember this name and location for importing into Constant Contact.


Sample concept of using manual export from your database to Constant Contact
There are multiple ways of using your database and Constant Contact to maintain and keep contact information current. Below is one method that may work for you. Evaluate your own needs and contact Constant Contact for details on using their software.
- Create a mailing list in Constant Contact that will contain the names of contacts that are NOT already in ChamberMaster. This will also contain the names of those that “Join” your mailing list using the Join selection provided by Constant Contact (used when the Subscribe button is selected within the emails). Add any desired contacts to this list now (excluding ChamberMaster contacts) and update whenever desired. Example mailing list title: Standard Mailing List
- Create another mailing list in Constant Contact that will contain the imported ChamberMaster contacts. Do not add any names to this list yet – you will be importing names into this list. Example mailing list title: ChamberMaster Contacts List
- Each time you are ready to perform a mailing, follow instructions above to export your entire set of contacts from ChamberMaster.
- In Constant Contact remove all contacts from the current “ChamberMaster Contacts List”. Then import the new ChamberMaster export into this list.
- When sending the email, select both the “Standard Mailing List” and the “ChamberMaster Contacts List” as recipients of the email.
NOTES
- Make sure to keep the email addresses for your contacts up-to-date in ChamberMaster which will follow-through into Constant Contact and end up in the “ChamberMaster Contacts List”.
- Updates to those contacts not in ChamberMaster may be done in Constant Contact on the “Standard Mailing List”.
- Clearing the “ChamberMaster Contacts List:” in Constant Contact each time will not eliminate the Opt Out list. Those that have opted out of your mailings (Do Not Mail) will be retained. Constant Contact keeps a list of these addresses internally.
- If a ChamberMaster contact manually tells you they would like to opt out of your mailings, you need to select the Do Not Mail selection in Constant Contact. Then when they are imported from ChamberMaster, Constant Contact will not allow the import since they are listed as Do Not Mail.
- If a ChamberMaster contact manually tells you they need their email address updated, you would need to change it in ChamberMaster so that it will be imported correctly next time.
- If a ChamberMaster contact manually tells you they need a new address added to the mailing list, either add their email address as a New Rep in ChamberMaster or add them as a contact in Constant Contact in the “Standard Mailing List”.
Disadvantages
- The Constant Contact Email History and Bounce History may not be retained since the ChamberMaster Contacts List will be cleared each time. Constant Contact only keeps history for 90 days anyway.
- When importing the contacts from ChamberMaster, all of the Constant Contact fields are updated with the information from ChamberMaster. If custom fields or other contact information fields have manually been updated in Constant Contact, they would be overwritten by the information coming from ChamberMaster each time. If these additional fields are not being used by you in Constant Contact, then this will not affect you.
Constant Contact FAQ
- Why are there fewer contacts in my Constant Contact list than what is showing in my database?
- A) When the data is pushed over to Constant Contact any emails that are invalid are automatically excluded. Any emails that are unsubscribed within Constant Contact would also be excluded from the final list in Constant Contact.
- What happens when I change a representatives email in ChamberMaster/GrowthZone?
- A) The representative will be added to anything their previous email was attached to but their previous email will not be removed. If you want their previous email removed you would need to do that directly within Constant Contact.
Using and Integrating MailChimp
Once synchronization to MailChimp is setup, then each night an automatic sync from your database into your MailChimp account will take place which will copy contact information from your database into the designated MailChimp list. If you’ve done updates to your mailing list in the database and you’d like to sync during the day, there is a “Sync now” choice available to do at any time. MailChimp synchronization is available to those with Plus edition or greater.
How ChamberMaster and GrowthZone sync with MailChimp
See an overview of how the MailChimp Synchronization works ![]()
What is synchronized?
- All active reps of active, courtesy or prospective members.
- Groups that have been marked to Sync under the groups module.
Where does the contact information go in MailChimp
The contact info is pulled into groups that are created and updated in MailChimp nightly:
- AUTO:Status group – contains reps by Membership Status
- AUTO:MembershipType group – contains reps by your Membership Type
- A group for each of your Group Types with a sub group created for each of your groups
The maximum number of groups per Group Type that may be synchronized is 60. Note: Groups synchronization will include inactive reps in the synch as long as they are marked as active within the group.
How to setup Mail Chimp synchronization
- Click Communication in the left-hand menu.
- Click MailChimp Setup.
- Click Click to Enable MailChimp.
- Enter your MailChimp login and password.
- Click Log In.
- The message will say that you are connected.
- Click the drop-down arrow and select the list you already have in MailChimp where you would like the contact information to be imported.
- Click Sync Now to immediately copy your contacts to MailChimp.
- Tip: Note this sync will happen every night but you can manually sync any time you’d like.
- All the contact information will be updated in MailChimp.
- Note: The System Event Log will display the synchronization transactions. Errors typically indicate invalid email addresses.
- Unsubscribers from the MailChimp system will remain subscribed in your database but MailChimp will prevent them from being imported at the next synchronization
Other Communication Tools
Web Leads
Web Leads are generated in the following ways:
- The consumer selecting the Contact these Businesses button within your directory. You can enable the Contact these Businesses button via the Directory Control Panel settings. See Modify the Directory Control Panel for details.
- The consumer clicking the Request Info button on the members individual directory page
- The consumer submits a Request for Proposal. NOTE: The Pro edition of the software is required for Requests for Proposal. See Requests for Proposals for further details.
Approving/Rejecting Web Leads
Staff signed up for All Web Leads Pending Approval will receive and email notification when either a Contact these Businesses lead or an RFP is submitted. NOTE: If you wish to approve web leads prior to consumers contacting your members, enable the Require Staff Approval Before Delivery option under Setup->Directory Control Panel.
Web Leads may be viewed and approved via the Task List. ![]() Watch video demonstrating “Contact Businesses” and the Web Leads task list
Watch video demonstrating “Contact Businesses” and the Web Leads task list
- Click Web Leads in the Task List.
- Click the Subject/Message to view details of the Web Lead.
- If you wish to view the contacts to whom the lead is to be sent, click the Show Recipients button.
- To approve the message, and send to members, click the Approve button. The message will be sent immediately. OR
- If this message should not be delivered to members, click Reject. The message will not be sent to members. NOTE: No notice is sent to the sender of your rejection.


eReferral
eReferral is designed to accomplish two tasks with a single entry - getting desired member information to a consumer while letting the member know that they’ve been referred.
Pertinent consumer information is entered and then the eReferral tool is used to generate an email message or printout that includes the selected member(s) contact information in referral format.
You can then choose to pass along the consumer's information to the members you referred. Through a separate optional email message, your member(s) are informed that their business information was passed on to an interested consumer. In turn the consumer's information is provided to your members so they can, if they so choose, provide additional outreach to that consumer.
Why use eReferrals
- eReferrals allow you to give your members' information to consumers when they ask for it. At the same time you can choose to send that consumer's information to your members giving them a lead.
- Every eReferral is recorded allowing you to show your members the value that you are giving them. Each referral means you are pointing customers to their business.
- Take for example, a consumer that calls and asks for a list of restaurants in your area. You enter their contact information in the eReferral screen. After selecting the Restaurant category members as your designated recipients, you click one button to email the detailed restaurant list with addresses, phone numbers, and web site address to the consumer. Then you click one additional button to send an email to the restaurant members with a message indicating that they have been referred. All these steps are handled under one screen.
- If you don't want to send an email to your members that's no problem. You can still record that you referred a member to them so they can see or be shown the added benefit of their membership with your association.
View/Edit Default eReferral Settings
- Click Setup on the main left menu.
- In the Information Request section click eReferral Settings/Options
- Enter desired Email Send Options:
- Specify the eMail From: Select Use email address for the logged in chamber representative to specify that the from address should be the staff member logged in; or Use the email address and enter an email address to be used each time an eReferral is sent.
- Email to referral recipients: Customize the default subject and message for the email being sent to your members. Enable Include carbon copy to sender. if you wish a copy of the eReferral to be sent to the sender.
- Email to potential customer: Customize the default subject and message for the email being sent to the consumer.
- Lead Sources: Select the desired lead source. Lead Sources allow you to categorize where your eReferrals were initiated from. The Lead Source is included in the information emailed to your members and is also recorded on their Communication history. It is also on the Referral Report which may be viewed in the Member Information Center (MIC). To add additional lead sources, click the edit list.
- The first item in the list will be the default lead source.
- Lead source list can be blank. This is an optional field.
- Click Save and Exit
Send and Record an eReferral
- Click the Add button at the top of your database.
- Choose eReferral

Details
- Click the Add button at the top of your database.
- Choose eReferral
- Enter in as much or as little Potential Customer information as desired.
- Select the members you wish to refer.
- You can select members by name or category. You can also select specific representatives by name or by group.
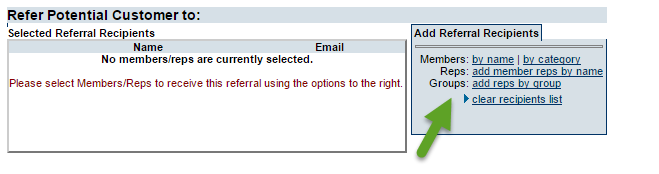 Add Referral Recipients
- When selecting members by name or category you can expand the advanced filter section and filter by boolean type (checkbox) member custom fields.
 eReferral Advanced Filter Options
- Check off and remove any records you wish to exclude by clicking Remove Selected Recipients
- Click Preview final referral recipients list with options to print/email potential customer
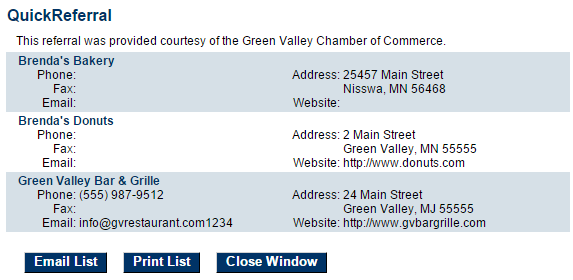 View, Print or Email the referral information
- Review the information and at the bottom you can print or email this list to the potential customer.
- In the Referral Recipient Options you can select the desired Lead Source (see eReferral Settings below to set up lead sources)
- Check Send email to Referral Recipients
- Checked will send an email using the options below to those being referred and will record it in the member's communication history.
- Unchecked will just record the eReferral in the member's communication history and will not send an email to your members.
- Adjust your Email From, Include Carbon Copy, Subject Line and modify your Message with details about the potential customer if desired.
- Click Send and Record Referral. The referral will be sent to members, and to the customer.


Record an eReferral Only
When selecting to record an eReferral only, you can log the referral without notifying the member. This is useful when you wish to track business cards, or brochures of a member that you have handed out.
- Click the Add button at the top of your database.
- Choose eReferral.
- Enter in as much or as little Potential Customer information as desired. If logging for business cards or brochures, you may leave this area blank.
- Select the members you wish to refer.
- You can select members by name or category. You can also select specific representatives by name or by group.
- Add Referral Recipients
- When selecting members by name or category you can expand the advanced filter section and filter by boolean type (checkbox) member custom fields.
- eReferral Advanced Filter Options
- Check off and remove any records you wish to exclude by clicking Remove Selected Recipients
- Click Preview final referral recipients list with options to print/email potential customer
- View, Print or Email the referral information
- Review the information and at the bottom you can print or email this list to the potential customer.
- In the Referral Recipient Options you can select the desired Lead Source (see eReferral Settings below to set up lead sources)
- Uncheck Send email to Referral Recipients
- Click Record Referral.
The ereferral will be logged on the member(s) communication history for reference.
Push Notifications
Push Notifications are a fast and efficient way to communicate with your members. They can help you send real-time updates and reminders that get your members to regularly engage with you, even if they’re not aware of it. You can target the right members by selecting to send to just individual groups, or to all of your members.
|
|
NOTE: Push Notifications are received by those Reps who have downloaded the MemberPlus App. See MemberPlus: An App For Your Members for more information. |
Send a Push Notification
- Click Communication in the left-hand navigation panel.
- Click Push Notification in the Other Communication Tools section.
- Select the Recipients:
- Click the check-box for the Group(s) to which you wish to send the notification
- OR
- Click All users in your association to send the notification to all reps in your association.
- Enter your message in the Message to push out text box.
- Click Send out message.

All representatives, who have downloaded the MemberPlus App, will receive the notification. See View Notifications in the MemberPlus App for details.
View Push Notification History
- Click Communication in the left-hand navigation panel.
- Click Push Notification in the Other Communication Tools section.
- Click the History tab.

Working with Blogs
Blogs are a great way to get your message out to your members and the public. Users with Pro Edition can now create one or more blogs that integrate perfectly with your website and Member Information Center. Watch a quick video on what the Blog feature can do for you: 
Create a Blog
Watch a video on how to create a blog:
- Click Communication in the left-hand menu.
- Click Manage Blog in the Other Communication Tools section.
- On the Blog Tool Home tab, click the Create New Blog button.
- Enter a Name (required). This may be displayed on your website.
- Enter a Description for your blog. This may be displayed on your Website. (optional)
- Click Save. The Posts tab is displayed. Add your first post:
- Click New Post.
- Enter a Title for your post. This field is required. Recommended max characters ~50-60 for best SEO results.
- Enter your Post. You may use all of the standard rich text editor functions, including adding images and links.
- Enter a Post Summary.
- Enter the Date displayed on the post. This will provide your readers an understanding of how current the post is.
- Select a Category(ies) for this blog. Categories help organize your blog, and make it easy for readers to find what they are looking for. Click the edit link to add/edit categories.
- Enter Tags separated by commas. Enter a word or phrase that specifically identifies what is a key topic in this particular post. Tags are meant to describe specific details of your posts. Think of these as your site’s index words. They are the micro-data that you can use to micro-categorize your content. Tags are not hierarchical. . On the
- Author: Your name will automatically be entered here but feel free to put in the name of your guest blogger if you have one. The author's name shows next to the post title. The author name will be displayed on the blog posts.
- Settings: Configure the following settings as desired:
- Allow/view comments: If Allow/View Comments is selected, visitors to the post will have the option to add their comments to your post and see comments by others that are marked as Approved.
- Require name and email address when submitting a comment (if not checked, anonymous comments are allowed): Enable this option if you would like visitors to provide name and email address when submitting a comment. NOTE: The email address will not be displayed in the blog, but will be available to your staff in the back-office.
- Require comment approval by staff: Enable this option if comments must be approved by your staff prior to being published on your page. If comment approval is required, an email address must be listed to receive the comment notifications on the Share Blog tab. If you are not too concerned about negative feedback on a post, we recommend allowing immediate display simply to encourage quick and healthy conversations on your post.
- Allow likes: Select this option if you wish to allow visitors to like posts in the blog.
- Published: To display this post in the blog, select Published. NOTE: The post will only be displayed if the blog itself has been made active.
- Click Close. NOTE: After the post is saved, you can edit the post to add a Featured Image. The image will display on the blog page where each post displays with a summary and a link to read the full article. See Add a Featured Image to Your Post for instruction.
- Click Save.


Add a Featured Image to Your Post
Blogging is just not about plain text written on a page; a good article is the combination of text, images, and other various multi-media elements like videos, charts, slides, etc. Remember: A picture is worth a thousand words.

Once you have created and saved a post, you can edit the post to add a Featured Image. The featured image will display on the blog page where each post displays with a summary and a link to read the full article. The image uploaded here will be cropped to fit into a square location which is consistent with the way other locations in the public pages display and use the featured image.
- Click Communication in the left-hand menu.
- Click Manage Blog in the Other Communication Tools section.
- Click the Home tab, and click the blog that you wish to add a featured image to. The Posts tab will display.
- Click the
 icon next to the post to which you wish to add a featured image.
- In the Featured Image section, click the
 icon.
icon.
- Select a previously uploaded file from the list, or click Upload to select a new file.
- Crop the image as needed, then click Crop & Save.
- Click Close.
- Click Save.


Edit a Blog
Delete a Blog
Once you have created your blog, you may share it in a variety of ways: send a link to the blog to interested parties; add the link to your web-page as a new page; add a widget to your web-page.
To share your blog:
- Click Communication in the left-hand menu.
- Click Manage Blog in the Other Communication Tools section.
- On the Blog Tool Home tab, click the blog that you wish to share.
- Click the Share Blog tab.
- Configure the following:
- Blog Status: Set the blog to Active. Setting the blog to active makes the blog publicly available if the URL is known and accessed by the public. You would still need to add the blog to your website as a separate step in order to make it easily available.
- Click Change Settings to adjust any additional settings related to the public display:
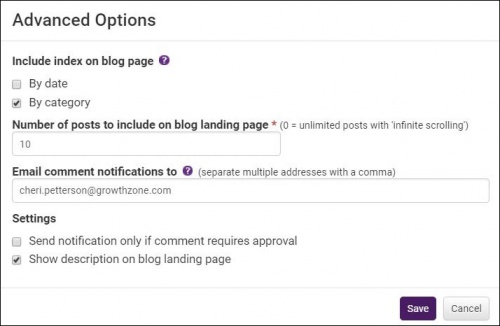
- Include Index on blog page: The blog page can display an index of the blogs posts by date and/or by category. If very few posts exists, the date index may not be necessary. The category index is helpful for visitors to easily locate the content they might be looking for.
- Index by date: Index by date will display the year and then the quantity of posts in that year. Then it will display the month followed by the quantity of posts in that month. Visitors will be able to click the year or click the month to filter the blog results to those posts only.
- Index by category: Index by category will display only those category names where posts are assigned with a quantity besides the category name. Visitors will be able to click the category name to filter the blog results to those posts only.
- Number of posts to include on blog landing page: This option allows you to limit the number of posts displayed on you blog - visitors can scroll to view additional posts. (0 = unlimited posts with 'infinite scrolling').
- Email comment notifications to: If you have configured the blog to require staff approval for visitor posts, enter the email address(es) of staff who should receive notification. You may enter multiple email addresses separated by commas. By default, the email address of the person that created the blog will be listed automatically.
- Settings:
- Send notification only if comment requires approval: Select this option if you only wish to be notified of comments added that require approval. If deselected, a notification will be sent each time a comment is added to the blog.
- Show description on blog landing page: Select this option if you wish the description of the blog to be displayed on the blog landing page.
- Click Save to save the advanced settings.
- Distribute your blog:
- Copy and email this link to interested parties: Copy and email the link that is listed here into the body of your email and send it to those you'd like to invite to read your blog.
- Add this link to your website as a new page: For SmartCMS Users, nothing needs to be done on the Share Blog tab. A web module is available to you. For other CMS users, copy the link that is displayed here, when in your CMS software, choose the selection for adding a link to your menu.
- Advanced: Embed as a widget on your website: For SmartCMS users, nothing needs to be done on the Share Blog tab. A widget is available to you to easily add the blog to your web-site. For other CMS:
- Click the Generate widget code. This will bring you into the Internet Settings Control Panel (ISCP)
- Click the Widgets tab.
- From the Widgets drop-down list, select Blog.
- Select from the list of available blogs. (Note: only active blogs will be displayed in the list).
- Make any desired changes to the default options.
- Click Generate. The HTML code will be displayed in the window at the bottom of the screen.
- Use this code to add the blog to your web-site.


Add a New Post to Your Blog
When it comes to your blog, you should make regular posts on a consistent basis. Your regular blog readers will be looking for new posts from you, and when they don’t find them, will assume that your blog is not that important to you and will quickly lose interest. Posting consistency also applies to the specific days of the week when you publish new content. If you start out posting every Monday and Thursday, you need to continue to post every Monday and Thursday.
- Click Communication in the left-hand menu.
- Click Manage Blog in the Other Communication Tools section.
- On the Blog Tool Home tab, click the blog that you wish to post to. The Posts tab will display. NOTE: You are adding a post to an existing blog NOT creating a new blog.
- Click the New Post button.
- Enter a Title for your post. This field is required. Recommended max characters ~50-60 for best SEO results.
- Enter your Post. You may use all of the standard rich text editor functions, including adding images and links.
- Enter a Post Summary.
- Enter the Date displayed on the post. This will provide your readers an understanding of how current the post is.
- Select a Category(ies) for this blog. Categories help organize your blog, and make it easy for readers to find what they are looking for. Click the edit link to add/edit categories.
- Enter Tags separated by commas. Enter a word or phrase that specifically identifies what is a key topic in this particular post. Tags are meant to describe specific details of your posts. Think of these as your site’s index words. They are the micro-data that you can use to micro-categorize your content. Tags are not hierarchical. . On the
- Author: Your name will automatically be entered here but feel free to put in the name of your guest blogger if you have one. The author's name shows next to the post title. The author name will be displayed on the blog posts.
- Settings: Configure the following settings as desired:
- Allow/view comments: If Allow/View Comments is selected, visitors to the post will have the option to add their comments to your post and see comments by others that are marked as Approved.
- Require name and email address when submitting a comment (if not checked, anonymous comments are allowed): Enable this option if you would like visitors to provide name and email address when submitting a comment. NOTE: The email address will not be displayed in the blog, but will be available to your staff in the back-office.
- Require comment approval by staff: Enable this option if comments must be approved by your staff prior to being published on your page. If comment approval is required, an email address must be listed to receive the comment notifications on the Share Blog tab. If you are not too concerned about negative feedback on a post, we recommend allowing immediate display simply to encourage quick and healthy conversations on your post.
- Allow likes: Select this option if you wish to allow visitors to like posts in the blog.
- Published: To display this post in the blog, select Published. NOTE: The post will only be displayed if the blog itself has been made active.
- Click Close.
- Click Save. NOTE: After the post is saved, you can edit the post to add a Featured Image. The image will display on the blog page where each post displays with a summary and a link to read the full article. See Add a Featured Image to Your Post for instruction.

View Comments added to your Blog Posts
- Click Communication in the left-hand menu.
- Click Manage Blog in the Other Communication Tools section.
- On the Blog Tool Home tab, you can click into the Unread Comments or Total Comments numbered link.
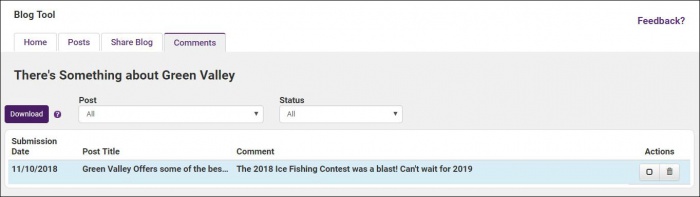
- Comments that are submitted will immediately display on the Comments tab with a dark, bold color for their title, which indicates it is Unread. After the comment has been clicked (indicating someone has read the comment) then the comment will change to the standard black font, which indicates it is Read. Read status is marked no matter which staff person clicks the title of the comment; it is not particular to a certain staff login.
- To view the details of a comment, click into the comment. The content of the comments, along with the name of the visitor who posted the comment will display.


Approve Comments made to your Blog Posts
If you have configured your posts to require approval of comments made, you will be able to view and approve (or decline) the posts added by visitors. Staff members identified as Email comment notifications to: in the Advanced Options on the Share Blog tab will receive the notification,shown below, when comments have been entered. Posts will not be displayed on your blog until they have been approved.

- Click Communication in the left-hand menu.
- Click Manage Blog in the Other Communication Tools section.
- On the Blog Tool Home tab, click the blog for which you wish to review comments.
- Click the Comments tab. Comments from all posts of this blog will appear on the Comments tab. Use the filters to view exactly what you are looking for.
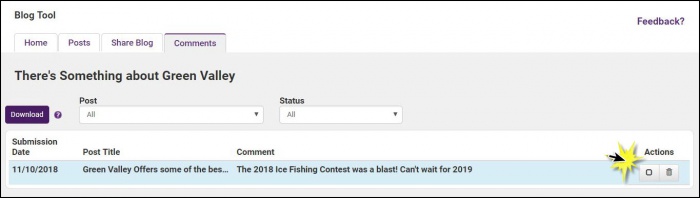
- To view further details of the comment, click into the comment. The content of the comments, along with the name of the visitor who posted the comment will display.
- Click the
 in the Actions column to approve the comment.

Delete Comments made to your Blog Posts
- Click Communication in the left-hand menu.
- Click Manage Blog in the Other Communication Tools section.
- On the Blog Tool Home tab, click the blog for which you wish to delete comments.
- Click the Comments tab. Comments from all posts of this blog will appear on the Comments tab. Use the filters to view exactly what you are looking for.
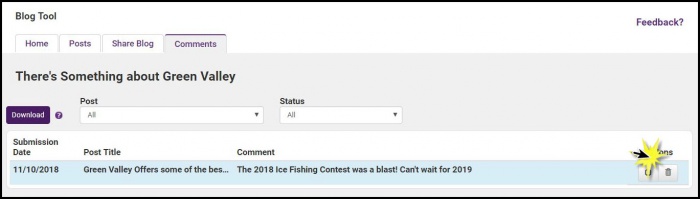
- To view further details of the comment, click into the comment. The content of the comments, along with the name of the visitor who posted the comment will display.
- Click the
 in the Actions column to delete a comment.

Smart Text
SmartText, group text messaging, available right within your ChamberMaster database allows you to contact your members, community, or other individuals via group text messaging. Use it to promote your own events or gain non-dues revenue by offering the service to your members at a fee.

SmartText Basic Concepts
Use SmartText for Non-Dues Revenue Generation
By setting up different recipients lists you can offer a group for text deals. These groups can be promoted by you and your members to build the list. Your members would pay a set amount to have their deal promoted via text message to this group. The set amount would need to be enough to cover the cost of using the SmartText feature and administrative time. These text deals would be a good way to promote a percentage off or special offer. One example would be that once an association has gotten numerous people who opt-in to the text group*, then they can allow members to purchase this media as an outlet to be able to contact those members via text/SMS messaging through your association. As a non-dues revenue source, an association can offer this to members at a cost to the member however, this would be less expensive than having their own SMS service and would allow through your association, many more opt-in clients (as well as public) that would like to receive text messages with offers and discounts. This feature eliminates the need for a member to have their own SMS push/notification feature and is at less costly than an association could do on your own. The member would see a turn of profit on people using the discount and this would show them the benefit of the price they paid as a member benefit for them. SmartText has great capabilities and is easy-to-use.
SmartText Availability
- SmartText is currently limited to subscribers on US mobile phone carriers.
SmartText Credits & Costs
- One credit equals one text – either a received text or a sent text.
- One credit currently costs .05 cents. Credits do not have an expiration date and are non-refundable.
- Purchase additional credits right in your ChamberMaster database under SmartText->Purchase tab.
- When someone subscribes to your list, that will cost 2 credits = 1 for the incoming request and 1 for the automatic thank-you reply. So, one subscription will cost .10 cents at the current rate.
- Examples:
- Sending a single group text to 100 subscribers would cost $5.00.
- Sending a single group text to 500 subscribers would cost $25.00.
- Sending a single group text to 1000 subscribers would cost $50.00.
Purchase Additional SmartText Credits
You can purchase additional Smart Text credits directly in your database.
- Click Communications in the left hand navigation panel.
- Click Smart Text in the Other Communication Tools section.
- .
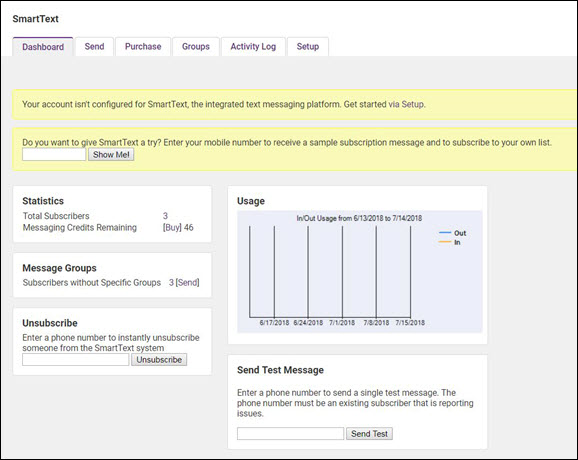
- Click the Purchase tab.
- In the I'd like to purchase text-box, enter the number of credits you would like to purchase. Each message credit is $.05. Credits do not have an expiration date and are non-refundable.
- Enter Payment Information and click Submit Payment.

|
|
You can also buy additional credits by clicking Buy in the statistics section of the SmartText Dashboard. |
Subscribing to SmartText
This list is opt-in only; Subscribers must opt in to be included in your subscriber groups. Lists of phone numbers may not be imported. Existing mobile phone numbers in ChamberMaster will not auto-populate your subscriber list. In order to have subscribers opt in, you must create a keyword – either a shared keyword (no charge) or a custom keyword ($25/month). NOTE: Practice and testing can happen without a keyword. If you wish to have different lists of subscribers (event list, board member group etc), you must create a group and have your subscribers opt in to each group. You must setup these groups prior to advertising your opt-in information to the public so that subscribers are placed in the proper groups. Subscribers may not be moved from one group to another.
Smart Text Setup
Key Word Reservation
Your ChamberMaster/MemberZone system is integrated with a leading provider of SMS/text services. We receive all text messages sent to 313131 (a short-code) that start with our keyword notify, or your own custom keyword. When our system receives the message we log it with your account by looking at the first 1 or 2 words of the message. If you use a custom keyword then the message will start with your keyword and we will match it up directly. Otherwise if you use a shared keyword we look for it after the word notify.
What is the difference between a shared and custom keyword? The easiest way to answer that is to show the difference. Let’s say our organization is the Green Acres Business Association. A shared keyword means you get new subscribers by telling them:
- When using a shared Keyword subscribers will text notify greenacres to 313131 to subscribe.
- When using a custom keyword subscribers will text greenacres to 313131 to subscribe.
Basically a custom keyword means your prospective subscribers have one less word to remember and enter, which will cut down on mistakes and lead to more subscribers. The difference is subtle but if you are putting it on a billboard, newsletter, etc. then the shorter message typically results in more interests. Especially once you start adding other commands. E.g. "To get notified of special events or discounts please text greenacres to 313131". You can drop the custom keyword at any time and revert to a shared keyword. For example, you could use a custom keyword for a year to build your base of subscribers and then drop it if you don't get many incoming subscription requests.
- Click Communications in the left hand navigation panel.
- Click Smart Text in the Other Communication Tools section.
- You will note on the Dashboard a message stating Your account isn't configured for SmartText, the integrated text messaging platform. Get started via Setup.
- Click the Setup tab.
- Read the Overview and the Differences between Shared and Custom Keywords information.
- Keyword Reservation:
- Click the Shared Keyword (No Charge) radio button OR
- Click the Custom Keyword ($25/mo. will be added to my subscription) radio button
- Enter your key word (this is required regardless of Shared or Custom selection).
- Click Check Availability to ensure your keyword is not already in use. If the key word is available:
- Click Reserve and Enable. custom keyword. The Current Keywords' section will populate with your unique SmartText information.


You are ready to advertise and start receiving subscriptions to your text service! In the shared keyword example above, you would advertise that your subscribers should text Notify training to 313131. This would subscribe them to your generic list titled Subscribers without Specific Groups. A response will be sent to them, confirming the subscription and providing instructions on how to unsubscribe.

If you would like different lists of subscribers (event list, board member group etc), you can create groups and have your subscribers opt in to specific groups. See Create Subscriber Groups for Smart Text for instructions. Best Practice is to setup these groups prior to advertising your opt-in information to the public so that subscribers are placed in the proper groups. Subscribers may not be moved from one group to another.
Create Subscriber Groups for Smart Text
If you would like to have different lists of subscribers (event list, board member group etc), you can create groups and have your subscribers opt into specific groups. You must setup these groups prior to advertising your opt-in information to the public so that subscribers are placed in the proper groups. Subscribers may not be moved from one group to another.
- Click Communications in the left hand navigation panel.
- Click Smart Text in the Other Communication Tools section.
- Click the Groups tab.
- Click Add New Group.
- Type the name for the group (board, events etc.) that will be used by the subscriber in the opt-in subscription text. Example advertisement: Text “notify training events” to 313131 when the shared keyword “training” is reserved.
- Type a Description for your internal purposes.
- Click Save.


You are ready to advertise and start receiving subscription to your text service for this specific group. In the shared keyword example (where the key word is "training" with a group called events, you would advertise that your subscribers should text Notify training events to 313131 This would subscribe them to your specific group titled “events”.
View List of Smart Text Subscribers
You can view subscribers to your smart texts on the Smart Text Dashboard or on the Smart Text Groups tab.
View Smart Text Subscribers from the Smart Text Dashboard
The Message Groups section will display all of your smart groups.

Click the numbered link for the desired group. The mobile number subscribed and the join date will be displayed. NOTE: Names are not displayed.

View Smart Text Subscribers on the Smart Text Groups tab
Click the Subscriber/Member number for the group you wish to view. The mobile number subscribed and the join date will be displayed. NOTE: Names are not displayed.
Testing Smart Text
Prior to going live with advertisement of your group texting ability, you will want to test the functionality of SmartText on your own.
Testing Smart Text without Subscribing
- Note: 50 free credits are provided to accommodate messages such as these. Sending test messages will reduce your available credits.
- Click Communication in the left-hand menu.
- In the Other Communication Tools section click SmartText
- Click the Dashboard tab.
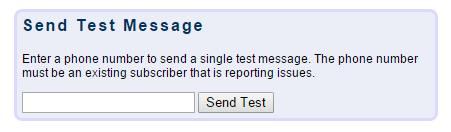 Send a Test Message
- Type your mobile number in the Send Test Message box and click Send Test.
- A test message will arrive on your mobile device.

- Example Message: “This is a test message sent at (date/time).”
Testing and Self-Subscribing to SmartText
Note: 50 free credits are provided to accommodate messages such as these. Sending test messages will reduce your available credits.
- Click Communication in the left-hand menu.
- In the Other Communication Tools section click SmartText
- Click the Dashboard tab.
- Type your mobile phone number and click Show Me! (only available if you have not yet setup your account.)
- A sample text message will arrive on your mobile device.
- This thank you subscription message is the message all your subscribers will receive. The association name listed in this message is pulling from the name listed under Setup>Organization Information.
- You will also notice your Dashboard Statistics shows an additional Subscriber and one less credit than before. Note: 50 free credits were given when SmartText became available.
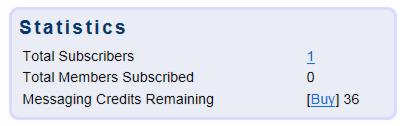 SmartText - Statistics
- You will also notice, if you click on the Send tab, that you belong to the subscriber list Subscribers without Specific Groups.
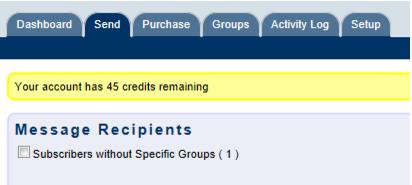 SmartText - Message Recipients
- You are officially part of the list of subscribers that would receive a message if this group “Subscribers without Specific Groups” is selected as a recipient.


Send a SmartText
A group text may be sent to those that are included in the subscribers list(s) on the Send tab. The default group of “Subscribers without Specific Groups” will always be available and may be the only group available if no additional groups have been created. To send a group text
- Click Communications in the left hand menu.
- Click SmartText
- Click the Send tab.
- Click to select the group(s) in the Message Recipients section that should receive your group message.
- Web Address Shortener (optional): For people that have a SmartPhone with a web-browser you can insert a link into the message. A full website address will take too many characters so use the Web Address Shortener to produce a compact URL. Type your full website URL, click Shorten and Insert. The short version will be inserted within your message.
- Type your outgoing text message in the Message to Send box. NOTE: Messages are limited (universally) to 160 characters in length. The Message to Send box will not allow more than 160 characters to be entered.
- Click Send Message. NOTE: When sending a message, if not enough credits are available, a message will appear indicating how many credits are needed in order to complete the current message delivery. Incoming subscriptions and auto-replies are allowed to create a negative balance. But the next message that is sent will require you to purchase additional credits in order to complete the current message delivery.

|
|
NOTE: When sending a message, if you do not have enough credits, a message will appear indicating how many credits are needed in order to complete the current message delivery. Incoming subscriptions and auto-replies are allowed to create a negative balance. But the next message that is sent will require you to purchase additional credits in order to complete the current message delivery. See Purchase Additional Credits for instructions on buying additional credits. |
View Available SmartText Credits
- Click Communications in the left hand menu.
- Click SmartText.
- In the Statistics section of the Dashboard, Messaging Credits Remaining will display the number of available credits.

Click the Buy link to purchase additional credits. See Purchase Additional Credits for instructions.
Smart Text Common Questions
Where do I purchase additional credits?
- Purchase additional credits right in your ChamberMaster database on the SmartText Purchases tab. See Purchase Additional Credits for instructions.
What is the difference between a shared and custom keyword?
- The easiest way to answer that is to show the difference. Let’s say our organization is the Green Acres Business Association. A shared keyword means you get new subscribers by telling them:
- Text notify greenacres to 313131 to subscribe.
- A custom keyword means you would tell subscribers:Text greenacres to 313131 to subscribe.
- Basically a custom keyword means your prospective subscribers have one less word to remember and enter, which will cut down on mistakes and lead to more subscribers. The difference is subtle but if you are putting it on a billboard, newsletter, etc. then the shorter message typically results in more interests. Especially once you start adding other commands. E.g. "To get notified of special events or discounts please text greenacres to 313131". You can drop the custom keyword at any time and revert to a shared keyword. For example, you could use a custom keyword for a year to build your base of subscribers and then drop it if you don't get many incoming subscription requests..
- How do subscribers unsubscribe?.
- To unsubscribe, subscribers will text “Stop notify shared keyword;” if you have reserved a shared keyword or “Stop custom keyword"; if you have reserved a custom keyword. NOTE: Unsubscribing will unsubscribe from all groups. See Unsubscribe from SmartText for further instructions.
- What if I don’t have enough credits?
- When sending a message, if not enough credits are available, a message will appear indicating how many credits are needed in order to complete the current message delivery. Incoming subscriptions and auto-replies are allowed to create a negative balance. But the next message that is sent will require you to purchase additional credits in order to complete the current message delivery. See Purchase Additional Credits for instructions on buying additional credits.
- When someone subscribes, does it matter if they use capital letters or not?'
- Capitalization does not matter - - incoming subscription texts can be upper or lower case and it will arrive at the appropriate chamber and their group; it is not case-sensitive.
- What happens if someone subscribed to a group more than once?
- If this happens, it is not detrimental – the subscriber will remain subscribed to the list and will not be duplicated. The only issue that appears is that the 2 auto-confirmation text will not specify the group they subscribed to, one will).
- How can I use SmartText to generate non-dues revenue?
- By setting up different recipients lists you can offer a group for text deals. These groups can be promoted by you and your members to build the list. Your members would pay a set amount to have their deal promoted via text message to this group. The set amount would need to be enough to cover the cost of using the SmartText feature and administrative time. These text deals would be a good way to promote a percentage off or special offer.
- One example would be that once an association has gotten numerous people who opt-in to the text group*, then they can allow members to purchase this media as an outlet to be able to contact those members via text/SMS messaging through your association. As a non-dues revenue source, an association can offer this to members at a cost to the member however, this would be less expensive than having their own SMS service and would allow through your association, many more opt-in clients (as well as public) that would like to receive text messages with offers and discounts. This feature eliminates the need for a member to have their own SMS push/notification feature and is at less costly than an association could do on your own. The member would see a turn of profit on people using the discount and this would show them the benefit of the price they paid as a member benefit for them.
- Public and clients who wish to receive SMS/Text Messages from your association will need to opt into the group. Staff cannot add mobile phone numbers directly under privacy laws.
Sample Automatic Emails Sent Out by ChamberMaster/GrowthZone
• |
check the subject of the email to see if it matches |
• |
check the disclaimer at the bottom of the email |
• |
or compare the content and format of the email |
Received by chamber members
1. |
Email from consumer visiting the member web page |
2. |
Email from the chamber that invites member to an event |
3. |
Email from the chamber that informs of consumer leads |
1. Email from a consumer visiting member web page
Where the message comes from: This email message is received by members whenever a consumer visits their member information page (web page) and chooses one these button below:
Content of the message: The comments of the message will vary based on what is written by consumers visiting the web site. Extra notes: Please note that the member’s email address may not be viewed by the consumer. The email is sent using a ChamberMaster form filled in by the consumer visiting the web site; the email address of the member is not displayed. Some consumers have chosen to abuse this feature on the web site that was originally designed to ask questions of the member. If this is a concern or problem, the ability to contact the members may be removed from the web site. Simply remove the email address in the Web Contact Information area on the Web tab of the member’s record.
2. Email from the chamber that invites member to an event

3. Email from the chamber that informs of consumer leads

Received by the chamber
4. |
Email from a consumer visiting the chamber web site |
4. Email from a consumer visiting the chamber web site

Received by consumers
5. |
Email from the chamber sending requested information |
6. |
Email generated by ChamberMaster sending a Hot |
7. |
Email generated by ChamberMaster sending a job posting |
5. Email from the chamber sending requested information

6. Email generated by ChamberMaster/GrowthZone sending a Hot Deal

7. Email generated by ChamberMaster/GrowthZone sending a job posting

FAQs on Emails, Letters, and Labels
- How do I add an attachment to an email?
- Who is able to view the attachment that comes when I send myself a carbon copy?
- Why do some of my email messages not make it through to the recipient?
- Are there any systems in place to help ensure the delivery of my emails?
- How can we ensure that our members are not spammed through the Contact Us link?
- Why do the links inside my email not open for me or my members?
- How do I create a signature block to use when sending communication?
- How can I easily provide referrals AND notify my members when I've given out information referring them?
- How do I send a letter/email to my members with their login name and password included automatically?
- Why do my mailing labels get cut off or are not aligned correctly?
- How do I manage my mailing lists?
- How do I remove the headers and footers that print on my letters and reports?
Find answers to more commonly asked questions about Communication on the FAQ page