Member Management
Contents
- 1 Membership Initial Setup
- 2 MarketSpace Categories
- 3 Printing Business Category Reports
- 4 Add a Prospect
- 5 Add New Member
- 6 Adding Members by approving On-line Applications
- 7 Why do I receive Spam Applications?
- 8 Drop a Member
- 9 Reinstate/Re-Activate a Member
- 10 Change Member Status
- 11 Merge Members
- 12 Community Member
- 13 Edit Member General Information
- 14 Manage Member Representatives
- 14.1 Add a New Rep
- 14.2 Add Login Credentials to New Rep
- 14.3 Set Rep Login Permissions
- 14.4 Change Rep Permissions
- 14.5 Modify Contact Information for a Rep
- 14.6 Rep Bio Information
- 14.7 Remove/Inactivate a Rep
- 14.8 Reactivate a Rep
- 14.9 Reassign a Rep
- 14.10 Add Custom fields for a Rep
- 14.11 Send Email to Rep(s)
- 14.12 Print label for a Rep
- 14.13 Set Display Preferences for a Rep
- 14.14 Manage Rep Group Participation
- 14.15 Impersonate a representative in the Member Information Center
- 15 Manage Member Account Information
- 15.1 Manage Billing Contact
- 15.2 Modify Billing Renewal Month
- 15.3 Editing/Assigning Recurring Fees and Dues
- 15.4 Check a Member's Current Balance
- 15.5 Invoice a One-Time Item
- 16 Edit Member Web Display Information
- 16.1 Edit Web Contact Information
- 16.2 Edit Member Social Network Services
- 16.3 Update Member Web Display Participation Options
- 16.4 Edit Web Description and Text Content
- 16.5 Add Web Photos and Images
- 16.6 Adding Mapping Information
- 16.7 Send Email to Members to Update Contact Information
- 16.8 Manage Member Categories
- 17 Manage Member Communications
- 18 Member Benefit Tracking
- 18.1 Setup Benefit Packages
- 18.2 Add New Benefit Items
- 18.3 Manage Benefit Categories
- 18.4 Assign Benefit Packages to Members
- 18.5 Review Member Benefit Usage
- 18.6 Record Benefit Usage
- 18.7 Send your members eMails reminding of their Benefits
- 18.8 Disable a Benefit Package on Member Drop
- 18.9 Reporting Benefit Usage
- 19 View Individual Member Stats
- 20 Member Management FAQ's
- 21 Help Documentation
The Members module is the cornerstone of the Growthzone software application. Here you can view contact information, membership status, account balance, and many other details for each of your members.
Membership Initial Setup
Setup Membership Types
Membership Types may be created so you can assign them to a drop-down list when creating or modifying your member’s record. Selecting your members by Membership Type then is an option that is available throughout the software. This will allow you to easily view totals of membership of a specific type,
- Click Setup in the left-hand menu.
- Click Define Membership Types
- Click Add New Type
- Enter the name of the new Membership Type.
- Click Save
- Click Continue.

Setup Directory Categories
Business Categories are used to group related members by their business type. Categories should be broad enough to encompass multiple members but specific enough that visitors can drill down to the member that they're looking for. See Example Category and Quicklink.pdf for a list of sample directory categories.
QuickLinks
Directory QuickLinks are the main categories (displayed in bold) within your directory. Your software has been populated with the industry standard links. You may add additional QuickLinks as needed.

Add QuickLinks
- Click Setup in the left-hand navigation panel.
- Click Define Directory Categories in the Member Options section.
- Scroll to the bottom of the list of categories and click the QuickLinks Categories link.
- Scroll to the bottom of the list, and click the Add a New QuickLink Categories link.
- Enter a Name for the new quick link.
- Click Continue.


Add Images to your QuickLinks
Users of the v4 Public Modules can add images to the QuickLinks.
- Click Setup in the left-hand menu.
- Click Define Directory Categories in the Member Options area.
- Click the QuickLink Categories link at the bottom of the page.
- For the QuickLink to which you wish to add an image, click the Add Image link.
- Click the + sign to upload the desired image OR select one of the images provided in the software.
- Click Close.

|
|
NOTE: Only images for QuickLinks to which categories and members have been associated will display on your directory. |
View and Edit Directory Categories
|
|
See Add a Directory Category in Action! |
Add Top Level Directory Categories
Top Level Business Categories are used to group related members by their business type. Categories should be broad enough to encompass multiple members but specific enough that visitors can drill down to the member that they're looking for.
|
|
NOTE: If you are just getting started with the ChamberMaster/MemberZone software and you have provided directory categories, the GrowthZone support team will import your business directory categories and maintain their association with the designated member(s). On a go forward, these categories are under your control and may be modified at your convenience. After the initial import, it is also a great idea to double-check the categories and view the entire structure including sub-categories and associated QuickLinks, which may be new to your member business directory and thus may not currently be assigned. |
- Click Setup in the left-hand menu.
- Click Define Directory Categories in the Member Options area.
- Click the Add a New Top-Level Category.
- Enter the name of the category in the New Category Name text box.
- Select the Quick Link under which this category should be displayed. A Quick Link category should be assigned to every top-level and sub-category to take full advantage of all search methods available on the integrated public web site.
- Click Save Changes.
Assign Attributes to Categories
You can add Category Attributes to any directory category to further identify the characteristics of your members.
For example, for restaurants, you could specify an attribute group called "Cuisine Type" with attribute tags of "Italian", "American", "Mexican", etc. and another group for "Average Entree" price. You Member Directory can then be searched by these attributes.
NOTE: Attributes will only display on the public website for those with 3.0 SEO website modules but staff with any website module version may enter and apply these to your members, allowing preparation of your member data prior to upgrading to the 3.0 modules. Not sure which version you have? Select "View Website Integration Instructions" from your Dashboard. Your module version will display in the heading at the top of the screen. Contact Customer Support for assistance or with questions.
To setup attributes for your categories:
- Select Setup in the left-hand navigation panel.
- Click Define Directory Categories in the Member Options section.
- For the desired category, click the add attributes link in the Attributes column.
- Click Add Group. A group which will contain similar attributes must first be created. For Example: You can create a group called price, then add '$', '$$', '$$$' attributes.
- Enter the name of the group in the New Group Name text-box.
- Click the green check-mark to save the new group.
- To add attributes to the group, click the + sign next to the name of the group.
- Click the Add button.
- Enter the name of the attribute in the New Attribute Name text box.
- Click the green check-mark to save the attribute.
- Repeat steps 6 - 8 above to add additional attributes.
- Click Close when all attributes have been added.


Assigning Attributes to your Members
If category attributes have been added to a business category, then they may be assigned to your member on the Advanced tab. Attributes allow online directory visitors to narrow their search for your members within the specified category.
- On the member's Advanced tab, click the new window symbol that follows the category name.
- Click the + sign on the desired attribute group to view the available attributes. If no attributes are available, you will see a message “There are no attributes available for this category”. Create attributes under Setup-Define Business Categories.
- Click the checkbox in front of the desired attribute.

This member will now return in the online directory search results when the selected criteria is searched.
Note: Attributes will only display in the online directory for those with 3.0 SEO website modules, but staff with any website module version may enter and apply these to your members, allowing preparation of your member data prior to upgrading to the 3.0 modules.

MarketSpace Categories
MarketSpace categories display in the search section of the MarketSpace public module.
- Click Setup in the left-hand menu.
- Click Define Business Categories.
- Select the MarketSpace checkbox in the row of the desired category that should be displayed as a MarketSpace category.
- Note: If the MarketSpace name has been changed, then the checkbox title may not be MarketSpace. Look at the title used in the left-hand menu to determine the title of this column.
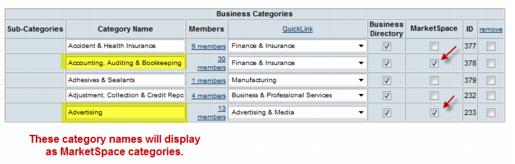
- Note: If selecting a main-level category as a MarketSpace category, then all the sub-categories will display as MarketSpace categories also.
- Click Save.

Printing Business Category Reports
Print List of Categories
- Click Setup in the left-hand navigation bar.
- Click Define Business Categories in the Member Options section. area.
- Click Print at the bottom of the category list.
- The category list will display on the screen.
- Select Print from your browser software. Use standard procedures to print the report.
Print List of Members & Associated Categories
- Click Reports in the left-hand navigation bar.
- Click Membership in Search by Category
- Click Membership Directory Report.
- Click Contact Information in the Available Fields list.
- Click the check box(es) for the fields you wish to include in your report.
- Click Group members by Category in the Extended Options area (if not already selected).
- Click View/Print Report.


The report will display on the screen. Select Print from your browser software. Use standard procedures to print the report.
An Overview of the Member Module Tabs
- General: Basic member information, membership status, sales stage, join date, & custom fields
- Reps: Basic member representative information, their personal web display options, & group participation, individual rep login permissions
- Web: Member description and contact information that displays on the member information page, web participation level (basic or enhanced), member login name and password, web display attributes, member logo, photos and images.
- Communication: Displays communication history for this member; ability to log a call, print a label, send email or send an eReferral. Task Reminders are scheduled here.
- Account: Assign Billing rep and billing renewal month, account information, membership fees, view invoice and payment activity
- Stats: Member reports for event activity, web hits, Hot Deal hits, Job Posting Hits, MarketSpace hits, A/R History, Member Benefit and Member Profile
- Lodging: Optional lodging information including facility types, lodging amenities, and vacancies. Only available if Lodging module has been enabled. Contact support@micronetonline.com to determine your options in regards to the Lodging module.
- Advanced Options: Business categories, location (if enabled), Hot Deals, job postings .Manage your members
- Marketing: Allows banner advertisements to be loaded for a member that will appear at designated places on your website. See Marketing Package. When the Marketing Package has been activated, your the Marketing tab will be displayed. Sponsorship banners may be added to a members account and specifically placed on targeted pages within your integrated chamber website. The Marketing tab, available at all times after the initial purchase of the Marketing Package, allows chamber staff to:
- Add a banner ad to multiple pages on the integrated website
- Focus placement of a Business Directory or Quick Link banner ad to display within a targeted business category
- Link a banner ad to a desired URL
- Specify start and end display dates of banner ad
- Upload desired .jpg or .gif banner ad
- Files: Area to upload files and documents that should be associated with a member. This is member-specific storage of files. E.g. Upload a member contract or agreement for reference by your staff. See Store member files on their record.
- Do you have documents like special agreements, member-specific graphics or other unique files that you'd like to keep handy with your member's account? Upload these files to the Files tab in the Members module so they are available for any staff member that needs to reference this material. Use this as a member-specific storage spot that is accessible by all staff.
- Watch this short video to find out how it works

- Watch this short video to find out how it works
Add a Prospect
To add a prospect to your database, you will simply click the Add button in the header bar. When adding a prospect to the database, you simply fill in the requested information as the wizard walks you through four information screens.
- Click the Add button in the header bar and click Member. Step 1: Basic Information opens
- Enter all required Basic Information.
- Click Next to continue. Step 2: Additional Information is displayed.
- Select Prospect from the Status drop-down list.
- Add any additional information you wish.
- Click Finish.

Add New Member
When adding a new member to the database, you simply fill in the requested information as the wizard walks you through four information screens. You will be asked to fill in the following information screens:
- General Information
- Additional Information
- Billing Information
- Web Display Information
When you click Finish, your member is automatically added to the database.
- Click the Add button in the header bar and click Member. Step 1: Basic Information opens
- Enter all required member information.
- Note: An immediate warning will appear if trying to create a duplicate member. See more info.
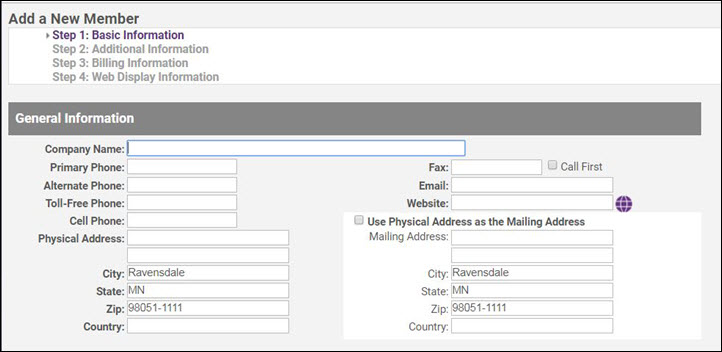
- Globe icon – Click the globe icon to open an internet connection and test the website address that is entered. This will ensure that you have typed the address correctly if the correct page opens in the browser window.
- Call First – Check this box as a reminder for you to “call first” before sending a fax to this member.
- Check Use Physical Address as the Mailing Address if both the physical and mailing address are the same address. This will save time so you won’t need to type the address twice.
- Tip: The Mailing Address fields must contain an address in order to print labels for this member. Either type an address or click Use Physical Address as the Mailing Address.
- Click Next to continue. Step 2: Additional Information is displayed.
- Enter all required additional information. Here you may assign categories, representatives, membership types, web packages, etc.
- Click Next to continue. Step 3: Lodging (not available in all editions) will be displayed, select Enable Lodging for this member if desired. If not, click Next.
- When Step 4: Billing Information opens, complete the desired fields and click Next to continue.
- When Step 5: Web Display Information opens, complete the desired fields and click Finish to complete the process.
- Click Finish, your member is automatically added to the database and included in the online directory (unless the Does Not Display on Web check box is selected).


| Note: Members can also be added by filling out the Membership Application form. |
Can I import a list of members into ChamberMaster/MemberZone?
While you are not able to import the list into ChamberMaster/MemberZone, GrowthZone can do this for you. We support a standard import file for loading your member data into our software. The standard procedure is to create an Excel file that contains your data, following the field order, titles and formatting as directed below. Although we recommend Excel, we can also accept CSV file types. You will find the .xls formatted file at this link.
|
|
IMPORTANT: If you have the Pro Edition of the software, you are eligible for one complimentary import per month. If you do not have the Pro Edition of the software fees will be applied for request to import members. Contact support@growthzone.com for a quote. |
Member data must be provided to GrowthZone in the xls file provided here and the file and fields must comply with the instructions below:
- File name should be called “std_import.xls” A sample file called “std_import” should be sent along with this document.
- Field names must remain the same, both the name and order.
- Additional fields may not be added.
- Fields may be left blank if information is not present.
- Every row will be imported as its own company/member record. Multiple listings of the same company name will result in multiple separate company records.
- “Status” field is used to determine if the user is an Active, Prospect, Courtesy, NonMember, or Dropped. Any entries not of those five types will be imported as Non-Member.
- “MemberType” can be of any classification you desire. We recommend not having more than 10 different types.
- States must be in their two letter abbreviation or three letters for International use. States entries longer than three characters will be ignored, or truncated to three characters.
- Full time and part time employee fields may only contain whole numbers and no ranges, or they will be ignored.
- Phone and fax number longer than 30 characters will be truncated to 30 characters.
- “RenewalMonth” must be a whole number, 1-12, or will be ignored.
- “DuesLevelName” is the name of the fee item assigned to the member from your dues schedule.
- “AnnualDuesAmount” is the total sum the member is expected to pay annually, regardless of billing frequency.
- “BillingFrequency” must be a whole number representing the number of invoices the member is to receive annually (1 for annual, 2 for semi-annually, 4 for quarterly, etc.) Any non-whole number will be imported as annually.
The table below lists the fields that may be imported in. It may be possible to import additional fields, but there may be a charge to do so.
| CompanyName | DuesLevelName |
| CompanyFileByName | AnnualDuesAmount |
| Status | BillingFrequency |
| MemberType | PrimaryBusinessCategory |
| Phone | SecondBusinessCategory |
| AltPhone | ThirdBusinessCategory |
| TollFreePhone | PrimaryContactFirstname |
| Fax | PrimaryContactLastName |
| PrimaryContactTitle | |
| Website | PrimaryContactEmail |
| MailAddr1 | PrimaryContactPhone |
| MailAddr2 | AdditionalContactFirstname1 |
| MailCity | AdditionalContactLastname1 |
| MailState | AdditionalContactTitle1 |
| MailZip | AdditionalContactEmail1 |
| PhysAddr1 | AdditionalContactPhone1 |
| PhysAddr2 | AdditionalContactFirstname2 |
| PhysCity | AdditionalContactLastname2 |
| PhysState | AdditionalContactTitle2 |
| PhysZip | AdditionalContactEmail2 |
| BillContactFirstname | AdditionalContactPhone2 |
| BillContactLastname | AdditionalContactFirstname3 |
| BillContactTitle | AdditionalContactLastname3 |
| BillAddr1 | AdditionalContactTitle3 |
| BillAddr2 | AdditionalContactEmail3 |
| BillCity | AdditionalContactPhone3 |
| BillState | AdditionalContactFirstname4 |
| BillZip | AdditionalContactLastname4 |
| NumFullTimeEmployees | AdditionalContactTitle4 |
| NumPartTimeEmployees | AdditionalContactEmail4 |
| JoinDate | AdditionalContactPhone4 |
| DropDate | MemberCustomField1 |
| BusinessDescription | MemberCustomField2 |
| InternalComments | MemberCustomField3 |
| RenewalMonth |
Adding Members by approving On-line Applications
If you have included a Membership Application form on your web-site. You can configure your system to automatically accept applicants as new members, or you can manually approve the applications. See Setup the On-line Application for further details on creating your on-line application form.
|
|
IMPORTANT: An industry standard Captcha is used, as a way of thwarting spam. However, you may still receive some spam applications. Spam applications may still make it through and are a nuisance. These applicants will be entered into your database as prospects. Best practice is to "Decline" the application then find the member record and delete it from the system. |
To approve an on-line application:
- Click Mbr Signups in the Task List.
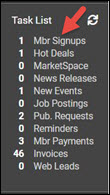
- A list of the memberships awaiting approval will be displayed. Click the Member Name to view further information about the applicant.
- You may click into the link for the new applicant to view further details
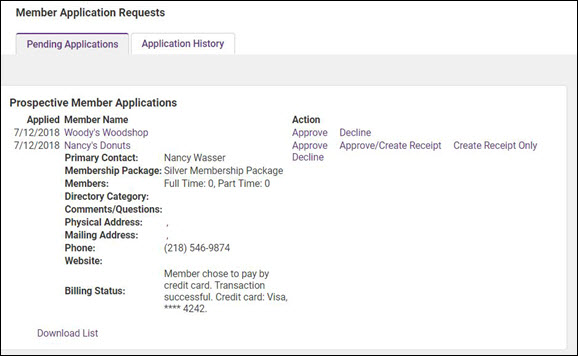
- If the member paid by credit card - you may see the following messages:
- "Member chose to pay by credit card. Transaction successful": Pay by Credit card was chosen and completed successfully.
- "Member chose to pay by credit card. Transaction is being processed. Transaction submitted MM/DD/YY - HH:MM": Pay by credit card was chosen, credit card information was entered but never received a success message. Check credit card report for success/fail.
- "Member chose to pay by credit card. Credit Card information was not entered.": This indicates the applicant selected pay by credit card but never even entered in their credit card information and closed out. The reason these still come through as an application is because it gives the chamber/organization the opportunity to pursue the member who might have just been too busy to complete the application.
- When you see the wording included on these messages saying receipt has been created or invoice has been created that indicates that a staff member has been processing that application and created the receipt or invoice from that application.
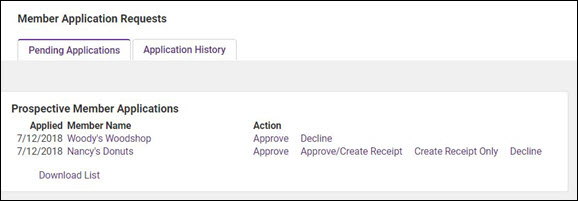
- For each of the membership requests, you may:
- Approve: This option allows you to approve memberships paid by credit card OR approve memberships where the applicant has requested to be invoiced without creating an invoice.
- Approve/Create Invoice: This options is only displayed if the applicant has requested to be invoiced (it will not be displayed if paid by credit card). When this option is selected, the applicant will be assigned as an active member, and the invoice will be created so that you may deliver it.
- Approve/Create Receipt: This option is displayed if the applicant has paid by credit card, and you wish to approve the application AND create a receipt for the transaction.
- Create Invoice Only This option allows you to create the invoice for the new membership. Select this option if your business process requires that you receive payment prior to activating a membership.
- Create Receipt Only: This option will be displayed if the applicant has paid by credit card, and you do not with to approve, simply create an invoice.
- Decline: Select this option if you do not wish to activate this new membership.


Application History
The Application History tab is accessible when you click onto Mbr Signups in the Task List. When an applicant has been approved or declined, their information is moved in the Application History tab. Applicants remain on this list for 90 days where they may be viewed.

At any time, this data may be exported to a CSV (comma separated value) file. This might be done to save the data for historical purposes, or to use as a source file in a mail merge, or for viewing and manipulating in other programs.
- Click Mbr Signups in the Task List.
- Click the Application History tab.
- Click download list.
- Type the desired name for this file.
- Select the desired file location.
- Click Save.
Why do I receive Spam Applications?
On your Application Form, an industry standard Captcha is used, as a way of thwarting spam. However, some spam applications may still make it through and are a nuisance. When an application is received, the business will be added to your database as a Prospect. Best Practice is to delete the record from your database.
Drop a Member
Members who are no longer participating may be dropped (set inactive) but still have their history and information available in the database. Members should only be deleted when history is not necessary or when a member was mistakenly created. Dropped members are still displayed in the Member drop-down list when the Filter Options are set to display Dropped/Inactive members. Dropped/Inactive members will display in red.
- On the member's General tab, click the Membership Status drop-down arrow in the Additional Information area.
- Click Dropped/Inactive. The Drop Member Options dialog box will be displayed.
- The Drop Date will default to the current date. You may change this if needed.
- Select a Drop Reason from the drop down-list. If needed click the Drop Reason hyper-link to add or edit drop reasons.
- Enter Drop Details.
- Update the Rep Status for each rep:
- Leave Unchanged (Active status) select this option if you wish to allow the rep to continue to access the MIC. The credentials to the MIC will be maintained.
- Set as Inactive status is appropriate for a rep who is no longer acting as a representative for the member. The rep’s information and history will be retained but there is a separate distinction given to them in reports and lists. Credentials to the MIC will be disabled.
- Delete a rep should be limited to a rep that was created by mistake. History and all reference to this rep would be removed. This is NOT recommended.
- Update the Group Status of each rep:
- Leave Unchanged status is appropriate if you wish the reps to remain active in groups (and receive email notifications).
- Disable in All Groups: Reps within a group are not visible in the group list on a regular basis and will not be included when selecting to contact these group members. Disabling a rep also preserves the history of their participation in this group.
- Delete From Groups: This option will delate a rep from a group, removes all record of their participation in the group.
- Note: Both active and inactive reps may be set as disabled in a group. Inactive reps, that are not disabled, are still included in emails sent to the group. Representatives that have a status of inactive will NOT automatically be returned to active status if a member is reinstated. Individual reps must be returned to active status on the Reps tab.
- Billing Information: The Current Balance for the member is displayed, you can manage open invoices on the members Account tab.
- Recurring Membership Dues & Fees: While you may choose to remove the recurring fees schedule, best practice is to leave the fee schedule so that you can report on revenue lost when a member drops. Dropped members are not included in recurring membership billing even if fees are left on their record.
- Click Save & Exit.


NOTE: The [Drop Analysis Report] will provide you with statistical information about your membership drops.
Reinstate/Re-Activate a Member
After an active member has been set to Dropped status, setting them back to Active status will display options to allow you to return reps back to active status and reinstate their group participation if desired. In addition, you will be prompted to reinstate individual Member Center Logins and Event Registration options if applicable. Member login permissions are also automatically re-enabled now in addition to their member page URL being reset to No Redirect Action. Find this new reactivate screen when selecting Active status on a member that is currently in Dropped status. Members>General tab>Additional Info area.
Reinstating or Re-activating a Member
- Click Members in the left-hand menu and select the desired member to be reinstated / re-activated.
- On the General tab, click the Membership Status arrow in the Additional Information area.
- Click Active.
- Complete the Activate Member window.
- Click Save and Exit.

Notes and Tips:
- If a member is reinstated you will typically want to set the Rep back to Active status. Check the reps on the Reps tab to verify their status after completing the Activate Member screen.
- Leaving Group Status Unchanged will leave reps disabled that were previously disabled in a group, and reps enabled that were previously enabled in a group. No change is made to the reps’ group status from how they were when they were dropped when selecting Leave Unchanged.
- If applicable, select the Member Permission Set that should be applied. Selecting Leave Unchanged will apply the last permission set that was in effect for this rep. If N/A displays, it indicates that they didn't have a permission set assigned to them previously. To assign a permission set for these reps, access the Reps tab after completing this screen.
- If applicable, select whether to allow this rep to register for events on the public website with their personal login but without logging into the Member Information Center. Selecting Leave Unchanged will apply the last setting that was in effect for this rep. If N/A displays, it indicates that they didn't have specific event permissions assigned to them previously. To assign specific event permissions for these reps, access the Reps tab after completing this screen.
- Upon re-activating, the Web tab->Redirect Index is reset to No Redirect Action, which will allow the member page URL to display instead of redirecting. See Redirect Index.
Change Member Status
At times you may wish to change the status of a prospect to non-member, of vice versus.
- For the desired member, click the General tab.
- Expand the Additional Information section if needed.
- Select the desired status from the Membership Status drop-down list.
- Click Save.
Merge Members
In the event that you have duplicate members in your database (perhaps you had added a prospect, then the prospect applied on-line), you can easily merge two contacts together. Best Practice is to merge the older contact into the newer contact.
NOTE: The user must have Administrative permissions to use merge feature.
- Select Members in the left-hand menu.
- Select the member the oldest member record, to merge into a new record.
- Click the General tab.
- Click Merge Into...
- Click select member to open the Member Lookup screen.
- Choose the member to merge into and click Continue.
- For each row of information, click either the data in the 1st column (1st member) or the 2nd column (2nd member) to pick which data will end up in the final merged member. Selected data will appear in green.
- Click Merge.


The first member recorded will be deleted and the 2nd member record will remain with the merged information.
Note: Some data does not appear in the merge columns for selection. Some data is simply combined and will NOT display in the merge window: all billing information (fees, invoices, etc.), communication, reps, event registrations, categories, keywords, locations, lodging info, change log entries, tracked benefits, and photos. Another reason data would not appear in the merge window would be if it already matches; no need to show it if it is the same in both records.
Community Member
The Community Member record provides a special way to organize information for a person that has some association with your association – but is not associated with a member. For example, a person who needs to be in a group that receives email, but isn’t a member would be a good example of a Community Member. Other examples include, but not limited to government officials, previous staff, or interested members of the community.
Edit and add to the Community Members in your database by going to the very top of the member drop down list in the Members module. After you choose [Community Member], click the Reps tab. When on the [Community Member] record, the other tabs will not display any data; the only information displayed is on the Reps tab.

Add a Rep to the Community Member
- Click Members in the left-hand menu.
- Select [Community Member] from the Members drop-down list (it is at the very top of the list of members)
- Note: You can also find the [Community Member] by selecting Communication->View/Edit Community Member Reps.
- Click the Reps tab.
- Click Add a New Rep.
- Complete the Add a New Representative screen.
- Note: Make sure to fill-in the Company field if appropriate.
- Click Save and Exit.

Hints on Using the Community Member
- To include a Community Member when creating groups or sending emails, make sure to remove the checkbox in front of the Show contacts for Active/Courtesy members only checkbox.

Edit Member General Information
Locate the member record and then select the appropriate information tab in the member’s record. Any changes you save to a member’s record are automatically updated throughout the database and within associated web site entries.
Edit Member Contact Information
- Select the desired member in the Members module.
- Click the General tab.
- Edit the Contact Information as desired.
- Click Save.

The Reps information will automatically be updated for address, phone and fax (when those same rep fields already match prior to the edit). Click the Reps tab and check the individual reps for any changes that should be made (if not already changed automatically). Click the Web tab to ensure that "Use Company Information" checkbox is selected (which means that the Web tab is already updated). If not selected, then you can update the Web tab with any desired contact changes.
Edit Member Additional Information

Edit Join Date
The join date is used for reference and in reports for the member. The Join is used to determine what month the new member is considered to have joined your association.
- On the General tab, edit the Join Date in the Additional Information area. Optionally, you may click the calendar icon to select a date.
- Click Save.
Add/Change Membership Type
When first adding a member to the database, you may need to add a Membership Type. Membership types are used for organizing, reporting, and filtering your members. To add/change a membership type:
- On the member's General tab, expand the Additional Information section.
- Select the desired Membership Type from the list.
- Click Save.

Change Membership Status
Membership status enables certain features and selections within the software and designates a distinction within reports and lists.
Membership Status Descriptions
- Active – Member that receives all membership benefits. Active members are also categorized by their website package as either Enhanced or Basic.
- Courtesy: Member with same features as basic member but has a separate distinction in reports and lists; usually used to indicate a member given a courtesy (free, gratis) membership.
- Non-Member: Usually used to indicate a company that is not a member but may need to receive communication and be tracked within the database.
- Prospective: Member with same features as basic member but has a separate distinction in reports and lists; usually used to indicate a potential member that you are soliciting to become a member; may easily be upgraded to an active member.
- Dropped/Inactive: Was once a member but was dropped for some reason. Information is still available on this member through reports and lists; may be reinstated as an active member if desired.
To change membership status:
- On the General tab, click the Membership Status arrow in the Additional Information area.
- Click the desired status.
- Click Save.
Note: If the Dropped/Inactive status is selected, a Drop Member Options window will display. See Drop a Member for more information.
Change Modified Date
The Modified Date is a system date stamp that is not able to be edited. This date indicates the last time this record was modified in the system. It is displayed for reference and to be used in select reports.
Items that will change the Modified date include adding/removing fees, updating contact information, modifying category assignments, webpage description and most all member record changes. Details of these changes are logged and may be viewed on the "Member Record Updates" report.
Add/Modify Member Sales Stage
Sales stages may be used for tracking your membership sales process. Sales stage is a reportable field, so you will be able to generate reports to view which members are at which stage. You may select an existing sales stage from the drop-down list in the Additional Information section of the member's general tab; or you may add/edit sales stages.
Add/Edit Sales Stages
- On the General tab, click the edit stage options link Additional Information area.
- Click Add New Status Type.
- Enter Status Name.
- Click Save.


Add Related Organizations
Related Organizations assist in tracking parent/child relationships between members in your database. For instance, a main bank location has multiple branch locations. The main location will be designated as the Parent and the branch locations will each be designated as a Child. This tracking is only for internal purposes and does not result in any changes to what is viewed in the public directory about these members or in the way that they are billed. This feature replaces the need for creating your own Custom Fields to track these relationships and also provides the added benefit of easy navigation and additional notes.
NOTE: Available to those with Plus edition or greater.

To add a new relationship:
- Click Add New Relation(s) to add a child or children to the current member.
- Add your own notes about that relationship.
Guidelines:
- Single-level relationship tracking
- One parent exists within a relationship
- A child does not have a child of it's own
Reporting Find the report titled "Related Organizations" in the Reports area
Manage Member Custom Field(s)
Custom Fields are designed to give ultimate flexibility in managing your data. When adding a custom field, you will create a database field that is available across all member records for tracking additional desired information. Custom Member fields are used in the following manner:
- Are viewed on each member's record.
- Are included as fields on a custom report.
- Are included in the download from a custom report.
- Are used to filter the records in the Members module.
- Are included on the Membership Application
- Are made available to members to view and/or modify within the Member Information Center (v4 only)
- May be included as a search filter within the member directory within the Member Information Center (v4 only)
Note: Additional custom fields may also be created to use on individual representatives, event registrations and within your groups.
Custom Field Types
- Text: Displays a field where text can be entered. Maximum size: 8000 characters
- Boolean (True/False): Displays a check box that can be selected or cleared.
- Date/Time: Displays a field where a date can be entered in many formats i.e. 9-7-06, 9-7-06, Sep 7 2006, Sep 7 06, 9/7/06 but once saved, will always display in the following format: 09/07/2006
- Number - Integer: Displays a field where whole numbers may be entered. Maximum size: 10 whole numbers
- Number - Decimal: Displays a field where numbers with up to 2 decimal values may be entered. Maximum size: 14 whole numbers, 2 decimal values
- Drop Down List: Displays your designated list of options that may be selected.
Add a Member Custom Field
- On the member's General tab click Add/Edit Custom Fields in the Custom Fields area.
- Click Add a Field.
- Type desired field name (maximum characters: 128)
- Click the Data Type arrow.
- Click the desired data type.
- If the selected data type is Text, type the desired Text Size.
- If the selected data type is Drop Down List, enter the desired list of items.
- Click Continue.
- Click Save & Exit.


Add Section Headers to Custom Fields
If you have a large number of custom fields, you can add section headers to organize the fields, as shown below.

- On the member's General tab click Add/Edit Custom Fields in the Custom Fields area.
- Click the Add Section a Heading button.
- A new text field, labeled Section Header will be displayed. Replace the text (Section Header) with your header text.
- Click Save & Exit.


To arrange your custom fields within the sections you have added, click & drag the custom fields under the appropriate section header.
Remove a Custom Field
- On the member's General tab, click Add/Edit Custom Fields in the Custom Fields area.
- Click the check box at the end of the row of the Field Name that you wish to remove.
- Click Remove Selected Fields.
- Click Save & Exit.
NOTE: All data in the custom field will be deleted.
Rename a Custom Field
- On the member's General tab, click Add/Edit Custom Fields in the Custom Fields area.
- Click in the text of the Field Name.
- Make the desired field name change.
- Click Save & Exit.
Change the Sort Order for Custom Field Display
- On the member's General tab, click Add/Edit Custom Fields in the Custom Fields area.
- Click and drag the field to the desired location.
- Click Save & Exit.
Manage Member Representatives
Add a New Rep
Note: Most member database fields may be referenced in custom reports allowing detailed member information to be extracted. Completion of each field will give the most flexibility at a later date.
- Click Members on the left side menu.
- Select the member you are adding a rep to from the Members dropdown list in the top tool bar.
- On the Reps tab, click Add a New Rep.
- Complete the form on the Contact Information section of the "Add a New Representative" screen.
- Click Finish.

Note: Alternatively, you can add a new rep by selecting "Representative" from the Add button in the top tool bar. If the Rep name already exists on the same or a different member, a warning message will appear that displays the name of that member. You may continue on and create the rep if desired.
| Contact Field | Description |
|---|---|
| Primary Contact: | Selecting the Primary Contact checkbox will make this the primary contact representative for the member. |
| Contact Preference: | Select the preferred contact method for this rep. Email, Fax, Mail, Phone or No Communication. See How is the "Contact Preference" Field Used on the Reps Tab? |
| Email: | Note that the email address listed here by default is the email address provided on the General tab. This can be edited to contain rep's individual email if desired. |
| Greeting: | Specify the common name used by this individual. See also What is the Greeting field used for? |
| Rep is currently active with this member | When selected, this rep will be included whenever “active” reps are selected. This checkbox should be de-selected when the rep no longer is participating in membership. This checkbox may be manually de-selected here but may automatically de-selected when the member is dropped through selections made at that time. |
| Billing Contact | When selected this rep will be included whenever “Billing reps” are selected. Billing transactions typically are addressed to the “Billing rep”. See information on “Edit Billing Contact”. |
| Comments | Comments are viewed only by staff who access this page. This cannot be viewed by the member/rep. |
After creating a representative, you’ll want to invite them to create their login for the Member Information Center. Access the Login Permissions area on the Reps tab where you will have the option to send them an invitation. The best practice suggestion is to allow them to create their own by sending them the personal emailed invitation. Although if you are working with them at that moment, create their login right now with a temporary password that they can change later is an option as well.
Add Login Credentials to New Rep
When Are Rep Logins and Passwords Created?
- When reps respond to the mass email that you send which invites them to create their login account.
- Using the pre-defined email template “Create Login Account Invitation” (or one created by you), your representatives will be able to create their own login account and immediately access the Member Information Center. This should be done when you first get your database and are ready for members to start logging in. It can also be done at any time that you desire to encourage more reps to create their personal account.
- One rep at a time
- Any rep may have a login and password created they are added to the Reps tab. You may create a login for them right there or there is a link to send them an invitation (recommended).
- When a rep is created in the Member Information Center by a member
- Members that have Read/Write permissions to Employees/Reps have the ability to add a new representative to their membership list. At the completion of creating a rep, there is an opportunity to send an email invitation to this rep so they can create their own login account.
It is best practice to assign a unique login and password to each individual rep that they will use when accessing the Member Information Center. Once logged in, they will have ability to view and perform specific functions based on the permissions that are assigned to them. Read more about permissions. You may create the log-in credentials for them, or you may send them an invitation with instructions to create their own credentials.
Create Login Credentials for the Rep
- On the member's Reps tab, click the name of the rep for which you wish to create credentials.
- Expand the Login Permissions for.. section
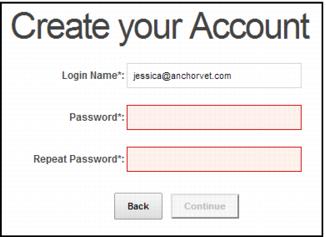
- Click Create their login right now. The Create your Account screen will be displayed.
- Enter a Login Name. The rep's email address is populated by default, you may change this as needed. Login names maximum 60 characters. The login name may include alpha-numeric and common keyboard symbols. Login name is NOT case sensitive.
- Enter a Password. Password maximum: 20 characters. The password may contain alpha-numeric and common keyboard symbols. Password is NOT case sensitive.
- Click Continue. The account is successfully created, and you can email login credentials to the rep.


Password recommendations:
- Contain at least 12 alpha-numeric characters
- Contain both upper and lower case letters
- Contain at least one number
- Contain at least one special character
- Never use a password from the previous 4 passwords
Send Rep an Invitation to create their own credentials
- On the member's Reps tab, click the name of the rep for which you wish to create credentials.
- Expand the Login Permissions for.. section
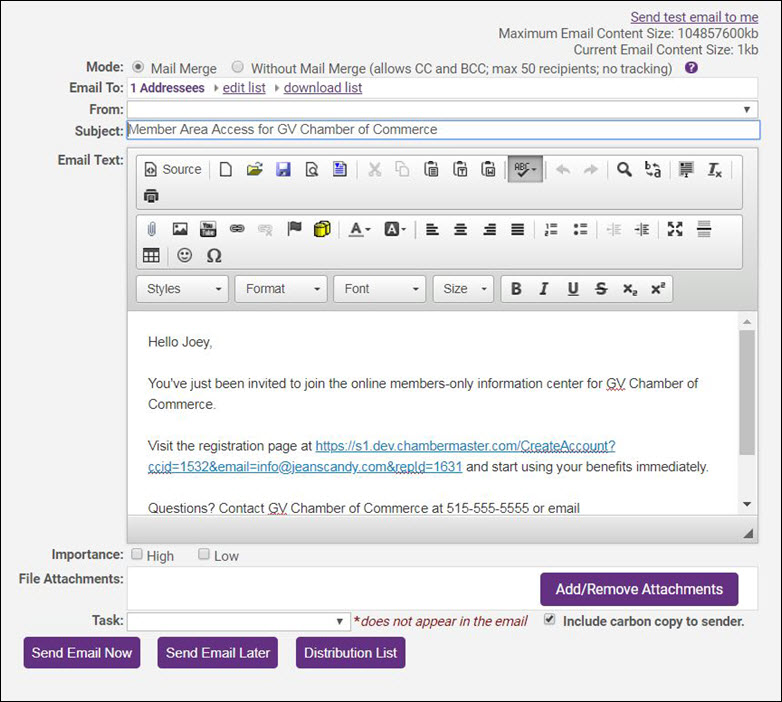
- Click send them an invitation. The email editor will open, with the Member Area Access email template. The template includes instructions for the rep to setup credentials. You may use the template as is or, edit as needed.
- Make any desired edits, and click Send Now.

Send a mass email invitation to create login account
Watch a video on how to send the "create account" email invitation.
- A mass email may be sent to your representatives inviting them to create a login and access the Member Information Center.
- Ensure that all representatives are marked with the proper role assignment. Look at the selection of Primary and Billing on the Members -> Reps tab in the Personal Information area for this role assignment.
- Hint: Run a custom representative report that includes the fields “Is Primary Contact” or “Is Billing Contact” to ensure you’ve assigned the desired role for each rep. Default permissions are assigned according to this role but may be changed or overridden later if desired.
- Select Communication in the left-hand menu.
- Click New Email to Multiple Members.
- Select the desired recipients
- Hint: Select representative email addresses using the choices under Add Representatives. If sending to a member email (choices under Add Members), the primary rep will be invited. Although this works, your member may be asked for more verification information.
- Click Edit with ChamberMaster / GrowthZone.
- Select the predefined template called “Create Login Account Invitation”.
- Add your own subject line and make desired changes if desired. No changes are necessary though – only if you desire. The personalized link in the email is what will allow them to create their login with appropriate permissions.
- Note: you may also create your own email and simply embed the personalize account creation link using the mail merge field title “Create Account Link”. Find this field by clicking Add Database Field, open the Rep Contact Information section, and select Create Account Link. This will populate with the specific registration link needed for each rep that receives the email. See this video starting at 4:20.
- Click Send Email Now.
- When the email is received and the personalized link is selected, the rep will be brought to a screen where they may create their own login and password. Their email address will be suggested as the Login Name. Or if not available, then another suggestion will be provided. They will be allowed immediate access to the Member Information Center.

If an account has already been created, the notification below will be displayed. They will be redirected to the login page or to the page where they can request a reminder.

How to Know if Your Rep Has a Login Assigned
- Click Members in the left-hand menu.
- Click the Reps tab.
- Scroll to the bottom of the screen. Open the section titled “Login Permissions for...”.
- Look to see if there is a Login Name listed.
- If not you can send an invite to your rep so they can create their own login.
NOTE: Customers that joined us before the winter of 2011 will only have a single member login enabled (one login per member found on Members->Web tab) unless rep logins have been assigned/created since then. Without rep logins, control of what is seen in the Member Center happens member by member – not rep by rep.
Login to the MIC as a Representative
At times you may wish to see what your reps see, or assist them within the MIC. You can easily "masquerade" as the rep:
- For the desired member, click the Reps tab.
- For the desired rep, click [login] adjacent to the name. You will be logged into the MIC as this representative.

|
|
IMPORTANT If the representative does not have credentials, the [login] link will not be available. |
Set Rep Login Permissions
Permission assignments allow you to limit the access the reps will have to the Member Information Center (MIC). Permissions exist to allow members to pay bills, change their company profile, post deals or jobs, view reports, modify their own information, and other. These permissions are grouped together in permission sets. Permission sets are a named group of individual rights that are granted to a rep.
Four permission sets are created by default but others may be created as needed. Click a section below to learn more. Using the automatic inherited rights assignment that is based on the role assignment of Primary, Billing, or Standard may be all you need. Four permission sets are available by default but others may be created as needed: These permission sets may also be modified to fit your specific needs but they may not be deleted.
- Primary permissions give all rights to everything in the Member Information Center. They also have rights to modify and create additional reps.
- Standard permissions only allow registration for events and to change their own login credentials. View only rights are available to the rest of the information. No rights are given to view reports.
- Finance permissions includes same rights as Standard permissions but additional rights to pay bills, access to the Business Information and to view reports.
- Prospect permissions include rights to change login/password but view only rights to their webpage and member information. This permission set is automatically applied to all reps that belong to a member with Prospective membership status.
NOTE: One additional set may appear in your list of permission sets. *MembertoRepTransition permissions set was created by the system during a short time period during September 2013. The set was created automatically when a member logged in with a Member Login and then was asked to create a Rep login with a goal of transitioning your members to a representative login. It applied only to those with Member Information Center v3 enabled at that time. This automatic creation has since been disabled and the process replaced with changes that occurred in the February 2014 software release. If you have any reps assigned to this set, feel free to leave them in that set if all is working correctly, or rename the set to something more meaningful to you or assign the reps to other sets that meet your needs better.
Understanding Inherited Permissions
For many users, the automatic inherited rights will be all that is ever needed to manage the permissions needed for your members to access the Member Information Center.
Watch a video describing how inherited permissions work ![]()
Inherited permissions will be granted by default based on the role assignment check-marks in the Personal Information section on the member's Reps tab.

A rep marked as Primary Contact will automatically be given the Primary permission set. A rep marked as Billing Contact will automatically be given the Billing permission set.
Create Custom Permission Sets
If the default permission sets of Primary, Billing and Standard are not sufficient, any rep may be assigned a custom permission set.
1. Create and assign a custom permission set.
2. Once a custom set is assigned, your override will be maintained. Changes to the role assignment checkbox will no longer change the permission to the inherited permission set.

Figure: Sample of how a custom permission set assignment appears
3. If automatic inheritance is desired instead of the custom permission set, change the permission set back to the default set that should be inherited. This rep will resume the automatic inheritance.

Figure: Sample of how inherited permission sets appear
Note: If you have Custom Set assigned to your reps and you are not sure why, watch this video – starting at 2:51 to hear an explanation of how to manage these sets that were imported after 2/21/2014 due to rep permission changes that happened.

Specific Rep Permissions
Reps may be limited in what they can access in the Member information Center by using permission assignments. These individual permissions are then grouped together and saved as a permission set and then assigned to a rep.
- Tip: Take advantage of the default permission sets that are already created. You may find that these already have your desired permissions selected or that minor tweaking will make them work great for your needs. These default sets in combination with automatic inheritance of these permissions will make handling permissions very simple. However, custom options are available if needed.
Definition of drop-down permission options:
- Read/Write – full access granted to this particular area
- Read Only – ability only to view this particular area
- Disabled – this particular is not visible at all
- Enabled – this area is available (same as Read/Write)
- Register Only – available only on the Events selection (same as Read Only but allows event registration)
Permission Checkboxes
The MIC permissions displayed are controlled by the global Member Login Area Options & Settings . Click here for more instruction on setting the available MIC permissions.
The checkbox must be selected in order to allow any permissions in this section. Removing the checkmark from Member Info would remove all access to the areas in that section. For example, "Member Info" must be selected to allow any permissions in this section.

Click Here to view a list and description of the permissions options.
Managing Rep Permission Sets
Create a Permission Set
Note: The permissions available here are controlled under Setup-> Member Login Area Options and Settings.
- Click Setup in the left-hand menu.
- Click Manage Permission Sets in the Member Options area.
- Click New Permission Set.
- Type the name of the new permission set in the Permission Set Name: field.
- Select desired permissions. Note: If individual items are enabled, make sure to also select the checkbox for the heading of that section.
- Click Save Permissions.
- Click Close.

View/Edit Permission Sets
To view the existing permissions assigned to a set:
- Click Setup in the left-hand navigation panel.
- Click Manage Permission Sets in the Member Options section. A list of all permission sets will be displayed.
- Make desired changes. NOTE: Changes made to the permission sets will update the permission for all members assigned to the set.
- Click Save Permissions.

Delete a Permission Set
When deleting a custom permission set, the rights assigned to a rep will be reverted back to their inherited permissions. NOTE: You are not able to delete the permission sets that have been provided on installation of the software.
- Click Setup in the left-hand menu.
- Click Manage Permission Sets in the Member Options area.
- Click the x at the end of the row of the desired permission set to be deleted.
- Click OK to the warning message.

The permission set is now deleted.
Assign a Permission Set
1. Click Members in the left-hand menu.
2. Select the desired member and click the Reps tab.
3. Select the desired rep.
4. Scroll to the bottom of the screen and open the “Login Permissions for …” area.
5. Click View and Manage Permissions.
6. Click OK to acknowledge that changes made to a permission set will apply to all reps assigned to that set and not just this individual rep
7. Make desired changes to the set or create and assign a new set to this individual.
8. Click Save.
Reporting on Assigned Permission Sets
A list of the assigned permissions sets is available when running the custom rep report.
1. Click Reports in the left-hand menu.
2. Type “custom” in the Report Finder Search field. Click Search
3. Click the green arrow in the Reports window to the right of the Custom Representative Report.
4. Click the category where the desired field is located in the list of Available Fields.
5. Click the check box in front of the desired fields, making sure to include the Rep Permission Set field under the Rep Contact Information category.

6. Continue following standard instructions for creating a custom report.
7. The report will display the assigned permission set.
Change Rep Permissions
- On the Rep's tab, click the desired rep name in the List of Representative area. The selected row will be highlighted in yellow.
- Scroll to the Login Permissions For... section on the Reps tab.
- Click the Change Set button.
- Select the desired permission set from the Permissions list.
- Click Save.


Modify Contact Information for a Rep
- On the Reps tab, click the desired rep’s name in the List of Representatives area. The selected row will show in yellow.
- Edit the fields in the Personal Information area.
- Click Save

Note: You can click copy business information to copy all contact information from the General tab to this rep. All fields are copied which include the phone numbers and email address.
Rep Bio Information
You may add bio information for a rep either from the database, or the rep may update their own information in the MIC. Personal Bios will only be displayed if the rep is in a group which displays publicly, not member web pages in the directory. 1000 characters max.
Click here for more information on how to set up display of bio information for groups.
|
|
NOTE: When creating a Personal biography, if the 1000 character limit has been reached, a message will appear indicating the total you've reached (which includes HTML markup) so you can reduce your amount by that many. This occurs for either staff in the back office or members in the Member Information Center. |
Remove/Inactivate a Rep
Inactive status is reserved for a rep who is no longer acting as a representative for the member. The rep’s information and history will be retained but there is a separate distinction given to them in reports and lists. Removing a rep should be limited to a rep that was created by mistake. History and all reference to this rep would be removed.
- For the desired member, click the Reps tab.
- In the Lists of Representatives tick the check-box for the rep you wish to in-activate/remove.
- Click the Remove/Inactivate Reps link.
- Choose one of the following options:
- Set rep as inactive and leave in current groups: This option will set the rep as inactive (and deactivate MIC log-in credentials), but leave the rep in any groups he/she is participating in.
- Set rep as inactive and remove from groups: This option will set the rep as inactive (and deactivate MIC log-in credentials), and remove from any groups he/she is participating in. This will remove from ALL groups.
- Set rep as inactive and inactivate in groups: This option will set the rep as inactive (and deactivate MIC log-in credentials), and deactivate in any groups he/she is participating in. When deactivated in a group, the rep would not receive email notifications sent to the group. This will deactivate in ALL groups. If you wish the rep to remain active in certain groups, select this option, then reactivate in the individual groups.
- Delete rep records and remove from groups: This option will permanently delete the representative. This is not recommended practice, as historical information is maintained about reps in the database, and all will be deleted. If deleted, and you wish to restore, GrowthZone can do so, but fees will be applied.
- Click Continue.
Reactivate a Rep
- On the Reps tab, click the the name of the rep you wish to re-activate.
- In the Personal Information section on the Reps tab, click to the Rep is currently active with this member check box.
- Click Save.


The rep may need to be reassigned to groups if the rep was originally removed from groups when inactivated. Note: Representative History will keep track of the members that this rep has been assigned. To view the history, locate the rep under Members->Reps tab. Open the Personal Information area and click History which is located after the “Rep is currently active with this member” checkbox.
Reassign a Rep
Once a rep is in the database, they may be reassigned to another member instead of deleting and then recreating the rep as this would eliminate any history and group associations.
- On the Reps tab, click the check box in front of the desired rep’s name in the List of Representatives area.
- Click Reassign Selected Reps.
- Click Assign to a different member or Assign to no member Community Member. See Community Member for more information.
- Click Continue.
- If Assign to no member Community Member was selected, the task is complete. If Assign to a different member was selected, click the desired member in the Member Look-up screen.

Note: Representative History will keep track of the members that this rep has been assigned. To view the history, locate the rep under the Members & Reps tab. Open the Personal Information area and click History which is located after the “Rep is currently active with this member” checkbox.
Add Custom fields for a Rep
Custom Fields are designed to give ultimate flexibility in managing your data. When adding a custom field, you will create a database field that is available across all member records for tracking additional desired information.
Custom Field Types
- Text: Displays a field where text can be entered. Maximum size: 8000 characters
- Boolean (True/False): Displays a check box that can be selected or cleared.
- Date/Time: Displays a field where a date can be entered in many formats i.e. 9-7-06, 9-7-06, Sep 7 2006, Sep 7 06, 9/7/06 but once saved, will always display in the following format: 09/07/2006
- Number - Integer: Displays a field where whole numbers may be entered. Maximum size: 10 whole numbers
- Number - Decimal: Displays a field where numbers with up to 2 decimal values may be entered. Maximum size: 14 whole numbers, 2 decimal values
- Drop Down List: Displays your designated list of options that may be selected.
Add a Rep Custom Field
- On the member's Reps tab, expand the Custom Fields section if needed.
- Click Add/Edit Custom Fields.
- Click Add a Field.
- Type desired field name (maximum characters: 128)
- Click the Data Type arrow.
- Choose the desired data type.
- If the selected data type is Text, type the desired Text Size.
- If the selected data type is Drop Down List, enter the desired list of items.
- Enable MIC Search if you wish your members to be able to search for on this field in the MIC.
- Choose the permission members have to this field. Set the field to disabled to not display this field in the MIC; set to Read if the member should be able to see this field, but not be able to change it; set this field to Read/Write if the member should be able to see and change this field.
- Click Continue.
- Click Save & Exit.


Edit a Rep Custom Field - Drop down list
If you wish to add additional options to a custom field that has been setup as a drop-down list:
- On the member's Reps tab, click the Add/Edit Custom Fields in the Custom Fields area.
- Click the Edit Items link for the field you wish to update. The edit items link is only displayed for custom fields that have been setup as Drop-down.
- Enter the additional choices you wish to include in the drop-down list. NOTE: 3 textboxes are available by default for your choices, if additional choices need to be added, click the
 icon.
icon. - Click Continue.
- Click Save & Exit.


Remove a Custom Field
- On the member's Reps tab', click Add/Edit Custom Fields in the Custom Fields area.
- Click the check box at the end of the row of the Field Name that you wish to remove.
- Click Remove Selected Fields.
- Click Save & Exit.
NOTE: All data in the custom field will be deleted.
Rename a Custom Field
- On the member's Reps tab, click Add/Edit Custom Fields in the Custom Fields area.
- Click in the text of the Field Name.
- Make the desired field name change.
- Click Save & Exit.
Change the Sort Order for Custom Field Display
- On the member's Reps tab, click Add/Edit Custom Fields in the Custom Fields area.
- Click and drag the field to the desired location.
- Click Save & Exit.
Send Email to Rep(s)
Send Email is an option located multiple places throughout the software. The Send Email button on the Reps tab is used to generate a quick email to a particular representative(s).
Send an Email to an individual Rep
- On the Reps tab, click the desired rep’s name in the List of Representatives. The selected row will show in yellow. Or click the checkbox in front of the desired representative name.
- Hover over Send email and select Email with ChamberMaster / GrowthZone or Email with Outlook. See Email Sending Options for more information.
- If selecting Email with ChamberMaster / GrowthZone, complete the Send an email screen OR if selecting Email with Outlook, complete your own email screen and send using your own familiar steps.

Send an email to multiple reps
- On the member's Reps tab, click to select the check mark in front of the desired reps to be emailed in the List of Representatives area.
- Hover over Send email and select Email with ChamberMaster / GrowthZone or Email with Outlook. See Email Sending Options for more information.
- If selecting Email with ChamberMaster / GrowthZone, complete the Send an email screen OR if selecting Email with Outlook, complete your own email screen and send using your own familiar steps.
-MemberManagement.1.35.2.jpg)
Print label for a Rep
Printing labels is a function you can do in multiple places throughout the software. The Print Labels button on the Reps tab is used to generate a quick label to a particular representative.
- On the member's Reps tab, click the desired rep’s name in the "List of Representatives" area. The selected row will show in yellow.
- Click Print Labels.
- Complete the Mailing Labels screen.
- Click View/Print Labels.
- From the File menu, click Print. Make desired selections and click OK.

Note: The label data may be downloaded to a comma separated value file by selecting "Download Labels".
Set Display Preferences for a Rep
The Display Preferences for a rep determine what other members see about this rep in the Member Information Center (MIC) or what should the public see about them in the public directory listing. Select the display preferences for this representative. The Display Preferences can be configured in the database, and/or the rep may view and modify the selections in the MIC under Personal Information. The members' ability to set these selections depend on the Permission setting titled Individual Profile.
- On the member's Reps tab, click the desired rep’s name in the "List of Representatives" area. The selected row will show in yellow.
- In the Display Preferences section, select what information to display publicly, and what information to display in the MIC.
- Click Save.

NOTE: Defaults for these setting can be specified under Setup > Define Default Rep Preferences in the Member Options section.
Manage Rep Group Participation
Member representatives may be grouped together to assist office staff in working with these reps as one entity. For instance, a task force designed to work with technology may belong to a group named Technology Task Force. When a mailing goes out to these individuals, you may select the Technology Task Force group and generate mailing labels specifically for these members. These groups are created in the Groupsmodule. Once created, reps may be assigned to these groups either in the Groups module or in the Members module on the Reps. tab.
Click Here for further information on creating groups.
Assign a Rep to a group
- On the member's Repstab, click the desired rep’s name in the List of Representatives area. The selected row will show in yellow.
- Click Join a Group in the Group Participation area.
- Click the desired group name in the Choose Groups list.
- Click the top double-headed arrow to move the desired group to the Selected Groups list.

Click Continue..
Remove a Rep from a group
- On the member's Reps tab, click the desired rep’s name in the List of Representatives area. The selected row will show in yellow.
- Click to select the check box in front of the Group Name that you wish to remove.
- Click Remove Rep from Selected Groups.
- Click OK.
Disable a Rep within a group
Reps that are disabled will not receive communication when this group is selected to receive an email. Using the Disabled selection is a good way to remember groups that a rep has participated in but not included them in mailings at this time.
- On the member's Reps tab, click the desired rep’s name in the List of Representatives area. The selected row will show in yellow.
- Click the name of the group that you wish to disable for this rep.
- Click to select the >Disable in this groupcheckbox.
- Click Close.

Note: Disabled reps will not display by default when viewing the Group roster in the Groups module. Click Show Disabled Group Members.
Impersonate a representative in the Member Information Center
Staff may “impersonate” a representative in order to see what the rep would see in the Member Information Center and perform tasks on their behalf.
- Click Members in the left-hand menu.
- Click the Reps tab.
- Click the desired rep in the list of Representatives.
- If the representative has a login and password assigned to them and “Allow login to MIC” is selected as a permission in their assigned permission set, then a [Login] link will appear after the representatives’ name.

- Note: If the representative does not have a login see Creating Rep Login/Password
- Click the Login link next to the representative’s name.
- The Member Information Center (MIC) will open in a new browser window where you can function as if you were that representative. This will allow you to change settings, pay bills, or view things as they would see them. A reminder of your impersonation is displayed at the top of this screen.
- When finished, close that browser window instead of choosing the Member Info Center Logout choice. This way you will remain logged in as the staff person in the original browser window.

Manage Member Account Information
Manage Billing Contact
Add a New Billing Rep
- On the Account tab, click select a billing rep in the General Information area. NOTE: This options is only available when a billing rep has not previously be selected.
- Click the desired rep name in the Choose a representative list box. If the desired rep is not listed, you may add a rep to this list by selecting Add a New Rep
- Click Continue.

Change a Billing Rep
- On the member's Account tab, click Change Billing Rep in the General Information area.
- Click the desired rep name in the Choose a representative list box.
- Click Continue.


Remove a Billing Rep
- On the Account tab, click remove billing rep in the General Information area.
Notes and Tips:
- The Billing rep may also be selected or removed on the Reps tab. The checkbox "Billing Contact" under "Personal Information" can be selected there instead of making the change on the Account tab
- The Billing rep and their billing contact preference may also be selected/changed by the member in the Member Information Center if they have the proper permissions.
- The address of the Billing rep is the address that invoices are sent to by default.
- Integrated billing: If a Billing rep is changed to a different person or a different address after an invoice has been created, the old invoice will not automatically be updated with the new address. To update the old invoice to the name/address of the new Billing rep, click into the invoice, click edit in the "Bill To:" box, and click "choose rep" and select the appropriate new name.
Modify Billing Renewal Month
Renewal month is the month that the member begins their membership term with you. It is also used when selecting which members should be included in the invoice batch – select members by renewal month.
Note: Each fee item may also have a designated Renewal Month making it so you can invoice the membership fee on a particular month and other recurring fees on another month. This field is only setting the default value for their account.
- On the member's Account tab, click the Renewal Month arrow to drop-down arrow.
- Click the desired month.
- Click Save.

Editing/Assigning Recurring Fees and Dues
Fees/dues assigned to the member can be set as recurring regularly or added as something to invoice only one time. Once they have been assigned to their account, they can be invoiced under Billing->Invoices (Integrated Billing) or under QuickBooks->Recurring Invoices.

NOTE: The Next Billed column in the Membership Fees and Dues area reflects the name of the monthly batch that this fee/due will be included in or already has been included in. This column will automatically display the next billing month when the current date passes that month. For instance, if the current date is February 2017 and a fee/due is set to be billed in February 2017, the Next Billed column will display February 2017 until March 1, 2017; then it will automatically switch and display February 2018. To see if a particular fee/due has been billed, refer to the transactions displayed in the Transaction History area.
Adding a Fee or Due to a Member’s Account
- On the Account tab, click Assign Fee Items in the Membership Dues and Fees area.
- In the Fee item list, select the appropriate fee or due.
- Enter a Description of the fee item.
- Accept or over-write the default Fee Amount. The default value is the fee amount associated to the item when it was first created.
- Quantity - enter the quantity of this fee item.
- Select the Billing Cycle. The cycle selected will drive the frequency at which the fee item will be billed. For example, if the fee item is $1200 and you select monthly, $100 per month will be the monthly recurring fee item.
- Select the renewal month from the every drop-down list.
- Select the Status of this fee item. See below for information on setting up a fee In Date Range.
- Select the contact to whom the invoice for this fee item should be sent from the Bill To: drop-down list.
- Charge to ACH, debit or credit card: Click the radio button if you wish to automatically charge this fee item to a credit card, or to a bank account. Click here for further information on setting up e-payments.
- Click Save & Exit.

NOTES:
- To make sure this fee item is included in the recurring invoice batch, set the Billing Cycle to a frequency of Annual, Semi-Annual, Quarterly, or Monthly.
- In the Standard edition or below, fee item frequency starts on the Renewal Month specified on the Members account and does not have an option within each fee assignment for a different month.
- If the Status on a Fee Item is set to Active in Date Range, (only available with Plus edition or greater) an option is available to place a start date and expiration on a fee item.
- Charge to ACH, debit or credit card selection displays options for setting the fee to be automatically billed.
Change a Member's Next Bill Date
- For the desired member, click the Account tab.
- In the Membership Fees & Dues section, click the hyper-link for the fee item you wish to change.
- From the Status list, select Active in Date Range.
- Click the calendar icon to select a new month & year for the recurring fee.
- Click Continue.
- Click Save & Exit.


Change Membership Dues Billing Frequency
In cases where the member or your organization wishes to change the frequency at which a member is billed this can be done on the member's account tab. For example, if a member is currently being billed annually and you wish to change them to monthly.
- Select the member's Account tab.
- In the Membership Fees & Dues section, click the name of the fee/due that you wish to change.
- Select the desired frequency from the Billing Cycle list. IMPORTANT: The price of the dues should remain set to an annual price. If you are changing the frequency to something other than annual, the system will do the math.
- Make any additional updates as needed.
- Click Save & Exit.


|
|
NOTE: If you are changing an annual frequency to monthly, this will result in you being prompted to create an invoice each month. This does NOT result in a monthly payment against an annual invoice. |
Removing a Fee or Due
- On the Account tab, click to select the check box in front of the fee/due that you wish to remove.
- Click Remove Selected Fee Items.
Editing Fee or Due Information (for this member only)
- On the Account tab, click the name of the fee/due that you wish to edit.
- Edit the desired fields.
- Click Save & Exit.
Note: Fees can be modified for all users globally under Setup->Fee Items List (Integrated Billing) or under QuickBooks->Fee Items tab.
Assign Fee with Start and Stop Date
Note: This applies to users with Plus Edition or greater
While creating or modifying a Fee Item assignment on a Member’s account, a Status of Active in Date Range may be specified. This will allow a start date and expiration date to be assigned to this particular Fee Item.

Assign Fee Item for Automatic Recurring Credit Card or ACH
With stored payments enabled, members who are paying online for membership or simply an event registration will have the option to save their credit card information. The next time they need to make a payment they can select a saved card and that will save them the time spent entering that information. All credit card information is stored within Authorize.Net's Customer Information Manager (CIM) which provides a secure method of storing credit/debit card or bank account information.
As an added benefit with saved cards/bank accounts enabled your staff can setup a member's account to automatically bill their saved card for their membership dues.
|
|
IMPORTANT: Assignment of a credit card for recurring fees is only available if you are using GrowthZone Pay or Auth.net CIM enabled as your credit card processor. ACH is only available for US Customers. |
- For the desired member, click the Account tab.
- Expand the Membership Fees & Dues section if needed.
- Click the link for the membership you wish to tie to a payment profile.
- Tick the Charge to ACH, debit or credit card check-box.
- In the Add/edit Epayment profile list, select an existing payment profile OR click Add/edit Epayment Profile to add in credit card or bank account information.
- If you have enabled auto-charge (GrowthZone Pay only), enter the Day of the month to charge. The day will default to the day you have defined in setup.
- Click Save.
You can allow your members to save their payment information for re-use and you can setup their dues billing to use that saved information as well.
Check a Member's Current Balance
The General Information area on the Account tab contains standard account settings such as renewal month, billing contact, billing notes, preference for output and a field displaying an automatically updated balance

The Current Balance displays the sum of all invoices and payments recorded. Balances displayed in red indicate an amount owed. Balances displayed in black indicate payments that meet or exceed current invoice totals.
Voluntary fees, if any exist, will not be included in the Current Balance but will display separately next to the balance amount, as shown above.
(QuickBooks CQI only) Balances will display the word UNKNOWN when using with QuickBooks CQI. An update of the balance has not taken place yet. Click Refresh QuickBooks data to update the account balance for this member. The connection to QuickBooks must be functioning properly for the balance to refresh.

Invoice a One-Time Item
- On the Account tab, ensure that the one-time fee has been added in the Membership Fees and Dues area. If not, click Assign Fee Items and add the one-time fee.
- Click invoice now in the Frequency column for the desired one-time fee.
- Edit the Invoice Options fields or make desired changes to invoice fields. CQI Users Only: Ensure that the check box(es) in front of the desired invoice items are selected. You may click to select any or all one-time fees to be included on this invoice.
- Click Create Invoice Now (CQI) or click Save (Integrated Billing). The invoice is automatically created at this time.


Note: If connected via the CQI, the QuickBooks connection must be active in order to complete this transaction.

- Figure 3: Invoice One-Time Item (Integrated Billing example)
Viewing transaction history (QuickBooks using CQI)
Invoice Activity (QuickBooks integration only) Invoice Activity displays all invoices for this member by reading QuickBooks data (QuickBooks integration only). Invoices are not generated here but the list can be sorted, printed, or downloaded. With QuickBooks Integration you may need to click Refresh QuickBooks Data in order to view the current list of invoices.
Figure 5-18 Invoice Activity (QuickBooks integration only) Sort the invoice list 1. On the Account tab, click the heading of the desired column in the Invoice Activity area. The screen will refresh and be sorted in ascending order according to the selected column. With QuickBooks integration, you may wish to update the invoice list by selecting Refresh All Invoices/Payments at the bottom of the screen or by clicking Refresh QuickBooks Data at the top of the screen. Print the invoice list 1. On the Account tab, click Print Invoice List in the Invoice Activity area. 2. The desired output will display on the screen. On the File menu, click Print or click Print at the bottom of the screen. 3. Click to select the desired printer and click Print. 4. Click Close. Download the invoice list 1. On the Account tab, click Download Invoice List in the Invoice Activity area. 2. Follow the prompts on your screen to either open or save the Comma Separated Value (.csv) file. If the data is displayed immediately, you may wish to select Save from the File menu to ensure this data is available for viewing at a later time. Payment Activity (QuickBooks Integration only) With QuickBooks Integration you may need to click Refresh QuickBooks Data in order to view the current list of payments. If the member has never been created in QuickBooks, member synchronization must happen first. See Chapter 5, “Manage Account Information” - - General Information, Synchronization for more information. Payment Activity displays all payments for this member by reading QuickBooks data (QuickBooks integration only) or from the integrated billing program. Payments are not entered here but the list can be sorted, printed, or downloaded.
Sort the payment list
With QuickBooks integration, you may wish to update the payment list by selecting Refresh All Invoices/Payments at the bottom of the screen or by clicking Refresh QuickBooks Data at the top of the screen. On the Account tab, click the heading of the desired column in the Payment Activity area. The screen will refresh and be sorted in ascending order according to the selected column.
Print the payment list
- On the Account tab, click Print Payment List in the Payment Activity area. The desired output will display on the screen. On the File menu, click Print or click Print at the bottom of the screen.
- Click to select the desired printer and click Print.
- Click Close.
Download the payment list
- On the Account tab, click Download Payment List in the Payment Activity area.
- Follow the prompts on your screen to either open or save the Comma Separated Value (.csv) file. If the data is displayed immediately, you may wish to select Save from the File menu to ensure this data is available for viewing at a later time.
Transaction History (Integrated Billing)
Transaction History displays all invoices, payments, credits, and sales receipts from integrated Billing. New invoices, sales receipts, payments, and credits may be created here by those with Finance or Administrator permission.

- Transaction History (Integrated Billing Only)
Sort the Payment List
1. On the Account tab, click the heading of the desired column in the Transaction History area. The screen will refresh and be sorted in ascending order according to the selected column. Click the column title again to sort in descending order.
Filter the Transaction History view
1. On the Account tab, click the arrow in the View dropdown list. Select the desired view selection.
2. Click more… to view transaction from a different date range.

- Filter Transaction History
Edit Member Web Display Information
Information and settings related to the member’s online directory listing is modified on the Web tab. Changes made here are automatically reflected in the online directory. The member may also modify these items in the Member Information Center (with proper permissions).
Edit Web Contact Information
If the Web Contact Information is dimmed, the company information is being pulled from the General tab and cannot be changed here. Make editing changes on the General tab in the Contact Information area. If the Member Information page in the Business Directory should display different information than the Contact Information on the General tab, click to clear the Use Company Information check box.
- On the Web tab, edit the fields in the Company Information area.
- Click Save.

Edit Member Social Network Services
Social Network Services with a check-mark will be displayed on the Member Information Page.
- Click the check-box for the Social Network to be displayed
- Enter desired links.
- Click Save.
| NOTE: The available social networks may be configured under Setup > General Options & Settings. |
Update Member Web Display Participation Options
Select Basic or Enhanced Listing
There are three levels of participation in the online directory: Non-member, Basic Package, and Enhanced Package. The level chosen determines what selections will be available in the Web Participation Options area, the Web Description / Text Content area, and the Web Photos & Images area on the Web tab. The default level is the Basic Package but may be upgraded to Enhanced Package or downgraded to the Non-Member selection.
- Non-Member: Non-members may have their business name, address, and phone number displayed in the online directory search results but their business name cannot be hyperlinked to their Member Information page. Only three Display Attributes are available for Non-Members: Does not Display on Web , Hide Social Networks and Web Link on Search Results. Check the Does Not Display on Web check box if this member should not display in the online directory search results. Check the Web Link on Search Results check box if this member should have a Visit our website link in the search results. Web Description/Text Content may be completed but will not be displayed on the web site. The Non-Member Web Participation package is not automatically selected when Non-Member Membership Status is selected on the General tab. These selections are made independently.
- Basic Package: Members belonging to the Basic Package may have their member name, address, and phone number displayed in the online directory search results and may choose to have their business name hyperlinked to their Member Information page. All Display Attributes are available to members in the Basic Package. The Web Description / Text Context area includes the following fields: Description, Hours of Operation, Driving Directions, and 240 characters for Keywords. Web Photos and Images are not available.
- Enhanced Package: Members belonging to the Enhanced Package may have their member name, address, and phone number displayed in the online directory search results and may choose to have their member name hyperlinked to their Member Information page. All Display Attributes are available to members in the Enhanced Package. The Web Description / Text Content area includes the following fields: Description, Results Summary, Hours of Operation, Driving Directions, Additional Bulleted Description, and unlimited characters for Keywords. All Web Photos & Images selections are available which include a search results icon, logo image, a photo gallery, video, and a map image selection. This option is available if you have purchased the Pro or Premier edition, or the Marketing Add-on package.
Upgrade Web Participation to Enhanced
| Note: The Enhanced Package is only available in the Pro or Premier Package, or to those who have purchased the Marketing Package add-on. Refer to http://www.chambermaster.com/pricingFeatures] for updated products and pricing. . |
- On the Web tab, click the Web Participation arrow in the Web Participation Options area.
- Select Enhanced.
- Click Save.
Configure Display Attributes (Web Participation Options)
Display Attributes determine the display options in the online directory and settings in the Member Information Center area. Display Attributes.
To edit the Web Participation Options:
- On the Web tab, select the check box in front of the desired attribute.
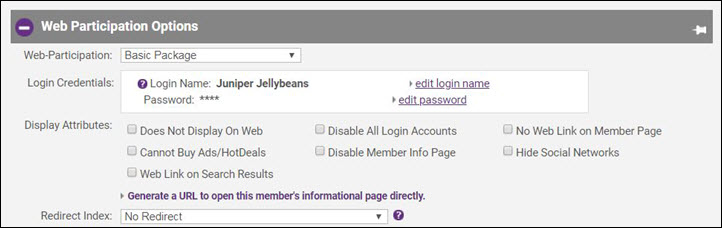
- Does Not Display on Web: Member will not display in the online directory
- Disable Login: Access is denied for this member and all their reps to the Member Information Center
- No Web Link on Member Page: Members web site link will not display on their Member Information page
- Cannot Buy Ads/Hot Deals: Member is denied access to purchase Ads/Hot Deals in the Member Information Center
- Disable Member Info Page: Member will be displayed in the Business Directory but they will not be hyperlinked to their Member Information Page
- Hide Social Networks: Members’ social network addresses will not display on their Member Information Page
- Web Link on Search Results: Member will have a Visit our website link displayed in the online directory search results.
- NOTE: When Web Participation is set to Non-Member, only three Display Attributes are available: Does Not Display on Web, Hide Social Networks and Web Link on Search Results.
- Click Save.

Generate Member Info Page URL
This function allows you to generate a URL to open this members information page directly.
- On the member's Web tab, click Generate a URL to open this member’s informational page directly in the Web Participation Options section.
- Click Generate Link.
- Triple-click the generated link text to select it.
- Right-click the highlighted selection and select Copy.
- Click in the desired location, right-click and select Paste.
- Click Close Window.


Set the Redirect Index
The Redirect Index indicates where a website visitor is directed when the Member Information Page URL is accessed. When the member is active, this selection should be left with the “blank” selection. The “blank” selection allows the member page URL to be accessed from any location (from the associations’ website or from other place that links directly to the member page.)
The Redirect Index is automatically set to 307-Temporary Redirect to Business Directory when a member is changed to Dropped status. This selection may then be changed to any other selection as desired while the member is in dropped status.
This is particularly useful so that dropped members do not continue to promote their Member Information Page as a website for their customers.
- On the member's Web tab, open the Web Participation area.
- Select the desired Redirect Index from the drop-down.
- Click Save.


Edit Web Description and Text Content
Note: Members may also modify this web display information in the Member Information Center.
- On the Web tab, edit the fields in the Web Description/Text Context area.
- Click Save.
Add Web Photos and Images
NOTE: For members who have been assigned an Enhanced Package, images and videos may be added. Basic Package does not include this feature. The GrowthZone Marketing package is required to have the enhanced option.
Add a logo or Member Information page image
- On the Web tab, click Add Image in the Action column of the Image Type that you wish to add in the Web Photos & Images area.
- Note: Enhanced members may add photos and images. Non-member and Basic package participants do not have this feature.
- Type the path and file name of the desired graphic file or click Browse to locate and click Open when desired graphic is located.
- Click Upload Image.
- Click Close Window.
Add an icon to the search results
- On the Web tab, click Enable in the Action column of the Search Results Icon in the Web Photos & Images area.
- Click Add Image.
- Type the path and file name of the desired graphic file or click Browse to locate and click Open when desired graphic is located.
- Click Upload Image.
- Click Close Window.
- Note: Search Results logo will only display if enabled for your members under Setup > Member Login Area Options and Settings. Make sure Search Results Icon is set to Enabled under Menu Items & Permissions.
Remove a logo, photo, search results icon, or an uploaded map image
- On the Web tab, click Remove Image in the Action column of the Image Type that you wish to remove in the Web Photos & Images area.
Change an existing logo, photo, search results icon, or an uploaded map image
- On the Web tab, click Change Image in the Action column of the Image Type that you wish to change in the Web Photos & Images area.
- Type the path and filename of the desired graphic file or click Browse to locate and click Open when desired graphic is located.
- Click Upload Image.
- Click Close Window.
Disable the search results icon
- On the Web tab, click Disable in the Action column of the Search Results Icon image type. Note: if an image was already uploaded for this Search Results Icon image Type, it will not be removed, only disabled.
Adding Mapping Information
Adding a Map Image
- On the member's Web tab, click Uploaded Image in the Web Photos & Images section.
- Click Add Image in the Action column.
- Type the path and file name of the desired graphic file or click Browse to locate and click Open when desired graphic is located.
- Click Upload Image.
- Click Close Window.
- Click Save

Add a Google Map to the Member's page
Google Maps are integrated into the online directory and will automatically display a map pin at the location of your identified address. This location, the description on the map pin, and whether the pin even displays may be modified.
- On the member's Web tab, expand the Web Photos & Images section if needed.
- Click Google Maps in the Web Photos & Images section.
- The page will refresh, expand the Search Results Map Information section if needed.
- Click the Show on Business Directory radio button in the Search Results Map Information section.
- Choose Physical Address from General Tab to use the address entered on the general tab, or select Custom from the drop-down list to enter an address. The map will populate the location based on the address you have entered. If needed, drag the marker to refine your position on the map.
- Click Save


You may also manually set the coordinate of a location:
- On the member's Web tab, click Manually Set Coordinates.
- Enter appropriate GPS coordinates or manually drag the map pin to the desired location. Click the Look Up hyper-link to look up coordinates.
- Click Save.
Send Email to Members to Update Contact Information
Keeping your members records up to date can be time-consuming. Your ChamberMaster/MemberZone database includes an email template, Update Your Membership Listing, that you can send to your members, requesting that they update their information via the MIC. The template includes the contact information for the organization, the names of the associated representatives, and basic public listing information. Within the template, your members will also find a link to easily log into the MIC. The template can be used as designed, or you may customize it to meet your organization's needs. See Working with Email Templates for further information on sending emails using templates.

Manage Member Categories
Assign Member Categories
Categories can be assigned to your members on the member's Advanced tab.
- For the desired member, click the Advanced tab.
- In the Directory Categories section, click the Assign Categories button.
- Select the categories to which you wish to assign the Member. NOTE: The first category you select will be marked as the members primary category.
- Click Save & Exit.


Change Member Primary Category
- For the desired member, click the Advanced tab.
- Tick the checkbox for the categories from which you wish to remove the member.
- Click Remove Selected Categories.

Remove Member from Categories
- For the desired member, click the Advanced tab.
- Tick the radio button for the category you wish to mark as primary.

Manage Member Communications
Log a Call or Note
- On the Communication tab of the desired member, click New Communication.
- Click Log a Call or Note.
- Date of Call - Type the date that the communication occurred. The current date automatically displays but can be edited. Optionally, you may click the calendar icon and select the desired date.
- Member Rep - Select the name of the member representative that communication was with. Clicking not in list will allow you to add another member representative to the database.
- Association Rep - Select the staff person who communicated with the member. If the staff person is not in the list, they may be added by selecting Chamber Employees/Reps from the Setup menu prior to selecting Log a Call.
- Task - Select a task item that indicates the nature of this communication. New task items can be created by selecting Add a New Task Type in the edit task options. These task items are then available as a Task item across all member records. The ability to add new task items is only available to staff with Administrator level permissions.
- Subject - Type a subject for this call. The Subject is used as a title for this entry. Leaving this field blank results in a title of [not specified], and cannot be changed later. (Maximum characters = 100)
- Notes - Enter notes for this communication.
- Click Save & Exit.


|
|
NOTE: It is not possible to log a note for multiple members simultaneously, but, by creatively using Form Letters you can achieve the same outcome. Click here to view a video on how this is done. |
Send an Email
Sending an email may be done multiple places throughout the software, any of which will automatically create an entry in the communication history. However, if sending to a single member, choosing Send an Email on the Communication tab streamlines the process by automatically selecting the current member’s email address.
- On the member's Communication tab, click New Communication.
- Click Email with GrowthZone/ChamberMaster or Email with Outlook.
- If selecting
- Email with GrowthZone/ChamberMaster, edit the desired Send an Email fields. See Figure 4-3 and Table 4-2.
- If selecting Email with Outlook complete your own email screen and send using your own familiar steps. See Email Sending Options” for more information.
- Click Send Email.
NOTE: Selecting to include a carbon copy to sender allows a staff person the ability to store and file emails in their own email program and also the ability to view the email as it will be seen by the recipient.

Select the email address for the one who should receive this email. Names and email addresses displayed here are pulled from the Contact Information area on the General tab and the individual rep’s email addresses on the Rep tab. Edit these locations to change the email addresses displayed here. The email address from the General tab is the default address displayed.
Create and send a letter or fax
You can create and print letters and fax output using the selection Form Letters under the Communication module. See Creating a Letter and Create and Send Fax Output.
Refer a member using eReferral
The eReferral is designed to accomplish two tasks with a single entry - getting desired member information to a consumer while letting the member know that they’ve been referred.
Pertinent consumer information is entered and then the eReferral tool is used to generate an email message or printout that includes the selected member(s) contact information in referral format.
You can then choose to pass along the consumer's information to the members you referred. Through a separate optional email message, your member(s) are informed that their business information was passed on to an interested consumer. In turn the consumer's information is provided to your members so they can, if they so choose, provide additional outreach to that consumer.
Why use eReferrals?
eReferrals allow you to show give your members' information to consumers when they ask for it. At the same time you can choose to send that consumer's information to your members giving them a lead.
Every eReferral is recorded allowing you to show your members the value that you are giving them. Each referral means you are pointing customers to their business.
Take for example, a consumer that calls and asks for a list of restaurants in your area. You enter their contact information in the eReferral screen. After selecting the Restaurant category members as your designated recipients, you click one button to email the detailed restaurant list with addresses, phone numbers, and web site address to the consumer. Then you click one additional button to send an email to the restaurant members with a message indicating that they have been referred. All these steps are handled under one screen.
If you don't want to send an email to your members that's no problem. You can still record that you referred a member to them so they can see or be shown the added benefit of their membership with your association.
Send and Record an eReferral
- Click the Add button at the top of your database.
- Choose eReferral

Details
- Click the Add button at the top of your database.
- Choose eReferral
- Enter in as much or as little Potential Customer information as desired.
- Select the members you wish to refer.
- You can select members by name or category. You can also select specific representatives by name or by group.
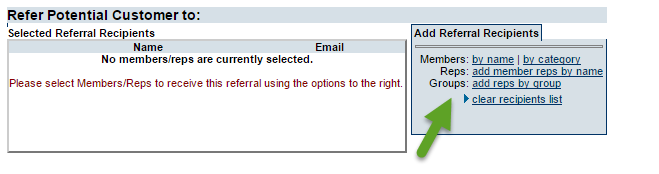 Add Referral Recipients
- When selecting members by name or category you can expand the advanced filter section and filter by boolean type (checkbox) member custom fields.
 eReferral Advanced Filter Options
- Check off and remove any records you wish to exclude by clicking Remove Selected Recipients
- Click Preview final referral recipients list with options to print/email potential customer
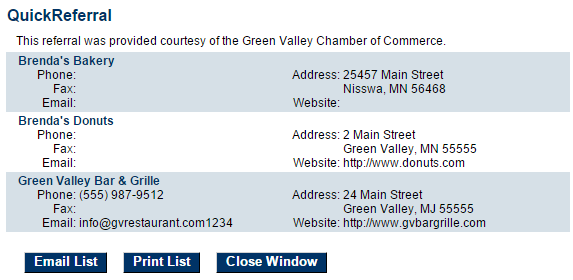 View, Print or Email the referral information
- Review the information and at the bottom you can print or email this list to the potential customer.
- In the Referral Recipient Options you can select the desired Lead Source (see eReferral Settings below to set up lead sources)
- Check or uncheck Send email to Referral Recipients
- Checked will send an email using the options below to those being referred and will record it in the member's communication history.
- Unchecked will just record the eReferral in the member's communication history and will not send an email to your members.
- Adjust your Email From, Include Carbon Copy, Subject Line and modify your Message with details about the potential customer if desired.
- Click Send and Record Referral or Record Referral


Change Default eReferral Settings
- Click Setup on the main left menu.
- In the Information Request section click eReferral Settings/Options
- Specify the default eMail From:
- Customize the default subject and message for the email being sent to your members.
- Customize the default subject and message for the email being sent to the consumer.
- If you are using multiple lead sources edit your list of lead sources.
- The first item in the list will be the default lead source.
- Lead source list can be blank. This is an optional field.
- Click Save and Exit
Create a reminder
Follow-up reminders may be specified for any communication history item which will display as a Reminder in the Task List on the designated date. Follow-Ups may be designated for another staff member to complete by selecting the desired Rep on the Follow-Up entry.

Add a Follow-up to an existing entry
- Find the desired communication that requires a follow-up on the members’ Communication tab.
- If no follow-up entries currently exist, click add follow-up in the Follow-up column on the Communication tab. If follow-ups entries already exist for an item, click the title of the desired event, then click Add a New Follow-up Entry.
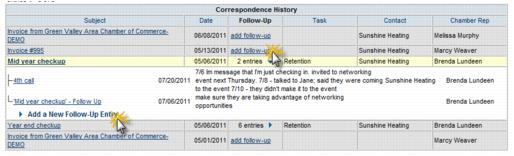 Add a follow-up
- Complete the New Follow-Up Entry screen fields.
- Click Save & Exit.
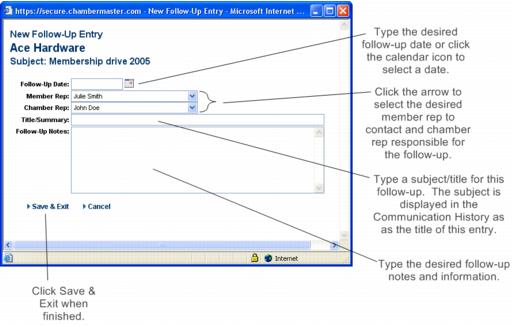 New Follow-Up Entry


Create new entry and follow-up at the same time
- On the Communication tab, click Notes and Follow-Up from the New Communication drop-down menu.
 Select Notes and Follow-UP
- Complete the New Correspondence Entry window.
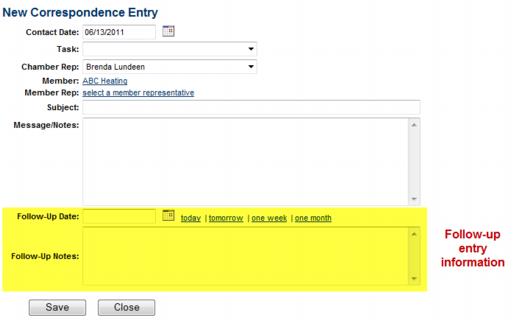 Create an entry and follow-up at the same time
- Click Save.


Printing Labels
- On the member's Communication tab, click New Communication.
- Click Print Mailing Label.
- Click the check box(es) in front of the desired Addressees.
- Complete the rest of the Mailing Labels screen.
- Click View/Print Labels. The desired output will display on the screen.
- On the File menu, click Print.
- Select the desired printer and click Print.
- Click the Close button.
- Click Close.

Download label information
- On the member's Communication tab, click New Communication.
- Click Print Mailing Label.
- Click the check box(es) in front of the desired Addressees.
- Complete the rest of the Mailing Labels screen.
- Click Download Labels.
- Follow the prompts on your screen to either open or save the Comma Separated Value (.csv) file. If the data is displayed immediately, you may wish to select Save from the File menu to ensure this data is available for viewing at a later time.
Member Benefit Tracking
Pro Edition of the ChamberMaster/MemberZone software provides an easy and efficient way for you to track member benefits, such as free or discounted admission to certain events or free/discounted usage of facilities or other tangible items as part of their membership. Benefit Tracking is also available as an add-on to Plus and Premiere editions.
Why use Benefit Tracking?
- Allow associations to offer tailored benefits to members by type or even to each individual. i.e. tiered dues
- Provides a way to give members exactly what they want from being a member and reinforces your value to members by offering them tailored membership benefits.
- A natural way to put your association in front of members throughout the year through a reminder of their remaining benefits to use i.e. you have benefits to spend
- No additional spreadsheet needed for tracking their benefits.
- Events ticket counts automatically tracked across multiple events.
- Members don't need to remember to use their event benefits. As long as they login, it will tell them if available. Hint: Using event invitations will automatically log them in for registration
Setup Benefit Packages
The Benefit Package is a grouping of benefit items. Benefit packages are assigned to a member so that all included benefit items can be recorded on members account.
- Click Setup in the left-hand navigation panel.
- Click Setup Benefit Packages in the Member Options section.
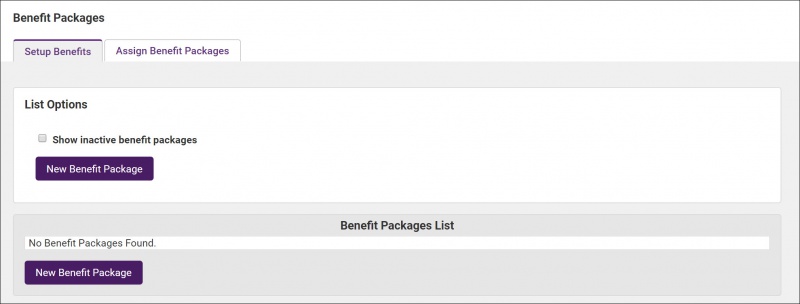
- The Benefit Packages screen displays a list of all packages you currently have created for your organization, if any.
- Click New Benefit Package.
- Enter the Benefit Package Name.
- Enter a Description of the benefit package.
- The Status of the Benefit Package will default to Active. When you are no longer using a benefit package, you will be able to set to Inactive.
- Select the Benefit Items you wish to include in this package. A list of all active benefit items you currently have created in your system will be displayed. If needed, click the New Benefit Item button to add a new item. See Add New Benefit Items for instructions.
- When benefit are selected for the package, the default quantity is 1. You can increase the quantity of a single benefit item by clicking the numbered link in the Quantity column. Quantity amount can be up to 100,000. NOTE: If the quantity is unlimited, enter 0.
- Enter the desired Package Item Qty.
- Click Save.
- Click Save & Exit.


Add New Benefit Items
When you create Benefit Packages, any active Benefit Items will be available to add to the package, if you wish to create new Benefit Items:
- Click Setup in the left-hand navigation panel.
- Click Setup Benefit Packages in the Member Options section.
- Click the Benefit Package to which you wish to add the new Benefit Item. NOTE: When you create a benefit item, it is available for selection in all of your benefit packages, not just the one within which you created it.
- Click New Benefit Item.
- Enter a Name for the benefit item. This name will display to the member when indicating what benefit items are used/available.
- Select a Category for this benefit item. Categories are a way by which you will be able to report on the various benefit items. It will help in presenting a summarized view of used/available (75% of Facility Use Benefits have been used, 50% of Event Discounts, 80% of Advertising Benefits used). Default Categories are been seeded into the system: Advertising Benefits, Event Discounts, Facility Use Benefits, Other Money-Saving Benefits. You can add additional categories by clicking the Manage Categories link.
- Select the Benefit Type: Select Event or Standard.
- Click Save & Exit.
- If needed, repeat steps 3 - 7 above to add additional Benefit Items.
- Click Cancel on the Benefit Package Details screen.


Manage Benefit Categories
Benefit Categories are a way by which you will be able to report on the various benefit items. It will help in presenting a summarized view of used/available (75% of Facility Use Benefits have been used, 50% of Event Discounts, 80% of Advertising Benefits used). Default Categories are been seeded into the system: Advertising Benefits, Event Discounts, Facility Use Benefits, Other Money-Saving Benefits.

- Click Setup in the left-hand navigation panel.
- Click Setup Benefit Packages in the Member Options section.
- Click an existing Benefit Package.
- Click an existing Benefit Item. Categories defined will be available, to select, for all benefit items regardless of the benefit item you select here.
- Click the Manage Categories link.
- To add a new category, click the Add New Category button.
- Enter the name of the new category by overwriting New Benefit Category.
- Click Save & Exit.

Add/Remove Benefit Items to/from Existing Benefit Packages
Once you have defined your benefit packages, there may be times that you wish to add additional benefits to those packages. If adding or removing a benefit item from a package or changing quantity, if the package is currently associated to members, you will be prompted to confirm that the change should be applied all members associated to the package.
- Click Setup in the left-hand navigation panel.
- Click Setup Benefit Packages in the Member Options section.
- Click the link for the package you wish to update.
- Select the desired benefit items you wish to add/remove.
- Click Save & Exit.
- Click Yes if you wish to update this change on packages currently assigned to the package. Click No if this change should only apply on a go forward.


|
|
IMPORTANT: Year over year, we recommend that you create new benefit packages rather than simply adjusting benefit packages. You can easily make copies of your benefit packages to adjust for the new year. |
Copy a Benefit Package
To provide efficiencies in creating your Benefit Packages, you can make a copy of a package to rename. For example, if all of your benefit packages start with a base level, you can make a copy to add/tweak the benefits offer in other packages.
|
|
IMPORTANT The copy function will also be useful in creating different packages each year. We do not recommend that you simply adjust an existing package if you wish to introduce changes from year to year. We recommend that you create a new package vs. editing an existing package. |
- Click Setup in the left-hand navigation panel.
- Click Setup Benefit Packages in the Member Options section.
- Click the Copy link for the Benefit Package you wish to copy.
- Update the copied Benefit Package as described in Setup Benefit Packages.
- Click Save & Exit.

Assign Benefit Packages to Members
Once your Benefit Packages have been created, you can assign these to your members. You can assign packages "in bulk" or you can assign the packages individually. If you are just getting started with Benefit Packages or you have change multiple members to a new package, "in bulk" may be the best option. If you have a few new members, and you wish to assign a Benefit Package to them, individually is the most efficient.
Assign Benefit Packages to Members - In Bulk
- Click Setup in the left-hand navigation panel.
- Click Setup Benefit Packages in the Member Options section.
- Click the Assign Benefit Packages tab.
- Select the members you wish to assign packages to from one or many of the following options:
- Membership Type
- Membership Status
- Renewal Month
- Join Start/End Dates
- Click Load/Refresh. The Select Package Assignments section will display a list of all members that meet the criteria entered.
- Assign the desired package(s) to the members. You can select one package to assign to all by choosing it from the Set All Packages to Assign drop down list, or you can assign packages individually to each member.
- By default the Package Names will be set to the name of the Benefit Package. You can over-ride this if you wish. You can set the same name for all by entering it into the Set All Packages Names text-box, or you can change the name individually for each member.
- Enter the Start Date and End Date for the Benefit Package(s). You can set these dates for all by entering them in the Set All Start Date and Set All End Date text boxes, or enter them individually.
- Click the Assign Packages Now button.


The benefit items, included in the assigned Benefit package, are immediately recorded and displayed as available on members’ Benefit Tracking tab.
Assign Benefit Packages to Members Individually
- For the desired member, click the Benefit Tracking tab.
- In the Benefit Packages section, click the Assign Benefit Package button.
- Select the desired Benefit Package from the Package list. All active Benefit Packages will be available for selection.
- The Name of the package will default to the name of the Benefit Package. You can change this if you wish.
- (Optional) Enter a Start Date and Expiration Date for the package.
- Click Assign. The Current Benefits Section and the Benefit Activity sections of the Benefit Tracking tab will automatically be populated with the Benefit Items included in the selected package, as shown below.


Add/Remove/Adjust Benefit Items in Package Assigned to a Member
After you have assigned a Benefit Package to a member, you have the ability to customize the package for just that one member. You will be able to add/remove items from the package, as well as update quantities.
- Select the member's Benefit Tracking tab.
- Click the link for the package you wish to adjust.
- Increase/decrease the quantity of a benefit item OR add/remove benefit items as needed.
- Click Save Changes.


Review Member Benefit Usage
You can review how members are using their benefits on the member's Benefit Tracking tab.
Coming April 2020 you will have the ability to print this page and/or email the benefit summary to remind members of the benefits that they have available.
Record Benefit Usage
Standard Benefit Items can be manually tracked on a member's Benefit Tracking tab. Event Benefit Items can automatically be tracked by tying them to event discounts.
Manually Record Benefit Usage
Benefit usage (for Standard Benefits) can be manually tracked on the member's Benefit Tracking tab.
|
|
NOTE: Standard benefit items must be manually tracked. Event benefit items can be manually tracked, or the usage can be automatically updated if a Benefit Item Discount has been created for the item and tied to an event. |
- For the desired member, click the Benefit Tracking tab.
- In the Benefit Tracking section, click the Record Benefit Usage button.
- Click the Record Usage for the desired benefit item.
- Enter the Usage Quantity. This will default to 1. You can change this if needed.
- The Usage Date will default to the current date.
- (Optional) Enter the name of the person who used the benefit in the Beneficiary Name field.
- (Optional) Enter further Usage Description of the benefit usage.
- Click Save Usage.


Updates to the benefit usage will be displayed in the Current Benefits Summary and the Benefits Usage section of the member's Benefits Tracking tab.
Edit a Benefit Usage
Once a benefit usage has been entered, you have the ability to go back and make changes. For example: when a staff person records the usage of an item, they may incorrectly indicate who has used the item or put in wrong description.
- Click the member's Benefit Tracking tab.
- In the Benefit Activity section, click the link for the benefit usage you wish to change.
- Make the desired changes and click Update Usage.


Delete a Benefit Usage
If a staff person accidentally records that someone used a benefit, but later realizes they put it on the wrong member, or they recorded a use that actually didn’t happen, the benefit usage may be deleted.
- Click the member's Benefit Tracking tab.
- In the Benefit Activity section, click the link for the benefit usage you wish to delete.
- Click the Delete button.
- Click OK to confirm.

Automate Event Benefit Usage Tracking
If benefits that you provide your member include free or discounted event registrations, you can automate the tracking process by creating a Benefit Item Discount for your event.
- For the desired event, click the Fees tab.
- Expand the Discount Options section if needed.
- In the Benefit Item Discount section, click Add Benefit Item.
- Select the Benefit Item that is to be used for this discount. All active benefit items of type Event will be available in the list.
- Select the registration fee to which this discount is to be applied from the 'Apply To list. All registration fees that you have setup for the event will be available in the list. This must be a fee that you have setup as member eligible.
- Configure the Value/Amount of the discount. For example, if the benefit item provides for free registration, you can set the Use a Flat Fee Amount of to $0.00.
- (Optional) Enter a Description for the discount. This description will be displayed to the registrant to give information about the discount they are selecting. COMING April 2020
- Click Save.


How Event Benefit Discounts Work
When an event benefit discount is setup for an event, an option to select the benefit item to be used will be displayed during the registration process. For Example: A benefit item for 50% off your Red Carpet event.

Send your members eMails reminding of their Benefits
Members do not always remember the benefits with their packages. A periodic reminder of the benefits they have with their membership will keep it front of them all year long, showing the value they have with their membership. It would also be especially important to know what is still remaining.
We have provided a template Benefit Summary Reminder eMail that can be sent to members individually or in bulk. Included in the template is a merge field [Member Benefit Summary] that that will list the available, used, remaining benefit items organized by category with a similar look as displayed in the benefit summary on the member's Benefit Tracking tab. You can use the template we have designed or you can create your own template using this field.

You can send the email individually to a member (See Send an eMail Using a Template ) OR you can send an email in bulk to members using the Benefit Tracking Mass Email report.
To send in bulk:
- Select Reports in the left-hand navigation panel.
- Select Benefit Tracking Mass Email.
- Select the desired benefit packages from the Benefit Packages to be Emailed list. The list will default to all, but you can select specific benefit package is desired. Only packages that are active will be available for selection.
- Click View Report.
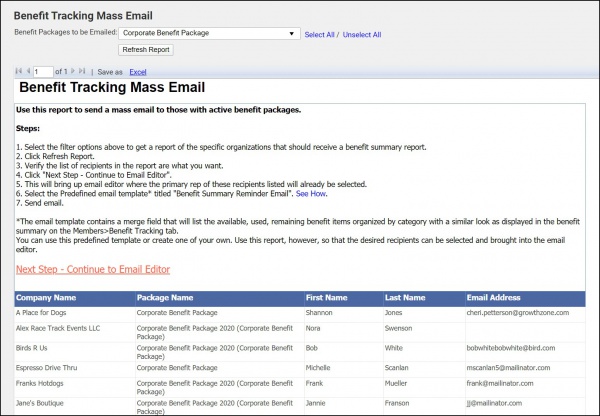
- The report will include the Member Name, Benefit Package, Primary Rep Name, Primary Rep Email Address.
- Click Next Step - Continue to Email Editor.
- Select the Predefined eMail template titled Benefit Summary Reminder Email, or, if you have chosen to customize the template, choose your template.
- Complete the necessary details for sending an email.
- Click Send.

Disable a Benefit Package on Member Drop
When a member drops, you may wish to de-activate their membership package.
- Drop the member as described in Drop a Member. If the member has a benefit package, the Benefit Packages section will be included on the Drop Member Options screen.
- Package Status: You can choose to Set as Disabled or Leave Unchanged.

Reporting Benefit Usage
Event Discount Usage
Event benefit use may be reported for each event by running the Event Discount Usage report.
- Select the event's Guest List tab.
- Click the Reports icon.
- In the Discount Use section, select Benefit Item.


Benefit Tracking Report
The Benefit Tracking Report can be used to review your members' current benefit packages and usage. Filtering options will easily allow you to view members who have not used their benefits, as well as see which benefits were used in a particular month so that you can total up what the dollar value to record in your books (for example, if you are deferring revenue in your accounting software, this would provide information on what should be recognized).
- Click Reports in the left-hand navigation panel.
- Search for the Benefit Tracking Report.
- Enter desired search criteria:
- Benefit Packages: Select all to view results for all of your benefit packages, or select an individual package from the list.
- Benefit Items: Select all to view results for all benefit items, or select an individual benefit item from the list. This list includes Inactive packages as well – so selecting ALL may not be desirable.
- Benefit Item Category: Select all to view results for all categories OR select an individual category from the list.
- Benefit Item Usage Filter: Select Quantity Used > 0 or Quantity Remaining > 0. If no selection is made, all will be included in the report results.
- Display Options: Select Summary to view a summarized list of your Benefit Packages, and the members assigned to each. Select Details to view a list of all your benefit packages, the members assigned to those packages, and the benefit item usage.
- Optional Filters:
- Items Assigned AFTER: Enter a date to filter the report to items assigned after that date.
- Items Assigned BEFORE: Enter a date to filter the report to items assigned before that date.
- Items Used AFTER: Enter a date to filter the report to items used after that date.
- Items Used BEFORE: Enter a date to filter the report to items used before that date.
- Click Refresh Report.


The report can be exported in Excel, PDF or Word format.
View Individual Member Stats
The member's Statstab gives staff the ability to view and print the member’s event activity, web site hit statistics, the member’s Hot Deal hit statistics, and reports showing the member’s accounts receivable billing history, and a profile of the member’s account.
|
|
Did You Know?? You can use the Member Benefit Report as a way to let your members know how they are taking advantage of their membership, and benefiting. You may wish to use the mass email functionality afforded by the Member Benefit Batch Print or Email report to reach out to multiple members based on their renewal dates.
Click Here for further information on mass emailing the Member Benefit report. |
Member Statistics Reports - Event Activity
Member event registrations, sponsorship and event attendance are tracked on the member's stats tab. This is a great way to view an individual member's engagement.
- For the desired member, click the Stats tab.
- Expand the Event Activity section if needed.

You can print or download the event activity report to share with your members.
Billing
The member's Stats tab allows staff to pull all accounts receivable history on to one screen for viewing, printing, and exporting. If using QuickBooks integration, the CQI service must be available in order to generate this report. This information is also available under the members' Account tab in the Transaction History area (or Invoice and Payments area if using the CQI connection).
On the member's Stats tab, you can view A/R billing reports.
- Click the member's Stats tab.
- Expand the Available Reports section if needed.
- Click the Billing hyper-link.
- Click A/R History. The Accounts Receivable History report will be displayed.

Other Individual Member Reports
Member Profile
The Member Profile report will allow staff to view and print information associated with a member’s account. The report will vary in size depending on the selections made.
- On the Stats tab, click Other Reports (if not already open). If the Other Reports is already open, clicking it will close the selection.
- Click Member Profile.
- Click to select the desired check box(es).
- Click View/Print Report. You may view the report or also print the report by selecting Print from your browser software. Make desired selections and click OK.

Member Benefit Report
The Member Benefit Report is a printable listing of membership benefits used by member.
- On the member's Stats tab, click Other Reports (if not already open). If the Other Reports is already open, clicking it will close the selection.
- Click Member Benefit.
- Click Print Report if desired.

Member Statistics Reports - Advertising
Statistics on a member's advertising submissions (Hot Deals, Job Postings & Banner Ads) can be viewed on the member's Stats tab.
- For the desired member, click the 'Stats tab.
- In the Advertising section both submissions and views for advertising opportunities (over the past 12 months) are displayed.

Member Management FAQ's
Find answers to the most commonly asked questions about Member Management on the FAQ page
- If someone is listed as a contact under multiple memberships is there a way to set them up so that they only need one set of login credentials?
- I’m "missing" members in my drop-down list. Where did they go?
- “This page is not available for the [Community Member] record. What does that mean?
- How do I drop or inactivate a Member?
- Will the software warn me if I try to create a duplicate member?
- Does updating the member contact info automatically update my representative contact info?
- What does the pushpin do?
- How is the Contact Preference field used on the Reps tab?
- What is the Greeting field used for?
- Can I view history for each rep?
- How do I specify who my featured members are?
- Who can login to the Member Information Center? Can prospects, courtesy or non-members login?
- Why can’t I view (see) my member/rep password?
- How do I know what permissions my rep has?
- Why is my member being asked to verify their identity when creating a login?
- How do I invite my reps to create a login account and access the Member information Center?
Help Documentation
Browse the Member Management Table of Contents