Events
Contents
- 1 Events Module Overview
- 2 Event Options and Settings
- 2.1 Modify Event Options and Settings
- 2.2 Allow Public to Submit Events
- 2.3 Modify the list of Event Categories
- 2.4 Registration Options
- 2.5 Define Event Categories
- 2.6 Find an Event
- 2.7 Add a New Event
- 2.8 Create a Recurring Event
- 2.9 Copy an Event
- 2.10 Import Events from an iCal Feed
- 2.11 Approve Events Submitted by Members
- 3 Edit/Customize Event Page Information
- 3.1 Edit/Customize Event Page Information
- 3.1.1 Limit Event Attendance/Enable Waiting List
- 3.1.2 Allow others to see who is attending
- 3.1.3 Add Photos/Images/Videos
- 3.1.4 Add Mapping Information
- 3.1.5 Add Custom Event Registration Fields
- 3.1.6 Select the Calendar(s) on Which an Event will Display
- 3.1.7 Customize Event Registration Instructions & Confirmation Message
- 3.2 Setup Event Fees and Billing
- 3.3 View Event Account Information
- 3.1 Edit/Customize Event Page Information
- 4 Working with Event Sponsors
- 5 Working with the Guest List
- 5.1 Send Invitations
- 5.2 Working with the Waiting List
- 5.3 Managing the Guest List
- 5.3.1 Filtering the Guest List
- 5.3.2 Add A New Registration
- 5.3.3 Add a Pre-paid Registration
- 5.3.4 Edit Attendee
- 5.4 Send an email to multiple guests
- 5.5 Reports and Labels
- 5.6 Create Event Name Tags
- 5.7 Postpone an Event
- 5.8 Cancel an Event
- 5.9 Delete an Event
- 6 Working with Events Projects/Tasks
- 7 Syncing Events with your calendar
- 8 FAQs
Events Module Overview
Understanding the basics of how the Events module is organized will give a foundation for operation. Viewing existing events and learning to display only desired events will also be helpful. Then learn how to create, modify and manage events.
Event Module Organization
To add, edit, and manage the Events, click Events in the left-hand menu where you can select the desired event and desired tab.


Event Tabs
Within the Events Module there are nine tabs: General, Fees, Sponsors, Advanced, Guest List, Account, Files, and Tasks.
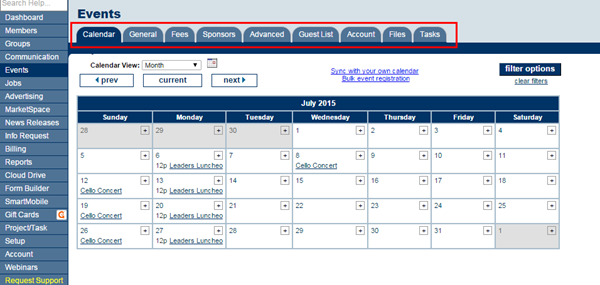
Figure: Tabs in the Events Module

Calendar: Displays the internal events calendar in one of five views: list, day, month, week, or year view. Filter options may also be selected which would display only user-selected events. New events may be added from this tab by clicking the + sign on the desired date/time
General: Event information, placement options, and photos and images
Fees: Assign event fees, billing preferences, and discounts based on age, date, or volume
Sponsors: Designate event sponsors, logos, fees
Advanced: Specify Locations (if available) and Custom Fields
Guest List: Send invitations; add guests to the roster; print roster sheet, labels, and name tags; send emails; register invitees
Account: View income and payment activity, generate invoices and sales receipts (if applicable)
Files:
Tasks: 'Integration with the Project/Task Manager (Pro edition only) When creating a new event, work with the tabs in order as displayed. For example, after completing the General tab, setup the fees (if applicable) on the Fees tab. The Sponsor tab would be next, the Guest List, and finally the Account tab. You may complete them out-of-order if desired but there is a logical flow if working from left to right.
Event Options and Settings
The display of your online Events calendar may be customized through a number of menu selections in the Setup module. Administrator permissions are required to make these changes. Changes made take effect immediately on your website.
In addition to these selections, there is an option to create your own list of Event Categories that may be used to filter what is seen when visitors search your online calendar. Certain registration options may also be customized such as the available authentication methods for member registrations.
Modify Event Options and Settings
These settings are for public modules version 1 and 2.
- Click Setup in the left-hand menu.
- Click Event Options and Settings.
- Make desired changes.
- Click Save.
Allow Public to Submit Events
- Click Setup in the left-hand menu.
- Click Event Options and Settings.
- Check the box for Allow public users to submit events for display (requires approval of each submitted event by chamber staff).
- Click Save.

Modify the list of Event Categories
1. |
Click Setup in the left-hand menu. |
2. |
Click Events Calendar: View/Edit Event Types. |
3. |
4. |
Make desired changes. |

Registration Options
Certain registration options may be modified such as:
- Member authentication options – what is required of a member in order to register as a member
- Which fields are required registrations fields for staff and registrants
- Default terminology (phrases used) for members, non-members, payment method wording and registration closed message
- Custom message displayed on all event registration confirmations
The default settings when new events are created may be set for:
- Automatic registration confirmation and notification emails
- Event invoice default
- Registration Fees and Billing Preferences
To set custom and default event registration options
- Click in the left-hand menu.
- Click Event Options and Settings.
- Open the Registration and Billing Preferences section.
- Make desired changes.
- Click Save.

Registration Member Authentication Method
![]()
Enforce required fields for staff – if fields are marked as required, then when staff enters a registration from the Guest List tab, then the fields will also be required for them as well. |
Require registrants to provide ________ - these fields will be marked with an asterisk on the event registration screens, indicating that they are required before moving to the next screen. |

Set defaults that appear on Events->Fees tab under Registration and Billing Preferences |

Set defaults that appear when creating event invoices under Billing->Invoices with Batch Type = Event (integrated Billing) or QuickBooks->Event Invoices tab (QuickBooks integration with CQI). |

Change on-screen terminology during event registration |


Set defaults for credit card payment tracking and invoice/receipt options for non-members. |

Customize the message that appears on all event registration confirmation emails. Confirmation email must be enabled under Events->Fees tab under Registration and Billing Preferences “Send an automatic Registration Confirmation email to consumers registering online.” |

Define Event Categories
Event categories are a way by which events can be filtered on your web-site. You can define event categories on the General tab of any event, and these categories will then be available for selection for all events.
- Click the event's General tab, expand the Placement Options section if needed.
- Click the edit categories link.
- Click Add Category.
- Enter the name of the category in the Category Name: text box.
- Click Save.


Find an Event
There are several ways that you can find an event in the database:
- Click the Find button in the header bar, and select Event to open the Event Lookup screen. Begin typing the name of the event you are looking for, the list of events will filter to that event.

- Click Events in the left-hand navigation panel, and select the desired event from the Events drop-down list in the header bar. You can also click the filter options link to filter the events drop-down by status, category, keyword, and/or active dates. For Example: If you simply wish to see future events, click the filter options link and check future. The filter option will also allow you to sort the events as you wish to see them displayed. For example, you can sort the events by start date. By default events will be displayed in alphabetical order.

- Use the Calendar tab in the Events module. See Working with the Event Calendar.
Working with the Event Calendar
The Calendar tab displays an Events calendar that may be displayed in five different views: list, day, week, month, and year view. As the name suggests, List view displays all events in a list format. The day, week, and month view will display all events falling within the specified date range. The year view displays a graphical calendar allowing chamber employees to advance quickly to a particular date.
The calendar may also be filtered to display only certain events matching the desired criteria. Click clear filters to display all events again.
- Click Events in the left-hand menu.
- On the Calendar tab, click the Calendar View arrow to select the desired view. The calendar will display on the current month.
- To see previous month click the Prev button, or to see the next month, click the Next button. Alternatively, you may click the calendar icon and select the desired month to view.

Filter the Internal Events Calendar (display only specified events)
- On the Calendar tab, click filter options button.
- Select the desired filter options:
- Status
- Visibility:
- Category: You can filter the calendar to just a selected category.
- Keyword: Keyword must be a single word. Multiple single words may be specified which returns all events with either word. For example, keywords ski swap will display all events with ski OR swap in the title or description.
- Click Continue.
When finished viewing the filtered list of events, click clear filters to view all events.
Outlook 2007 or greater will accept iCalendar feeds. See Sync Events with Outlook.
Add a New Event
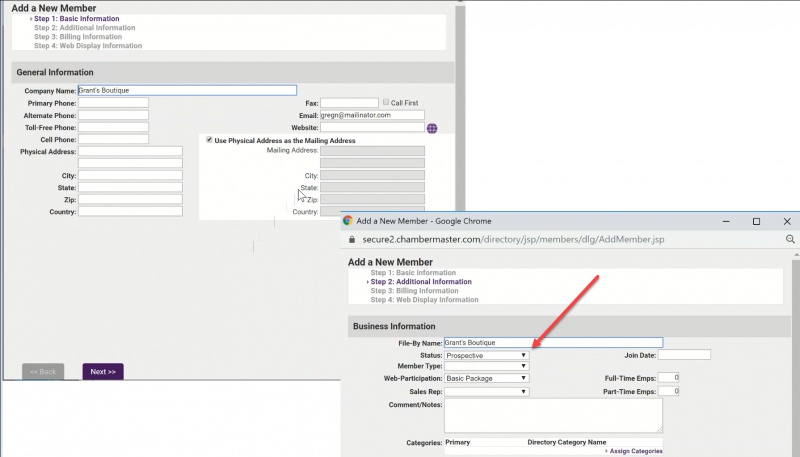
Adding an event may be done by clicking the Add button in the header bar menu OR by clicking the + sign for a date, when on the Calendar tab. The process will be the same regardless of the option you choose to use. To add an event, you will be guided by a wizard to fill in:
- General Information
- Descriptions/Appearance
- Fees/Billing Information
- Click Add in the header bar.
- Click Event. The Add a New Event wizard will be displayed.
- Configure the following General Information settings:
- Event Title: This title will display in your Events drop-down list and also on the Event page of your public web-site.
- Start/End Date/Time: Enter the correct dates for the event. A different end date is only needed when a single event runs multiple days – like over the weekend. NOTE: All Day Event is selected by default, seselect this checkbox if you wish to enter exact times.
- Reminder: If selected, an automatically generated reminder email will be sent using content from details on the General tab of your event. The email is sent, two days prior to the event, to all registrants on your Guest List with a status of Registered. You may change the date/time that the email is sent if you wish. NOTE: Only those with Plus or greater software version only.
- Recurrence: An event occurring multiple times on your calendar may be duplicated by setting a recurrence. See Create a Recurring Event.
- Professional Development Hours: If you wish to include professional development hours, enter the number of hours. This is for informational purposes only, and will not tie back to a contact's information.
- Continuing Education Hours: This is an optional field to identify CEU's. This field will not track back to a contact's information.
- Goals: (Optional) Enter your goals for the event. You will be able to monitor where you stand against your goals on the event's Advanced tab.
- Approval Status: When the event is in Approved status, it will be displayed this on all calendar marked under “Visibility”. Status of Pending or Disabled will not display on the public calendar.
- Visibility: Check the calendars on which you wish to display this event. Note: all events regardless of these check-boxes will display on the Events Calendar tab. This allows you to define who can see the event (internal, public, member).
- Internal Chamber Event Calendar: The internal calendar refers to the database calendar displayed within the Events module. Enable this option to include this event on this calendar.
- Display on Public Events Calendar: When this option is checked the event will display on your website's events calendar (if you have integrated the events public module). Additionally, it will be displayed in Upcoming Events on your public website, if you have integrated an Upcoming Events feed.
- Display on Members Only Calendar: When this option is checked the event will display on the Member Information Center after they log in. This option must be checked for the event to show on the members’ calendar in the MIC.
- Display on Featured Events: This option allows for the event to be listed as a featured event on the Featured Events list, if you have integrated the Featured Events fee on your web-site. Click the edit featured events link to view and/or edit the events currently included on your list.
- Event Category: Select the categories to which you wish to assign the event. You may add the event to as many categories as you wish. Categories provide a way for visitors to your web-site to search for events. Website visitors may search for events by category on the public website. Click the edit categories link to add and/or edit available categories.
- Click Next. The Description/Appearance settings will be displayed.
- Configure the following (all fields are optional and may be edited as needed, once the event has been saved):
- Event Description: Enter a description of the event. Click the advanced edit link to format the text as desired for display on the website.
- Location Description: Enter location details. Click the advanced edit link to format the text as desired for display on the website.
- Date/Time Description: Enter date/time description to be displayed on the web-site. Click the advanced edit link for additional formatting options.
- Fee Description: Enter fee description to be displayed on the web-site. Click the advanced edit link for additional formatting options.
- Search Description: Enter the description to be displayed when events are searched.
- Contact Information: Enter the name of the contact for this event.
- Contact Email: Enter the email for the contact.
- Website URL: If applicable, enter the URL to a website that provides further information about the event.
- Website URL Text: If applicable, enter text for the URL.
- Sync With Zoom: If you are syncing the event with Zoom, enable this checkbox. See HERE for more details.
- Click Next. The Fees/Billing Information screen will be displayed.
- Assign Fee Items: If registration fees are to be associated with this event, click Assign Fee Items. In order to be assigned, fees must first be created by someone with Finance or Administrator permissions. Fees can also be assigned later on the Fees tab of the event. NOTE: If you will be assigning custom fields to your registration fees, you may wish to assign the fee items on the event's Fees tab after the event has been created.
- Online Registration Options: If desired, select to allow members and/or non-members to register online for this event. Selecting this checkbox will immediately display the Register button on the public event page. This selection can also be turned on later on the Fees tab of the event.
- Click Finish.


After creating a new event, work with the tabs in order as displayed. For example, after completing the General tab, setup the fees (if applicable) on the Fees tab. The Sponsor tab would be next, the Guest List, and finally the Account tab. You may complete them out-of-order if desired but there is a logical flow if working from left to right. The main concern would be to have the fees in place before registering guests and sponsors.
Create a Recurring Event
If your association has an event which occurs on a regular basis, save time by setting it up as a recurring event. Most the details of the original event will be applied to the recurring instances. A notable exception is Fees, which must be set for each instance.
The following event details DO NOT get copied from original event:
- Reminder to attendees
- Fees
- Discounts
- Attendees
- Attendees List
- Locations
- Custom Fields
- Event Notes
Once an event is listed as a recurring event, each event instance will be displayed on the calendar at the appropriate date/time where the instance may be modified on an individual basis or ALL instances may be changed at once by editing the original occurrence.
|
|
NOTE: After an instance has been edited individually, it will no longer accept the changes from the original occurrence. |
Set the recurrence of an event
- On the General tab, click the Recurrence arrow and click the desired recurrence.
 recurrence
- Complete the Recurrence fields for the selected recurrence.

NOTE: If you are already on the General tab of the original event, you may click edit specific instance and click to select the desired instance to edit.
Edit a specific instance
- In the Events module, click the Calendar tab
- Advance to the date of the desired instance.
- Click the title of the event.
- Make desired modification. Modifications made will only affect this specific instance. (You may even delete a specific instance without affecting the others.)
Edit all Event Instances
To edit all instances of the event, you may also click the original event on the Calendar to go directly to the original event. After an instance has been edited individually, it will no longer accept the changes from the original occurrence.
- In the Events module click the Calendar tab
- Click the title of any event instance of the desired event.
- In the Recurrence field, click the title of the original event.
Copy an Event
- Click Add in the header bar.
- Click Event. The Add a New Event wizard will be displayed.
- Click Copy a Past Event.
- Type the name of the event in the Event Name text box and select or scroll through the list and select the desired event.
- Click Continue. The General Information, Descriptions/Appearance, and Fees/Billing Information will be copied from the past event.
- Update fields as needed.


Import Events from an iCal Feed
iCalendar (iCal) is an open standard for exchanging calendar and scheduling information. iCal feed enables an application to fetch, push or syncronize date and time based data to an another calendar application.
The ChamberMaster/MemberZone iCal feed import provides an ability for you to upload your iCal list (from the Cloud drive or other http url used with iPhones, iPads etc and other similar calendars) and import directly into the event calendar. A URL is specified to the location of this iCal and then each night the events are synched. NOTE: Recurring events are NOT supported with the iCal import feature.
To import iCal feeds into the event calendar:
- Click Setup in the left-hand menu.
- Click Event Options and Settings
- Open the General Settings area.
- Click the +Add button in the iCal Import section.
- Type the URL of the iCal feed.
- Click Save.

|
|
NOTE: Once an iCal has been added, the events on that calendar may take up to 24 hours to display on your event calendar. |
Approve Events Submitted by Members
If you allow your members to submit events via the MIC, your task list will notify you when events need to be approved. To approve an event:
- Click the numbered link for Events in your task list. A list of all events requiring approval will be displayed.
- Click the hyperlink for the event that you wish to approve.
- On the event's General tab, you can review the event details. If you wish to approve the event, select Approved from the Approval Status drop-down list.
- Click Save.

|
|
IMPORTANT: Your members can not define where the event will be displayed. Be certain to select where you wish this event to be displayed from the Visibility settings on the event's General tab. |
Edit/Customize Event Page Information
Facts displayed about an event are based on information from the event’s General tab. The Event Title, Start Date/Time, End Date/Time, Contact Information, Website URL, and Approval Status may be modified here.
In addition to this basic information, the Event Information area contains the Event Description, Location Description, Date/Time Description, and Fee Description, which is typed into the built-in editor allowing formatting of the text such as bold, underline, font size and style changes.
Edit/Customize Event Page Information
- In the Events module, select the desired event.
- On the General tab, modify the desired fields.
- Click Save.
Limit Event Attendance/Enable Waiting List
Attendees will never be turned away again - allow them to join the waiting list! Watch this short video to see how. ![]()
On the event's General Tab, in the Event Information section, you can limit the number of attendees, and enable a waiting list.

Allow others to see who is attending
On the event's General Tab, in the Event Information section, you can enable the option to allow your members and the general public to see who else is attending the event.
Add Photos/Images/Videos
Photos, images, a map and a video may be added to the event page. One photo may be added as a Main Event photo that is automatically positioned within the event description area, and/or multiple photos may be included in the Photo Gallery which displays in thumbnail size at the bottom of the event page but will be enlarged when a consumer clicks the image. Images are automatically resized to accommodate the space allowed. Images must be .jpg or .gif. One YouTube video may be displayed on the event description page as well.

Add a Search Results Icon to Your Event
The Search Results Icon will appear for visitors in your public events list making it easier to spot.
|
|
NOTE:: The Search Results Icon is available with with version 3 public modules or greater. |
- Select the event's General tab.
- If needed, expand the Photos & Images section.
- Click the + icon for the Search Results Icon.
- Click a previously imported image, or click the Upload button to navigate to your icon.
- Click Select.
- Crop the image if needed.
- Click Crop & Save.


Add an Event Header Photo
One of the first things visitors to your event page will notice is the header. Grab their attention with a splashy header that will make them want to learn more. NOTE: The event header is available with v4 Public Modules.

|
|
NOTE: For best results, upload an image that is a minimum of 1200 x 225. A larger image will be downsized appropriately but will maintain the aspect ratio so not to distort the image. A smaller image will not be increased to avoid distortion. |
- Select the Event's General tab
- Expand the Photos & Images section if needed.
- Click the + icon in the Event Header Photo section.
- Click an existing file, or click Upload to navigate to the desired file.
- Click Select.
- Crop the image if needed.
- Click Crop & Save.

Add a Main Event Photo or a New Gallery Photo
- On the General tab, click Add Image in the Action column of the Image Type that you wish to add in the Photos & Images area.
- Type the path and filename of the desired graphic file or click Browse to locate and open the desired graphic is located.
- Click Upload Image.
- Click Close Window.


NOTE: Only one Main Event photo may be added which is automatically positioned within the event description area. However, Gallery Photos may contain multiple images which display in thumbnail size at the bottom of the event page but will be enlarged when a consumer clicks the image. Photos may also be added to the Event Description. Click Add/Edit Image while editing the description text.
|
|
NOTE:
|
Remove a Main Event Photo or a Gallery Photo
On the event's General, click Remove Image in the Action column of the Image Type that you wish to remove in the Photos & Images area.

NOTE: There is no confirmation required, the images will be immediately removed.
Change an existing Main Event Photo or Gallery Photo
- On the event's General tab click Change Image in the Action column of the Image Type that you wish to change in the Photos & Images area.
- Type the path and filename of the desired graphic file or click Browse to locate and open the desired graphic is located.
- Click Upload Image.
Add a Video
- On the event's General, click Add Video in the Action column in the Photos & Images area.
- Type or paste the YouTube “share link” for the desired video into the Event Video field.

Add Mapping Information
You may upload a map image of include address information to display the location of your event in Google maps.
Upload a Map Image
- On the event's General, click Upload Image in the Action column in the Photos & Images area.
- Click Add Image in the Action column.
- Type the path and filename of the desired graphic file or click Browse to locate and click Open when desired graphic is located.
- Click Upload Image.
- Click Close Window.

Include Map to Event
- On the event's General, click Google Maps in the Action column in the Photos & Images area.
- Enter Street Addr and City/State/Zip.

NOTE: Click on View Map to preview the map location.
Add Custom Event Registration Fields
Custom Event registration fields provide an opportunity to gather further details during the registration process. For example, you may need meal choices, dietary restrictions, golf handicap, etc.
- From the Advanced tab click to expand Custom Registration Fields.
- Click Add a Field.
- Configure the following:
- Field Name: This is the field name displayed in the database.
- Public Display Text (optional): This is the text that will be displayed on the event registration form. For example, if you are creating a "Meal" field for selection of a meal choice on an Event, you may wish the enter "Please select your meal choice" to be displayed to the public.
- Data Type: Select the type of data expected as a response to this question. See Custom Field Types for further information.
- If Text is selected as the data type, enter the maximum number of characters allowed.
- If Drop Down List is selected as the data type, enter choices.
- Visible to Public: Designate whether or not custom field will be a publicly displayed field. If this option is not enabled, it will only be available for staff use.
- Required: Designate whether or not custom filed is required
- Click Continue to save the custom field.


Select the Calendar(s) on Which an Event will Display
An event may be displayed on three different calendars, as well as on a Featured Events RSS Feed:
- Internal Event Calendar: All calendar events will automatically display for your Chamber staff on the Calendar tab no matter what selection is made for the Visibility check box but if selecting “Internal Chamber Event Calendar”, you will be able to filter by this selection on the Calendar tab.
- Public Events Calendar: If you have integrated the events public module on your web-site, selecting this option will include this event on the web-site calendar.
- Members Only calendar: This option included the event on the MIC events calendar.
- Featured Events: Selecting this option will include this event in your Featured Events RSS feed, if applicable.
- Select the event's General tab.
- Scroll to and expand the Placement Options section.
- Click the desired Visibility: check-boxes. If you select Featured Events review Special Notes - Featured Events below.
- Click Save.
Special Notes - Featured Events When Featured Events is selected as a visibility option:
- If your event is setup with a recurrence, a dialog box will be displayed asking if you wish to add just the single event to the Featured Events List or all occurrences of the event.

- You can click the edit featured events link to view and manage all events currently included on your Featured Events list.

|
|
NOTE: Only approved events will be displayed on your external calendars & featured events. |
Customize Event Registration Instructions & Confirmation Message
You can add event registration instructions to be displayed on the registration form, and also customize a message displayed after the registrant completes registration and in the registrant's email confirmation. This is a great location to share pertinent information about the event, such as login information for a virtual meeting. IMPORTANT: As of today only the primary registrant will receive the email containing the registration confirmation information, but they can easily forward to their other guests.
- On the desired event page, click the Advanced tab.
- Expand the Messages section.
- In the Registration Instructions text-box, type the message that you would like to appear at the top of the registration page. Click the advanced edit link for more editing options.
- In the Registration Confirmation text box, type the message that you would like to appear in the browser window after the registrant completes the registration form. Click the advanced edit link for more editing options. The confirmation is also included in the confirmation email.
- Click Save to save your messages.

Setup Event Fees and Billing
Events that require a fee to participate can be managed through the Events module. Event fees, designated for members or non-members, may be associated with each event. If allowing online registration, members-only pricing is available to those with a members-only login name and password.
Staff control what payment options appear for members and non-members, with a separate set of options available for each. If integrated with QuickBooks or using the integrated billing module, individual invoices may be generated from the Events module for those requesting payment by invoice.
Discounts based on age, date, or volume may be created for each event and applied when appropriate information is provided during registration.
The Account tab displays a running total of the event income activity in addition to a summary of guest list information.
Setting up and using event fees require the following steps:
- Assign Event Fees
- Select Billing Preferences
- Create Discounts Options
- View Account Information
- Create Event Invoices
Create Event Registration Fees
Assigning event registration fees may be done during creation of a new event by selecting Assign Fee Items on Step 3 of 3 or after creation on the event's Fees tab. When assigning fees after creation, event registration fees and< additional fees items may both be assigned. Steps outlined below will specifically address assigning fees after creation but the same concepts can be applied to assigning fees during creation.
When creating your registration fees, you can create fees that will register one individual, multiple individuals (for example for a table of 8), or registration fees that will also register the attendee as a sponsor.
|
|
NOTE: Only one event registration fee may be selected per registrant. |
Create a Registration Fee (Individual)
- For the desired event, click the Fees tab.
- Click the Assign Fee Item button, in the Event Registration Fees section.
- Select the desired fee item from the drop-down list. Fee Items available for selection are those fee items that you have configured as Event type.
- Enter the Display Name. This is the name that will be shown on your event registration form, as well as invoices, if applicable.
- Enter a Description. The description will be included on your event registration form.
- Enter the Fee Amount. The fee amount will default to the price assigned when you created the fee item, but you may over-ride this if needed.
- From the Allow this fee item for list, choose who should be able to select this fee item. This is how you will be able to differentiate pricing between Members and Non-Members. Create one registration fee item, and select Members, then create a similar fee item but select Non-Members.
- Enable Display this fee item on the public event registration page if you wish to include this registration option on your event registration page. If deselected, your staff will be able to select this registration type when registering someone from the back-office.
- Click the Advanced Options Link (Optional).
- If you wish to limit the number of this type of registration available, enter the number available in the Maximum quantity available to sell; 0 = unlimited. Enter 0 to allow unlimited purchases of this item. Or enter a maximum number that can be sold of this item.
- Number of attendee names allowed per fee: For a simple individual registration fee, set the quantity to 1. This field can be used Enter the in cases where the fee item represents a table of 8 or a golf foursome or similar case you may wish to specify a larger quantity.
- Reserve 1 attendees even if they aren't entered by registrant. This quantity usually matches the quantity entered under "Number of attendee names
- List this fee item separately from registration fees. (Available only when editing an existing fee) This selection moves the item between the "Additional Fee Items" list and the "Event Registration Fees" list. When selected, the item is on the "Additional Fee Items" list which means that it may be selected in addition to a Registration Fee and in multiple quantities. When deselected, the item displays in the "Event Registration Fees". Only one Event Registration Fee may be selected per registrant. One Event Registration Fee is required per registrant.
- Fee item automatically adds registrant as sponsor. If selected, this item (when selected by the registrant as their registration fee) will automatically add them to the Sponsors list on the Sponsors tab in addition to the Event Guest List.
- Display custom fields when fee is selected. Select the checkbox(es) in front of the custom fields that you'd like to show when this particular fee is selected. If you do not see any custom fields to select when you check "Display custom fields when fee is selected", that means there are no custom registration fields created for this event yet.
- Click Save & Exit.


Create a Registration Fee for Groups/Tables
You can associate multiple attendees to a single fee item. This works well when you are selling tables, or golf foursomes.
- Click the event's Fees tab.
- Click the Assign Fee Items button.
- Select a previously configured Fee Item Type from the drop-down list.
- Enter a Display Name. This is the name that will be displayed on your event registration page.
- (Optional) Enter a description of the registration type. This will be displayed on your event registration page.
- The Fee Amount will be populated with the price associated to the fee item when it was created. You may override this if you wish.
- From the Allow this fee item For list, select whether members, non-members or both may select this fee item.
- Select the Display this fee item on the public event registration page check box if you wish to display this fee item on the event registration page.
- Click the Advanced Options link, and configure the following:
- Maximum quantity available to sell; 0 = unlimited (ex: max 20 Tables): If you wish to limit the number of this type of registration enter the maximum quantity available. If set to zero, there is no limit.
- Number of attendee names allowed per fee (ex: Table of 8 = 8): Enter the number of attendees that will be registered when this registration type is selected. For Example: If you are selling tables of 8, enter 8 or if you are selling golf foursomes, enter 4.
- Reserve X attendees even if they aren't entered by registrant: Select this check-box if you wish to register the total number of attendees, even if the names of the registrants are not entered. If selected, Additional Attendee will be listed as the name of the attendee.
- If this registration fee also qualifies for sponsorship, enable the Fee item automatically adds registrant as sponsor check-box.
- If custom fields must be filled in when this registration type is selected, click the Display custom fields when fee is selected check-box and select the desired custom fields.
- Click Save & Exit.


Create a Registration Fee that includes a Sponsorship
In order for sponsors to be added to your Sponsorship tab, you must create fee items that add the registration as a sponsor. To do this, you will check the Fee item automatically adds registrant as sponsor option when creating your registration fees.
- On the event's Fees tab, click the Assign Fee Items button.
- Select a previously configured Fee Item Type from the drop-down list.
- Enter a Display Name. This is the name that will be displayed on your event registration page.
- (Optional) Enter a description of the registration type. This will be displayed on your event registration page.
- The Fee Amount will be populated with the price associated to the fee item when it was created. You may override this if you wish.
- From the Allow this fee item For list, select whether members, non-members or both may select this fee item.
- Select the Display this fee item on the public event registration page check box if you wish to display this fee item on the event registration page.
- Click the Advanced Options link, and configure the following:
- Maximum quantity available to sell; 0 = unlimited (ex: max 20 Tables): If you wish to limit the number of this type of registration enter the maximum quantity available. If set to zero, there is no limit.
- Number of attendee names allowed per fee (ex: Table of 8 = 8): Enter the number of attendees that will be registered when this registration type is selected. For Example: If you are selling tables of 8, enter 8 or if you are selling golf foursomes, enter 4. NOTE: When creating a sponsorship registration fee, at least one attendee must be included.
- Reserve X attendees even if they aren't entered by registrant: Select this check-box if you wish to register the total number of attendees, even if the names of the registrants are not entered. If selected, Additional Attendee will be listed as the name of the attendee.
- Enable the Fee item automatically adds registrant as sponsor check-box.
- If custom fields must be filled in when this registration type is selected, click the Display custom fields when fee is selected check-box and select the desired custom fields.
- Click Save & Exit.
Include Add-on Items for Your Event
If you wish to sell additional items during registration, you will create those on the event's Fees tab. For example, if you wish to sell mulligans, skins, etc. these can be included on your event registration page. NOTE: Purchase of add-on items are only available to those who register for the event.
- On the Fees tab, expand the Additional Fee Items section if needed.
- Click the Assign Fee Items button.
- Select a previously created fee item from the Fee Item Type list.
- Enter a Display Name. This will be displayed on your event registration page.
- Enter a Description of the additional item. This is optional, and will be displayed on the event registration page.
- The Fee Amount will display the amount that was configured when the fee item was set up. You may over-ride this if you wish.
- If you wish to limit who can purchase this item, select from the Allow this item for drop-down list, and select from: Members and Non-Members, Members Only, Non-Members Only.
- Check Display this fee item on the public event registration page. if you wish to include this item on your event registration page. If deselected, the item will be available to back-office staff when registering someone.
- Click the Advanced Options (optional):
- Fee item automatically adds registrant as sponsor: If selected, this item will automatically add them to the Sponsors list on the Sponsors tab in addition to the Event Guest List.
- Only allow specific membership types to register with this fee: If this option is enabled, only active members with the specified membership types will be able to purchase this item.
- Click Save & Exit.


|
|
Did you know? You can easily report on purchase of Add-on items by selecting the report option on the Guest List. |
Select Registration and Billing Preferences
Registration and Billing Preferences must be configured if fees have been assigned or to indicate online registration preferences. Many of these preferences are available when you first setup an event on Step 3 of 3 or all selections may be made after you create the event on the Fees tab.
Preferences include selection of online registration options for members and non-members, available payment methods, general invoice options and non-members invoice options (if applicable). In addition email confirmation notices and email notification of registration may be specified if desired.
The steps outlined below allow you to setup preferences specific to the event you are working with.
- On the event's Fees tab, expand the Registration and Billing Preferences section.
- Configure the following options as desired for this event:
- Online Registration Options - If allowing online registration but you do not select any acceptable methods of payment, upon registration a message will be displayed to registrants that the chamber will be in contact with them regarding the registration fees for this event.
- Allow members to register online for this event. When this option is selected, you may choose one or more of the following billing options (NOTE: The payment methods selected under this option will be available to Active and Courtesy members.)
- Allow registrants to request to be Invoiced for fees incurred.
- Allow registrants to specify that they will pay by Cash or Check at the time of the event.
- Allow non-members to register online for this event. When this option is selected, you may choose one or more of the following options (NOTE: The payment options selected here will be available to Non-Member, Prospective members, and the general public.
- Disallow online registrations after. Click the option if you wish to close registration at a certain date and time. Enter the date and time.
- Allow online registrants to include multiple attendees on a single registration. Click the option to allow multiple attendees to be included on a single registration.
- Send an automatic Registration Confirmation email to consumers registering online. Click this option if you wish to send an automated event registration confirmation. Note: Custom text may be included on the confirmation email. Put the desired custom text in the Chamber Message window in Setup > Event Options and Settings under the Registration and Billing Preferences area.
- If you have selected Send an automatic Registration Confirmation email to consumers registering online, the Include QR Code in Confirmation email for easy check-in option will be displayed. This option will include a QR Code in the event confirmation. The event confirmation will display a "Print at Home" ticket. At your event, using the Staff App, you can scan the users QR code right from their smart phone or a printed version of their email. Once scanned, the attendee will immediately be marked as attended in the system.
- Allow members to register online for this event. When this option is selected, you may choose one or more of the following billing options (NOTE: The payment methods selected under this option will be available to Active and Courtesy members.)
- Send an automatic Registration Notification email to our association at. Click this option and enter the email address to whom an automated email message will be sent when someone registers for the event.
- Invoice and Receipt Options - the following settings allow you to determine how you wish to track invoices for non-members who pay for event registration with a credit card:
- Assign non-member invoices or receipts to a single Member. Select this option to assign all invoices to one member (this is best practice). The default member you configured under Setup > Events Options & Settings is displayed. Click the hyper-link to select a different member.
- Create a new Member for each non-member participant that pays by credit card to assign the invoice/receipt to. Select this option if you want a new member create for each non-member participant. From the drop-down list, select the member status to be associated to the new member.
- Credit Card Payment Tracking Options - these options allow you to configure how you wish to track credit card transactions. Your accounting practices will drive your choice.
- Create a new Invoice and Payment for each Credit Card Payment.
- Create a new Sales Receipt for each Credit Card Payment.
- Do not create Credit Card Payment records.
- Create a new Quick Books Customer for each non-member participant - this is only available for CQI users.
- Online Registration Options - If allowing online registration but you do not select any acceptable methods of payment, upon registration a message will be displayed to registrants that the chamber will be in contact with them regarding the registration fees for this event.
- Click Save Preferences.


Create Discount Options
Any event may have special discounts available and applied to all or selected fees. Discounts based on age, date, or volume may be created for each event and applied when appropriate information is provided during registration or the discount criteria is met because of date or volume.
Aged Based Discount
- On the Event's Fees tab, click Add Discount in the Age-Based Discounts section.
- Enter a Discount Name.
- Select to apply the discount to All Fees or select an individual fee.
- Set the desired discount method in the Value/Amount section.
- Enter the Age Range to which this discount will apply.
- (Optional) Enter a Description for this discount.
- Click Save.

Early Registration Discount
- On the Event's Fees tab, click Add Discount in the Early Registration section.
- Enter a Discount Name.
- Select to apply the discount to All Fees or select an individual fee.
- Set the desired discount method in the Value/Amount section.
- Enter the number of days prior to the event registrations must be received to qualify for the discount.
- (Optional) Enter a Description for this discount.
- Click Save.

Volume Based Discount
- On the Event's Fees tab, click Add Discount in the Volume Discounts section.
- Enter a Discount Name.
- Select to apply the discount to All Fees or select an individual fee.
- Set the desired discount method in the Value/Amount section.
- Enter the Volume Range. This indicates the minimum and maximum numbers of registrations that must be purchased to qualify for the discount.
- (Optional) Enter a Description for this discount.
- Click Save.

Create Membership Type Discount
See event discounts by membership type in action. ![]()
- On the Fees tab, click Add Discount in the Discount Options area under the Membership Type Discounts section.
- Complete the Add Event Discount screen.
- Click Save.
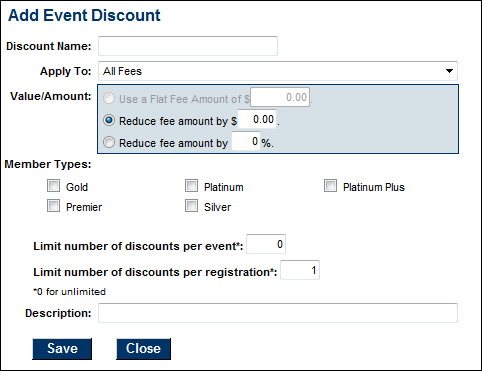 Membership Type Discount Screen

Notes:
- Idea: Grant discounted, free, or included benefits to specific membership types.
- Total discounts used per event may be specified and a separate limit per registration is also available.
- For Plus edition or greater only.
Create Promo Code Discount
See event promo codes in action ![]()
- On the Fees tab, click Add Discount in the Discount Options area under the Promo Code section.
- Complete the Add Event Discount screen.
- Click Save.
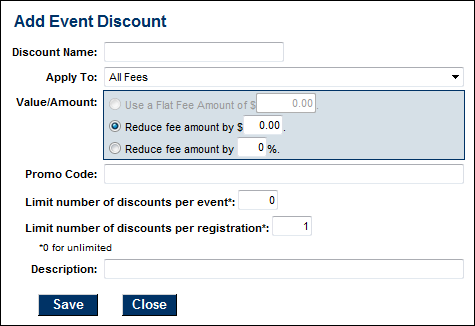 Event Promo code window

Notes:
- Idea: create a Promo Code on your Event Fees tab and then post your promo code on specific advertising so you can track the effectiveness of the ad or provide this promo code to a select group of attendees.
- Make sure to create different promo code for each discount.
- Create multiple codes for each event if desired.
- Limits on usage are available at the event level and registration level.
- For Plus edition or greater only.
|
|
IMPORTANT Promo Codes must be unique for each discount. |
Related Topics Invoice Discounts
View Event Account Information
View the Event Account Information
1. |
Select the desired event. |
2. |
Click the Account tab. |

Create Event Invoices and Sales Receipts
Create Event Invoices/Sales Receipts when QuickBooks is Integrated
1. |
Select the desired event. |
2. |
Click the Fees tab. |
3. |
Make the desired selections in the Billing Preferences area. |
1. |
Select the desired event. |
2. |
Click the Account tab. |
3. |
If registrations have specified a payment method of “invoice” and the invoice has not yet been created, a selection will appear indicating the number of invoices that need to be created. Or if credit card payment has been accepted and Credit Card Payment Tracking Options are set to create either an invoice/payment or sales receipt, a selection will appear indicating the number of entries that need to be created. |

4. |
Click Create QuickBooks Entries Now. |
5. |
Make desired changes in the Invoice Options area. |

6. |
Click Create QuickBooks Entries Now. |

7. |
Invoice creation begins. Click Refresh Status Now to display the current status for completed invoices. When Invoicing Complete appears, click Refresh Status Now to view a complete status list of all invoices. |

8. |
Click Finish. |
9. |
These invoices now exist in QuickBooks and are marked to be printed. You may view and print them in QuickBooks according to standard QuickBooks procedures. |
Create Event Invoices Using Integrated Billing Module
If a payment method of Invoice is selected, this invoice will be queued and then created at a time of your choosing. If a payment method of Credit Card is selected, one of three results will happen depending on your choice: an invoice and payment will be automatically created, a sales receipt will automatically be created, or no transaction will happen. Make these selections for each event on the Fees tab of the desired Event.
Event invoices may be created from within the Events module or from the Billing module. Either way of creating invoices accomplishes the same task.
- In the Event Module, select the desired event.
- Click the Account tab.
- If there are invoices to be created, the Create Invoices Now button will be displayed. If the Create Invoices Now button does not appear, there are no invoices to be created at this time.
- Click Create Invoices Now.
- Make any desired selections in the Bill To: which allows you to specify to whom the invoice should be addressed, and which items should be on the invoice line. box for who the invoice should be addressed to and what items should appear on the invoice line.
- If you wish to apply any available credits a member may have available on their account, click Auto-apply available credits on invoices checkbox.
- If desired, select a Message that will be printed on each invoice. Note: Click edit to modify the message or create a one-time custom message to display on all invoices.
- Complete the rest of the fields including Invoice Date, Date Due and Payment Terms.
- In the list of invoices, uncheck any invoices that should be excluded from this Batch. Note: All excluded invoices may be added to this batch later.
- Click Deliver Customer Invoices.
- Click Save Batch or Deliver Invoices. If clicking Save Batch, you can return to a batch of invoices at any time to deliver them (email or print them). If clicking Deliver Invoices, continue to the next step. Either choice, Save Batch or Deliver Invoices, will create the batch of invoices. Deliver Invoices will create the invoices and immediately open a window with options to print and/or email the invoices.
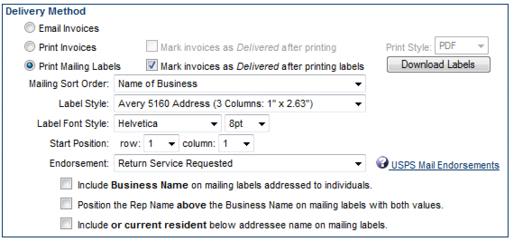
- If you have selected Deliver Invoices the Deliver Customer Invoices window will appear. The Delivery Method of Print Invoices is already selected. Those invoices with an Output selection (from the previous window) of Print or Both will be selected. Those invoices with an Output selection of Email or None will not be selected. Also, any invoice that does not have complete mailing address information will not be selected.
- NOTE: Changes made to the Contact Name or address on the Deliver Customer Invoices window does not modify the Member’s Account information. Permanent Billing Rep or address changes must be made in the Members module.
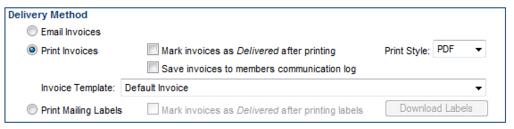
- Complete the Delivery Method selections as desired.
Note: A default Invoice Template may be selected as desired by clicking '''Setup''' > '''Billing Options''' and '''Settings'''. Open the '''Appearance''' area and select a new '''Default Template'''. The templates may also be edited at this location. See “Invoice Templates” for more information.
- When ready, click Preview Invoices or Print Invoices.
- Suggestion: Click Mark invoices as Delivered after printing when printing the labels. (if not printing labels, click Mark invoices as Delivered after printing when printing the invoices). This will make it easier to determine later if the invoices in that batch have been printed or not. Later, the selection Print/Email Invoices on the Reports tab will easily identify any outstanding invoices that have not been “delivered”, regardless of which batch they belong to. See “Print/Email All Undelivered Invoices”
- If mailing labels are desired, click Print Mailing Labels in the Delivery Method section.
Note: When viewing the Member's Account tab after billing: The Next Billed column in the Membership Fees and Dues area reflects the name of the monthly batch that this fee/due will be included in or already has been included in. This column will automatically display the next billing month when the current date passes that month. For instance, if the current date is February 2015 and a fee/due is set to be billed in February 2015, the Next Billed column will display February 2015 until March 1, 2015; then it will automatically switch and display February 2016. To see if a particular fee/due has been billed, refer to the transactions displayed in the Transaction History area.
- Make the desired selections.
- Click Print Labels.
- If any invoices need to be emailed, click Email Invoices in the Delivery Method section.
- Make the desired selections.


Working with Event Sponsors
Adding a Sponsor
You can add sponsors through the database, or sponsors are added automatically when a registrant selects a registration fee that you have designed to automatically add as a sponsor.
NOTE: You must have fees setup for sponsorships prior to adding sponsors.
- In the desired event, click the Sponsors tab.
- Click Add Sponsor.
- Enter required contact information.
- Select the appropriate sponsorship registration fee.
- Click Save Changes.
- Complete the registration form and check-out.


Remove a Sponsor
NOTE: While the system provides the functionality to remove a sponsor, best practice is to cancel the registration associated with this sponsor. When you remove a sponsor on the Sponsor tab, this will also delete their event registration.
- On the Sponsors tab, click the check box in front of the desired sponsor’s name in the List of Sponsors.
- Click Remove Selected Sponsors.
Add Additional Attendees with a Sponsor
- On the Sponsors tab, click the desired sponsor’s name in the List of Sponsors. The selected row will be highlighted in yellow.
- Click the Edit Registration icon.
- Click 'Add Attendee and complete the registration form.

Sponsor Web Display Options
Sponsor logos may be uploaded and placement determined. In addition, a logo website link for the sponsor may be activated. A sponsor logo will automatically be displayed for the Sponsor Logo if a logo has been displayed for this sponsor-member before on any other event or if the member has a logo uploaded for their member logo in the Member Information Center. Sponsorship levels may also be created and assigned appropriately to each sponsor. Sponsors may also be assigned a certain sort order.
Manage Sponsor Logos
Add a Sponsor Logo
NOTE:A sponsor logo will automatically be available, if a logo has been previously uploaded for this sponsor-member or if the member has uploaded a logo in the Member Information Center.
- On the Sponsors tab, click the desired sponsor’s name in the List of Sponsors area. The selected row will be highlighted in yellow.
- Click Add Image in the Sponsor Web Display Options area.
- Type the path and filename of the desired graphic file or click Browse to locate the desired graphic. NOTE: Ensure the file names are short, and do not include special characters. This could prevent the logo from displaying on your event page.
- Click Upload Image.
- Click Close Window.
- Select logo placement by clicking the Logo Placement arrow. This option allows you to define where, on your event page, sponsor logs will be displayed.
- If you are using v4 of the public modules, select Below Title v4 or Below Description v4.
- If you are using v3 of the public modules, select Right Column v3 or Page Bottom v3.
- If you do not wish to display logos on your event page, select Do Not Display.
- Click Save.


|
|
NOTE: A sponsor logo will automatically be populated, for a sponsor, if a logo has been previously uploaded for this sponsor-member or if the member has uploaded a logo in the Member Information Center. |
Remove a Sponsor Logo
- On the Sponsors tab, click the desired sponsor’s name in the List of Sponsors area. The selected row will be highlighted in yellow.
- Click Remove Image in the Actionscolumn of the Sponsor Web Display Options area.
Change a Sponsor Logo
- On the Sponsors tab, click the desired sponsor’s name in the List of Sponsors. The selected row will be highlighted in yellow.
- Click Change Image in the Action column in the Sponsor Web Display Options area.
- Type the path and filename of the desired graphic file or click Browse to locate the desired graphic.
- Click Upload Image.
- Click Close Window.
Sponsorship Levels
Default sponsorship levels may be created to use on events as desired (so that you only create the levels once and may use multiple times). Also, each event may have a unique set of sponsorship levels defined.
Create default sponsorship levels
Default sponsorship levels will be available to use on each event if desired. For each level, select whether the Sponsorship Level Name should display on the website as a heading for those listed under this sponsorship level.
- Login with administrator permissions.
- Click Setup in the left-hand menu.
- Click Event Options and Settings.
- Click Edit Default Levels in the Sponsors area.
- Click Add New Level.
- Type the name of the new sponsorship level in the Name field.
- Select the desired Appearance option: “Display Heading” or “Do Not Display”.
- Optional: Change the order in which the sponsorship levels will appear on the website.
- Click Save Changes.

Create unique sponsorship levels for each event
- For the desired event, click the Sponsors tab.
- Click Edit Sponsorship Levels in the Sponsor Web Display Options area.
- Click Add New Level to create a unique sponsorship level for this event or click Use Defaults to automatically display the default list of sponsorship levels that were created in the Setup module. (See “Create default sponsorship levels” above.).
- For the new level, select the desired Appearance options. Select Display Heading if you wish to include the name of the sponsorship level on the event page. Order allows you to define the order in which sponsorship levels will display on your event page.
- Continue adding, editing, and removing sponsorship levels until the list is as desired for this particular event. Note: any editing here does not affect the default sponsorship levels list created in the Setup module.
- Click Save Changes.
Order/Re-order Sponsorship Levels
When you create your sponsorship levels, you can determine the order in which they will be displayed on your event page.
- For the desired event, click the Sponsors tab.
- Click Edit Sponsorship Levels in the Sponsor Web Display Options area.
- Select the order in which you would like the Sponsorship Levels to be displayed on your event page in the Order column. Sponsorship levels in the 1 position will be displayed first.
- Click Save Changes

Sponsor Logo Sort Order
The order in which your sponsor logos are displayed can be defined on the sponsors tab. The Logo Sort Order option defines how sponsors will be displayed within a sponsorship level.
- On the event's Sponsor Tab, click the name of the sponsor to which you wish to assign sort order.
- Select ordering from the Logo Sort Order drop-down list.
- Click Save.

|
|
NOTE: If the Logo Sort Order is set to 1 for all sponsors, the businesses will be sorted alphabetically. |
Change Sponsor Logo Display Placement
- On the event's Sponsor Tab, click the name of the sponsor to which you wish to assign sort order.
- Select the desired logo placement from the Log Placement list.
- Click Save.
Update Sponsor Level
- On the event's Sponsor Tab, click the name of the sponsor to which you wish to assign sort order.
- Select the desired Sponsor Level from the Sponsorship Level list.
- Click 'Save.
Output Rosters/Name Tags/Labels for Sponsors
- On the Sponsors tab, click the Reports arrow.
- Select the desired output option:
- Print Roster
- Print Nametags
- Print Mailing Labels
- Print Listing
- Download Listing
- Event Sponsors Report

Event Roster with QR Code
Print your Event Roster with attendee QR Codes printed next to their name and bring with you to the event. You can use this to quickly check-in attendees at your next event using the free ChamberMaster / MemberZone Staff app.
- Click Reports in the left-hand navigation panel.
- Select Event Roster with QR Codes.
- Enter desired filtering criteria.
- Click Refresh Report.


Working with the Guest List
| NOTE: If you have recently made the move to the updated Guest List, click here |
When registration rosters and attendee lists must be tracked, a complete solution for managing participants is provided through the Guest List tab. Participants may be added using member or representative names in the current database, added as new by a chamber employee, or automatically entered by the participant if online registration is enabled.
In addition, invitations may be sent to prospective attendees, resent to those who have not responded, and continually monitored, sorted, and reported on using the registration status column in the Guest List.
Output from the registration list consists of a roster sheet, mailing labels, name tags, and a printed list. Filter options may be applied to any output, filtered by registration status, payment status, or other self-selected filters. For example, emails may be sent, targeting only those registered or those still not registered, or many other combinations using the available filter options. Downloading this same information to a comma separated value (.csv) file is also available.
Sending invitations to attendees is not required in order to maintain a list of participants. However, if invitations will be sent, it is most helpful to send the invitations before creating the participant list.
Send Invitations
Invitations may be created and sent via email using the Guest List Summary area on the Guest List tab. Mailing labels may be specifically generated for this group using the output options for mailing labels.
During the course of time, if invitees have still not responded to your invitations, you may decide to resend your invitation. The database will keep track of who has received an invitation but has not yet registered so that you may easily target those that might need a second or third reminder.
- Click Create Invitations.
- Select the attendees that should receive invitations using one or more selections available under Add Invitees, Add Members, or Add Representatives. Repeat until your invitee list is complete. NOTE: Invitees that already appear on the Guest List will automatically be marked with an asterisk and may be removed by clicking Remove to avoid accidental duplication of these invitees on the participant list.
- Click Continue
- Complete the Send an Email invitation screen.
- Click Send Email Now or you can choose to send the email at a future date.


NOTE: You may wish to save this original email as a template for future use (for example if you wish to resend the invitation.)
Resend Invitations to those not yet Registered
- On the Guest List tab, click the view/resend link.
- Review the list, and update if needed.
- Click Continue.
- Complete the Send an Email invitation screen.
- Click Send Email Now.


NOTE: If you saved the original invite, you will be able to select it from your templates.
Manage Invitee List
From within the Invitations section you can indicate an invitee has declined, register an invitee, and add a comment:

Register an Invitee
- On the Guest List tab, click the Manage List link in the Invitations section.
- Click the Register link for the participant you wish to register.
- Complete the registration, and check-out.
Decline an Invitee
- On the Guest List tab, click the Manage List link in the Invitations section.
- Click the Decline link for the participant who is declining.
- Click Done.
Comment on Invitee
- On the Guest List tab, click the Manage List link in the Invitations section.
- Click the Comment link for the participant on whom you wish to comment.
- Enter the comment
- Click Save
- Click Done
NOTE: You can add to, edit, or remove this comment at any time.

Working with the Waiting List
If you have checked Enable waiting list on the General tab, if you have reached the Limit Attendee Count To number, people wishing to register for the event will be notified that the event is full and asked if they would like to be placed on a waiting list.
If the user clicks Yes please, they will be able to enter their name, and the number of guests they wish to bring.

The Waiting List on the Guest List tab will be updated by the number of guests they entered.
If registrations come available for the event, you can manage the waiting list on the Guest List tab.
- Click Manage List adjacent to Waiting List.
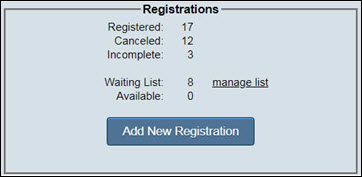
- A list of all individuals on the list will be displayed.
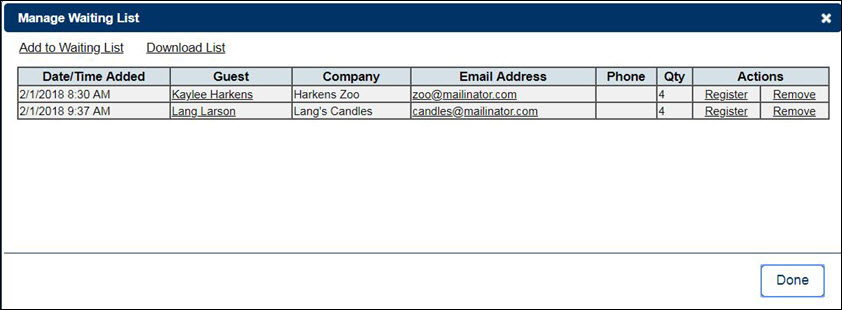
- Click the Register link if you wish to register an individual, or click the Remove link to remove an individual from the list.


Managing the Guest List
The Guest List is created manually by registering guests through the back-office, or through on-line registrations.

The Status column will display one of four options, dependent on actions taken:
- Registered - This status will be displayed when someone registers on-line, or when a staff member registers for them.
- Invitation Declined - This status will be displayed when an invitee declines the invitation, or a staff member declines for them.
- Cancelled - This status will be displayed when a registration is cancelled.
- Incomplete - This status will be displayed if a registrant exits the registration check-out page, without making payment.
Filtering the Guest List
The Guest List may be filtered in a variety of ways:
- Status: From the Status drop-down you can filter to:
- Registered - This status will be displayed when someone registers on-line, or when a staff member registers for them.
- Invitation Declined - This status will be displayed when an invitee declines the invitation, or a staff member declines for them.
- Cancelled - This status will be displayed when a registration is cancelled.
- Incomplete - This status will be displayed if a registrant exits the registration check-out page, without making payment.
- Paid: From the Paid drop-down you can filter to Paid Only or Unpaid Only registrations.
- Click the More Options for additional filtering options, and to display custom fields on the guest list.
Add A New Registration
- For the desired event, click the Guest List tab.
- Click Add New Registration in the Registrations section.
- Enter required contact information for the registrant.
- Select the desired registration fee.
- Proceed to checkout.

Add a Pre-paid Registration
If you have pre-sold registrations to your event, or included registrations to events in your membership packages, you can register these to account for the attendees on the event guest list tab.
- For the desired event, click the Guest List tab.
- Click Add New Registration.
- Select the desired registration fee(s) and proceed to check-out.
- Select No Charge as the payment method.
- Click Checkout.
- On the Checkout Successful screen, click Continue.
- Best Practice: Enter the previously created invoice number or a reason for the no charge in the Reason/Comments text box.
- Click Save & Close.


No Charge registrations will be reflected on the event's account tab.

Move an Event registration to Different Event
Occasionally someone will register for the wrong event and you may want to move their completed registration to the correct event. Follow these steps below to complete this task.
- Cancel the registration on the incorrect event. This doesn't affect any invoice or payment it simply cancels that registration on that event.
- To cancel the registration click the edit registration icon
 on the guest list and change their registration status to cancelled.
- To cancel the registration click the edit registration icon
- Next create a new registration for that person on the correct event using their appropriate fees.
- Complete the registration with the payment option invoice selected.
- When you return to your guest list click the edit payment icon
 to open up the payment options for this registration.
 - Change the payment status to paid.
- In the Invoice Ref # field enter the invoice # from their original registration.
- You can edit this field even though it is grayed out.
- Click Save & Close
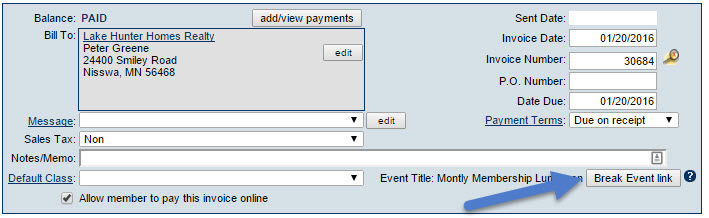
- (Optional) Go to that invoice and associate it with the correct event.
- Open the invoice (use the invoice number and the find > billing transaction to locate it quickly)
- Click Break Event Link to disconnect the invoice from the previous event.
 Break Event Association Link on an Invoice
- Click Save to save the change.
- Now the Break Event Link button has changed to Associate with Event click this and select the correct event the new registration was created on.
- Click Save to save the association before closing the invoice.
- Re-associating the invoice isn't required unless some specific event based reports are being used.

Resend an Event Confirmation Email
You can easily resend an event confirmation to a registrant from the event's guest list.
- Select the desired event.
- Click the Guest List tab.
- For the desired registrant, click the Registered link in the Status column.
- Click the check-box next to the person to whom you wish to send the confirmation.
- Select a sender from the Confirmation Sender: list.
- Click Save & Close.


Cancel an Event Registration
- Go to Events ➝ Guest List
- Click on the Edit Registration icon for the registration that needs to be cancelled.
- Select Cancelled from the Status list.
- Click Save & Close


See steps below for managing the financial side of a canceled registration.
Refund or Credit a Registration Fees
If you have had to cancel or postpone an event, you may need to refund or credit the registrants.
|
|
See Issue a Refund/Credit in Action! |
Cancelled Event - Issue a Credit on the Member’s Account
If the registrant has paid, one option is to issue a credit to be used later.
- For the desired member, click the Account tab.
- Click the New Credit button.
- Type the credit amount in the Credit Amount field. If there are outstanding invoices displayed, the credit amount will automatically be applied to an open invoice. If you do not wish to apply the credit to an open invoice, deselect the check-box next to the open invoice. NOTE: If there are no open invoices, you may simply create the credit, and it will be available for future use
- Complete the credit information fields if needed. Credit Date defaults to the current date and the Credit Number automatically displays the next available credit number. Optional: Enter a P.O. Number if applicable. Select a Message if desired. Notes: is available for miscellaneous notes displayed on the credit.
- Note: If Transaction Classes have been created, a Class drop-down selection will appear on the screen. Select the desired Class for this transaction.
- Select the Assigned Item for this credit. NOTE: The account associated to the fee item will be debited the amount of the credit immediately, not at the time that the credit is used.
- Click Save Credit.

Cancelled Event - Refund Registration Fees
|
|
See Cancel a Registration/Issue a Refund In Action |
IMPORTANT: How you process the refund will depend on the method of payment used, and whether an invoice or a receipt was created.
- For the desired event, click the Guest List.
- Click on the invoice Reference number.
- Click the Show Balance Summary button.
- In the Balance Summary area click the PAYMENT Ref #.
- Click Refund Payment. Update the amount of the refund if needed.
- Click Save.


If Sales Receipts were created the refund process will require a negative sales receipt to be manually created through the Members ➝Account➝ Transaction History➝ New Sales Receipt location.
|
|
IMPORTANT: If your Credit Card Processor is GrowthZone Pay or Auth.Net CIM Enabled the refund back to the processor via the software. If you are using a different processor, follow the steps provided by that processor to issue the actual refund back to the card. See: Managing Refunds for more information. |
Cancelled Event - Write-off Unpaid Invoice
When cancelling events, if a registrant has an unpaid invoice, best practice is to write-off the invoice. In this scenario, best practice is to write off the invoice. See Process a Write Off to complete the write-off.
Edit Attendee
The Edit Attendee function on the event guest list allows you to update the details of a registrant. For example, this may be used to add the names for Additional Attendees, update a registrants custom fields, and even add an attendee or organization as a record in your database.
Add a Member to Your Database from an Event
An orange icon in the Attendee column of the guest list indicates that neither the attendee nor the organization are associated to a record in your database. You can add the company to your database from the guest list.
- For the desired event, click the Guest List tab.
- Click the
 for the desired attendee.
- Click Create Record.
- Select Member.
- The information provided by the event registrant will be automatically populated (including the name of the attendee). You can add any information as needed. On the second step, you will be able to define the status of the member. For example, if you wish to capture the event registrant information as a prospect, select Prospect from the Status drop-down.
- Complete any other information you wish to add.
- Click Save.


The registrant's organization has now been added as a member record to your database.
Add a Representative to an Existing Member from an Event
Using the Edit Attendee icon, you can easily add a representative to an existing member in your database. A yellow edit attendee icon indicates that a member record exists, but the event registrant is not associated to that member. In this scenario ![]() will be displayed next to the registrant name.
will be displayed next to the registrant name.
To add the registrant as a representative of the existing member:
- For the desired event, click the Guest List tab.
- Click the
 for the attendee you wish to associate to an existing member.
- Click Create Record.
- Select Representative.
- The screen will refresh, and the attendee is now associated to the member.
- Click Save & Exit.


Send an email to multiple guests
You can easily send emails to the guests of an event from the Guest List tab:
- Select your Event
- Click the Guest List tab.
- Click the envelope icon, located in the Guest List section.
- Select the desired filtering options:
- Include all attendees
- Include only attendees displayed in the Guest List as it is currently filtered.
- Registration Status.
- Payment Status.
- Include currently selected attendees only.
- Include only Primary Contact from event registration.
- Click Continue. The Send an Email screen will be displayed to complete sending your email to multiple guests.


Send Event Reminders
Note: Only those with Plus edition or greater will have this feature.
An automatically generated reminder email can be sent to all registrants on an event's Guest List with a status of "Registered".
1. Click Events in the left-hand menu.
2. Select the desired event.
3. Click the General tab.
4. Click to select the “Send automatic reminder to all registrants” checkbox.
5. Complete the Date and Time fields to indicate when the reminder should be sent.
6. Click Save.
Note: Preview the automatic reminder by clicking the reminder link.

Reports and Labels
Reports
- Click Reports in the left-hand menu.
- Click Events from the list of links.
- Select the desired report from the list.
- Complete the selections as desired and click Print Report.

Additional Fee Items Report
To easily view a list of all Add-on item purchases, you can generate the Additional Fee Items Report. The report can display the details of items sold, along with the registrants contact information, should you need to reach out to them.
- Select the event's Guest List tab.
- Click the reports icon.
- Click Additional Fee Items Report link.


Generate and Email a List of Events
A report is available that will list selected details of your desired event(s). After generating this report, you may choose to email that to desired recipients.
Events Summary Listing Report
The Events Summary Listing Report
1. |
Click Reports in the left-hand navigation bar |
2. |
Click Events in the Reports Categories area. |
3. |
Click Event Summary Listing. |
4. |
Complete the desired Filter Options and click View/Print List. |

5. |
When the desired events display on the screen, press Ctrl-A (to select all) and then press Ctrl-C (to copy all). |
6. |
Click Close |
7. |
After completing the above steps, proceed immediately to the next section. |
Email the Event Listing
1. |
Click Communication in the left-hand navigation bar. |
2. |
Click New Email to Multiple Members. |
3. |
Select the desired addressees (by membership status for all active members) and distribution method (Email only). |
4. |
Click Continue. |
5. |
Complete the From: and Subject: fields. |
6. |
Click in the Body text area. Type any desired opening information. |
7. |
Click the Paste |
8. |
Click Allow Access (if necessary). |
9. |
The events listing from the steps performed above will display in the email. |
10. |
Complete the email and click Send Email. |
Create Event Name Tags
Various Avery style nametag templates are available in the software
- For the desired event, click the Guest List tab.
- In the Guest List section click on the Reports button.
- In the Report Items window select the desired name tag style. Three styles are available which include preset fields. If you wish to use alternate fields, including custom fields, see Use Advanced Report Builder for Event Name Tags/Tent Cards.

- In the example below, style 1 for Avery 2-1/3x3-3/8 Labels is selected.
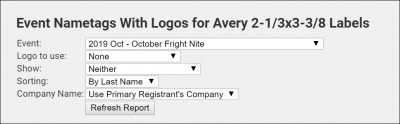
- Select the desired Logo to use option. You may choose to include the member's logo, your organization's logo, or no logo.
- Select the additional details you wish to Show on the name tags: Both Title and Company, Only Member's Title, Only Member's Company or None.
- Select how you want the nametages sorted.
- Select which Company Name you want to include on the name tags: Use Primary Registrant's Company or Use Attendee's Company.
- Click Refresh Report.


Review the report, then output the report to print your name tags.
Download Name Tag Data
Name tags may be created that will list a participant's name and business name. If you desire additional participant information or to include a graphic on the name tab, you may wish to download the name tag data and import into Microsoft Word where you can customize the name tag as desired.
- For the desired event, click the Guest List tab.
- In the Guest List section click on the Reports button.
- In the Report Items window select Style 3.
- Complete the Guest List Report Filters. This option allows you to select the registrants that you wish to include in your output file.
- Click Continue.
- On the Name Tags options screen click the Download Name Tag Data button.


The Name Tag data will be downloaded to an excel spreadsheet for your future use.
Use Advanced Reporting for Event Name Tags/Tent Cards
The Advanced Reporting option allows you to customize the fields included on your name tags, tent card, etc. This option allows you to select custom fields associated to your events. For example, if you use a custom field to track your table assignments, and wish to include these on your name tags, you can create a template to include this field.
- For the desired event, click the Guest List tab.
- In the Guest List section click on the Reports icon.
- Click Advanced Reporting. The Report Builder screen will be displayed. Many of your event fields are included as Selected Fields by default and the Filter by Criteria/Conditions are set to the event you are working with.
- To select your custom field(s), click Events > Registrations > Custom Fields in the left-hand list.
- Dwell your mouse over the custom field you wish to include to drag it to the Selected Fields list.
- Once you have added all the needed fields, click Run Report. You will use the column headers to identify the merge fields in your template. Best Practice: Copy the columns to notepad for future use.
- Click Nametags, Tent Cards, Envelopes, Labels & more using Word® Mail Merge.
- Click Customize next to the template you wish to update. The template will open in word.
- Enable editing of the word document, and add the desired merge fields. Processes for adding merge field to a word document will vary dependent on the version of Word you are using. Directions below are for Microsoft Office 365. Refer to Microsoft documentation for details on working with merge fields.
- Copy one of the merge fields in the document, and paste it where you would like to include the new merge field. In the example below, «Attendee Company» has been copied.
- Right click on the copied field, and select Edit Field.
- Enter the previously copied column header into the Field Name text-box.
- Click OK. Add additional merge fields as needed.
- Save your template. Best Practice: Save the template where it will be easily accessible to you in the future.
- Return to the Report Builder screen to choose your template.
- Click Choose File and navigate to and select your saved template.
- Click Perform Merge. A word document will output.


|
|
NOTE: The Word template you have created is NOT saved to your ChamberMaster/MemberZone database. Be sure to save the template to your hard-drive for future use. |
Mark Registrants as Attended
Marking your registrants as having attended an event is important so that you can (a) send a thank you email to all that have attended and (b) track your members engagement.
You can use the Staff App to check-in your attendees as described above, this will automatically update the status to attended. Or, if you have used a paper roster to check in, you can mark registrants as attended through the back-office, after the fact.
- For the desired event, click the Guest List tab.
- In the Registered Attendee Info section, click the View/Edit Attendance List button.
- Check off those who attended the event. TIP: If you have a long list of registrants, you can tick the top check-box to set all to attended, then de-select those who did not attend.
- Click Save.

Postpone an Event
It is unfortunate, but at times, you may find it necessary to postpone an event. You can easily change the date of the event, and keep all attendees registered for the event.
Postpone an Event when Future Date is Known
Here are best practices for postponing your event, when the future date is known:
- Notify registrants that you are postponing the event to a new date. See Send an Email to Multiple Guests.
- Change the date of the event to the new dates on the event's General tab.
- If you wish to retain the original event on your calendar(but marked as postponed) Add Event > Copy Event:
- Make a copy of the new event (with new dates). See Copy an Event.
- Set the dates of the copied event to the original event dates
- Add ***Postponed*** to the title and description of the event. You may also wish to add the new dates into the title and description.
- Ensure that a reminder is not set for the postponed event.
- Ensure that registration is not enabled for the postponed event.


Postpone an Event when Future Date is NOT Known
- Update the title and description of the event with ***Postpone***, on the General tab for the event.
- Notify all registrants. See Send an Email to Multiple Guests.
- Disable on-line registration for the event on the event's Fees tab, by deselecting Allow members to register online for this event and Allow non-members to register online for this event. See Select Registration and Billing Preferences.
- On the event's General tab, turn off the automated reminder for the event (if applicable).
Once you have decided on a future date, follow the steps described in Postpone an Event when the Future Date is Known to "re-activate" this event. NOTE: if you have disabled online registration and the event reminder, be sure to turn those back on for the new event.
Cancel an Event
Manually Cancel an Event
It is unfortunate, but at times, you may find it necessary to cancel an event. Here are four best practices for cancelling your event.
|
|
See Cancel an Event in Action! |
- Update the Event Title/Description: You may simply wish to add "Cancelled" after the name of the event. It is also a good idea to add some further information in the description. Perhaps you are planning simply to postpone and want to let the public know this. The title and description can be updated on the event's General tab.
- Turn off on-line registration: To ensure that no additional registrations are received for the event, disable Allow members to register online for this event and Allow non-members to register online for this event in the Registration & Billing Preferences section of the Fees tab. Be sure to Save Preferences.
- Notify Registrants: Email your registrants as soon as you can, and if possible, give everyone a call. Some folks aren’t always checking their inbox, so be sure to communicate this critical information using all avenues possible (you may also want to consider using social media). Your email should be upbeat, and include details about refunds, future event date, etc. You can easily email all registrants from the Guest List tab. See Send an Email to multiple guests.
- Turn Off Event Reminder: If you have setup a reminder to automatically be sent to registrants, best practice is to turn off the reminder. The reminder may be turned off on the event's General tab. NOTE: If you have edited the title and the description of the event, these changes would be included in the reminder if you have forgotten to turn off the reminder.


Delete an Event
If an event has been created by mistake, you may delete the event. NOTE: All history of participants, sponsors, and fees will also be deleted and no longer available in reports. Use this option with caution. If you delete an event in error, and wish GrowthZone to restore the event, fees will be applied.
On the event's General tab, click Delete Event
![]()
Note: The Delete Event selection is only available to those with Administrator Level permissions.
Working with Events Projects/Tasks
If you are using the Pro Edition, you can easily create a project, or add tasks to your events.
Create a Project for an Event
- On the desired event, click the Tasks tab.
- Click the New Project button.
- See Create a New Project for final instructions on creating the new project.
Add Tasks to an Event
If you are using the Pro Edition of ChamberMaster/MemberZone you can add tasks to an event to make it easy for you to track progress.
- On the desired event, click theTasks tab.
- Click the New Task button.
- See Adding a Task for final instructions on creating the task.
Syncing Events with your calendar
Event calendar feeds automatically synchronize your calendar with your events listed in your software. Many different applications support iCalendar, including Microsoft Outlook 2007 and later (Exchange), Lotus Notes 8.5 and later, Apple Calendar iPhone and iPad), and Google Calendar (Android and Gmail).
Syncing with your calendar (basic instructions)
- Click Events in the left-hand menu.
- Click the Calendar tab.
- Click Sync with your own calendar hyper-link.
- Click the desired link and follow the prompts to synchronize with the default calendar on your system (if available).


To synchronize with a different calendar, copy and paste the desired URL into your calendar software in the location where feeds are accepted, often identified with “Subscribe”, “Add Calendar”, etc.
Your third party calendar will automatically update every hour with any changes made to your events. The populated date range: today - 365 days from now.
Sync Events with Outlook
1. |
Click Events in the left-hand menu. |
2. |
Click the Calendar tab and click “Synch with your own calendar.” |

3. |
Locate the desired event feed. |

4. |
Highlight the URL and copy it. (Right click on the highlighted URL and click Copy) |
5. |
Open your Outlook software. |
6. |
Click File, Date File Management. |
7. |
Click the Internet Calendars tab. |

8. |
Click New... |
9. |
Paste the URL. (Right click and click Paste.) |
10. |
Click Add. |
11. |
Click OK on the Subscription Options window. |

Synch your events with Google Calendar
1. |
Click Events in the left-hand menu. |
2. |
Click the Calendar tab and click “Synch with your own calendar.” |

3. |
Locate the desired event feed. |

4. |
Highlight the URL and copy it. (Right click on the highlighted URL and click Copy) |
5. |
Open a browser window and login to your Google Calendar. |
6. |
Click the arrow next to Other calendars. |

7. |
Select Add by URL. |
8. |
Paste the URL into the URL field and click Add Calendar. |

1. |
When logged into your Google Calendar, click the arrow next to Other calendars. |

2. |
Select Settings. |
3. |
At the bottom of the screen in the Other Calendars area, click Unsubscribe to the right of the calendar that you wish to remove. (Public Events in the example below.) |

4. |
Click Unsubscribe. |
Synch your events with Apple iCalendar
1. |
Click Events in the left-hand menu. |
2. |
Click the Calendar tab and click “Synch with your own calendar.” |

3. |
Locate the desired event feed. |

4. |
Highlight the URL and copy it. |
5. |
Open your iCal software. |
6. |
Select the Calendar menu and click Subscribe. |

7. |
Paste the copied URL into the Calendar URL field. |

8. |
Click Subscribe. |
9. |
After the feed is loaded, you have the option of changing some of the settings if you wish. |
10. |
Click OK. |
1. |
From the Calendars menu, right click (control) the calendar under the Subscriptions section. |
2. |
Click Delete. |
3. |
From the Calendars menu, right click (control) the calendar under the Subscriptions section. |
4. |
Click Get Info and set Auto-Refresh to None. |

Synch your events with your iPad or iPhone
1. |
Click Events in the left-hand menu. |
2. |
Click the Calendar tab and click “Synch with your own calendar.” |
3. |
Locate the desired event feed. |

4. |
Highlight the URL and copy it. (Right click on the highlighted URL and click Copy) |
5. |
Send yourself an email with URL pasted into it. |
6. |
On your iPad or iPhone open that email. |
7. |
Click the URL. |

8. |
Click Subscribe. |
9. |
The feed will load and provide a message. |

10. |
Click Done. |
11. |
The calendar will appear in your iPad calendar. |

1. |
Select Settings. |
2. |
Select Mail, Contacts, Calendars. |

3. |
Select Subscribed Calendars. |
4. |
Select your subscribed calendar to be removed. (Public Events in example below.) |

5. |
Select Delete Account. |

FAQs
- Can I customize registration instructions and/or confirmation messages for my events?
- How do I create an event fee item that has limited quantities available?
- How do I create an event fee item that will automatically register multiple attendees – a table of 8, team of 4, etc.?
- How do I gather certain information for an event at the time of registration (meal choice, shirt size, seating preference, etc.)?
- How do I cancel an event registration?
- How do I add photos to an event?
- Can I edit or add to the event invitation that is created when sending the built-in invitation?
- Why is my event showing multiple times on the public calendar and I only entered it once?
- Why does the download of my event guest list include additional columns of items not related to my event?
Common Tasks
- Create an Event
- Create a Recurring Event
- Send Email Invitations for an Event
- Customize Event Name Tags
Create Event Fees with CQI (Legacy)
Note: CQI is a legacy product.
7. |
Click QuickBooks in the left-hand navigation bar. |
8. |
Click the Event Fees tab. |
9. |
Click Add Fee Items. |
10. |
Click Define a New Fee Item. |
11. |
Complete the Fee Item Information screen. |
-image57.png)
12. |
Click Update ChamberMaster. |
13. |
If the fee does not exist in QuickBooks yet, click Add Fee Item to QuickBooks Now. |
14. |
Click Close Window. |
1. |
Click QuickBooks in the left-hand navigation bar. |
2. |
Click the Event Fees tab. |
3. |
Click Add Fee Items. |
4. |
From the list of QuickBooks items and services click the check box in front of the QuickBooks Fee Item that you desire to add to ChamberMaster / GrowthZone. |
5. |
Click Save & Exit. |
1. |
Click QuickBooks in the left-hand navigation bar. |
2. |
Click the Event Fees tab. |
3. |
Click Find a Match in the row of the desired fee to be matched. |
4. |
From the list of QuickBooks items and services click to select the desired item and service that matches your fee and due. |
5. |
Click Continue. |
1. |
Click QuickBooks in the left-hand navigation bar. |
2. |
Click the Event Fees tab. |
3. |
Click to select the check box at the end of the desired item to be deleted. |
4. |
Click Remove Selected Fees. |