Difference between revisions of "Create a Credit"
Jump to navigation
Jump to search
| Line 7: | Line 7: | ||
#Complete the credit information fields if needed. Credit Date defaults to the current date and the Credit Number automatically displays the next available Credit Number. Optional: Enter a P.O. Number if applicable. Select a Message if desired. Notes: is available for miscellaneous notes displayed on the credit. | #Complete the credit information fields if needed. Credit Date defaults to the current date and the Credit Number automatically displays the next available Credit Number. Optional: Enter a P.O. Number if applicable. Select a Message if desired. Notes: is available for miscellaneous notes displayed on the credit. | ||
:::'''Note: '''If Transaction Classes have been created, a Class drop-down selection will appear on the screen. Select the desired Class for this transaction. | :::'''Note: '''If Transaction Classes have been created, a Class drop-down selection will appear on the screen. Select the desired Class for this transaction. | ||
| − | : | + | :::[[File:ChamberMaster_Billing-Create_a_Credit-CMBilling.1.056.1.jpg]] |
| − | |||
| − | |||
| − | |||
| − | ::[[File:ChamberMaster_Billing-Create_a_Credit-CMBilling.1.056.1.jpg]] | ||
| − | |||
| − | |||
| − | |||
| − | |||
#Click to select the checkbox of the invoice(s) that should be credited. | #Click to select the checkbox of the invoice(s) that should be credited. | ||
#Type the credit amount(s) in the Credit column. | #Type the credit amount(s) in the Credit column. | ||
#Select the Assigned Item for this credit. | #Select the Assigned Item for this credit. | ||
#Click Save Credit. | #Click Save Credit. | ||
Revision as of 20:03, 4 September 2015
- Click Billing in the left-hand menu.
- Click the Credits tab.
- Ensure that the A/R Account: drop-down selection is the desired account for funds to be applied against. (Accounts Receivable is typically the correct account.)
- Click Select a Member.
- Click the desired Member and click Continue.
- Type the credit amount in the Credit Amount field.
- Complete the credit information fields if needed. Credit Date defaults to the current date and the Credit Number automatically displays the next available Credit Number. Optional: Enter a P.O. Number if applicable. Select a Message if desired. Notes: is available for miscellaneous notes displayed on the credit.
- Note: If Transaction Classes have been created, a Class drop-down selection will appear on the screen. Select the desired Class for this transaction.
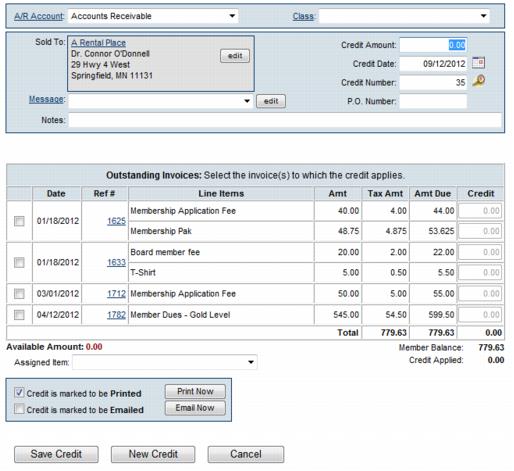

- Click to select the checkbox of the invoice(s) that should be credited.
- Type the credit amount(s) in the Credit column.
- Select the Assigned Item for this credit.
- Click Save Credit.