Difference between revisions of "Assign Discount Before Payment is Received"
Jump to navigation
Jump to search
(Created page with "<div xmlns="http://www.w3.org/1999/xhtml"> <div style="text-align: left;">Table of Contents | ChamberMaster_Billing-Discounts|Pr...") |
|||
| Line 1: | Line 1: | ||
| − | |||
| − | |||
| − | |||
| − | |||
| − | |||
| − | |||
<div style="margin-left: 18pt;"> | <div style="margin-left: 18pt;"> | ||
<table border="0" cellspacing="0" cellpadding="0" width="99%" summary=""> | <table border="0" cellspacing="0" cellpadding="0" width="99%" summary=""> | ||
| Line 88: | Line 82: | ||
<div style="font-family: Calibri; font-size: 11pt; margin-bottom: 12pt; margin-left: 36pt; text-align: justify;"><span id="wwpID0E0B40HA">[[Image:ChamberMaster_Billing-Assign_Discount_Before_Payment_is_Received-CMBilling.1.066.5.jpg]]</span></div> | <div style="font-family: Calibri; font-size: 11pt; margin-bottom: 12pt; margin-left: 36pt; text-align: justify;"><span id="wwpID0E0B40HA">[[Image:ChamberMaster_Billing-Assign_Discount_Before_Payment_is_Received-CMBilling.1.066.5.jpg]]</span></div> | ||
<div style="font-family: Calibri; font-size: 10pt; margin-bottom: 12pt; margin-left: 54pt; text-align: justify;"><span id="wwpID0E0A40HA">Figure 3-18 View Credits & Discounts on the </span><span style="font-weight: bold;">Payments</span> tab</div> | <div style="font-family: Calibri; font-size: 10pt; margin-bottom: 12pt; margin-left: 54pt; text-align: justify;"><span id="wwpID0E0A40HA">Figure 3-18 View Credits & Discounts on the </span><span style="font-weight: bold;">Payments</span> tab</div> | ||
| − | |||
Revision as of 20:48, 24 July 2015
1. |
Click Billing in the left-hand menu. |
2. |
Click the Invoices tab. |
3. |
Locate the desired invoice where a discount should be applied. |
4. |
Click the New Transaction drop-down arrow. |
Figure 3-14 Assign Discount before payment is received
5. |
Click Add Discount. |
6. |
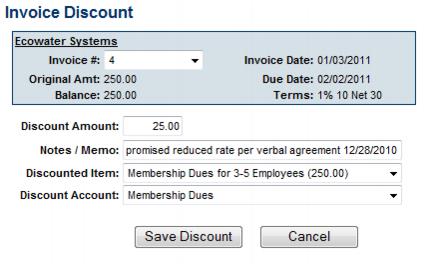
Type the Discount Amount, Notes/Memo (if desired), and double-check the Discounted Item and Discount Account. |

Figure3-15 Input discount amount
If Transaction Classes have been created, a Class drop-down selection will appear on the screen. Select the desired Class for this transaction.
7. |
Click Save Discount. |
8. |
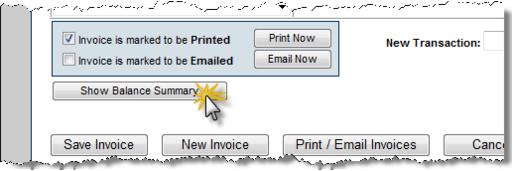
Click Show Balance Summary to view the assignment of this discount. |

Figure 3-16 Show Balance Summary
Figure 3-17 Balance Summary displayed
8. |
This invoice will display the new amount when payment is received. At that time you may view the discount by clicking View Credits & Discounts. |
Figure 3-18 View Credits & Discounts on the Payments tab