Trip Builder
Jump to navigation
Jump to search
View a video demonstrating how Trip Builder would look on your public website. 
- Once Trip Builder is enabled on your software edition, Add to Trip and View Trip buttons are added to every member, hot deal, and event on your public modules.
- An optional Trip Builder widget can also be added to your website (often at the top of every page) that tallies each item added to the trip – kind of like a “shopping cart” reminder as you browse the website. Click the widget to be brought to the /tripbuilder page. Contact customer support for more information on having this widget on your website.
- Sample widget that could be placed throughout your website
- You may also choose to add a direct link in your website menus or an icon that leads to the Trip Builder page which would be referenced just like any other module page (i.e. your business directory is /list or your Events module is /events) The Trip Builder module page is accessed with /tripbuilder. This is also the page that will be accessed when a visitor selects View Trip or clicks the Trip Builder widget.
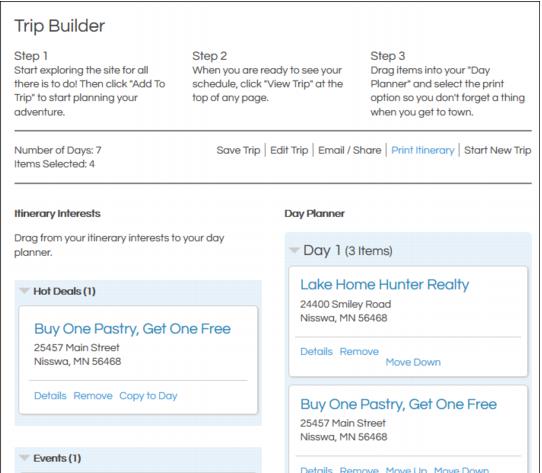
- Sample Trip Builder page at /tripbuilder accessed when a visitor clicks View Trip
- Save Trip: Visitors to this page can save the trip which provides them a URL that they can copy so they can return to the trip builder page later with the same items in their trip. This link can also be emailed to an address of their choosing.
- Edit Trip: Visitors can edit the trip which allows them to change the name of their trip and modify the number of days in their trip.
- Email/Share: Sends the trip URL link to the email specified along with any custom message that is typed in the Note field.
The email subject line defaults to: <Website Visitor Name> has sent you a trip for <Your Association Name>. Your association name may be replaced with a phrase of your choosing. See Custom Trip Builder settings.
- Print Itinerary: Displays an on-screen list of the Day Planner items with a map pinpointing each stop and a map showing the route between each stop. Selecting Condensed View at the top of the itinerary will remove the maps and leave only the name and address location.
- Start New Trip: Clears the visitor’s itinerary items and allows them to start over. Any previously selected items are removed. Accessing the unique URL specified when they saved their trip would be the only way to access their previous itinerary.
