Project/Task Manager - Quick Start
Overview
Project/Task Manager can help you manage and track projects by allowing you to assign tasks to staff members, monitor the project’s progress and keep an eye on deadlines.
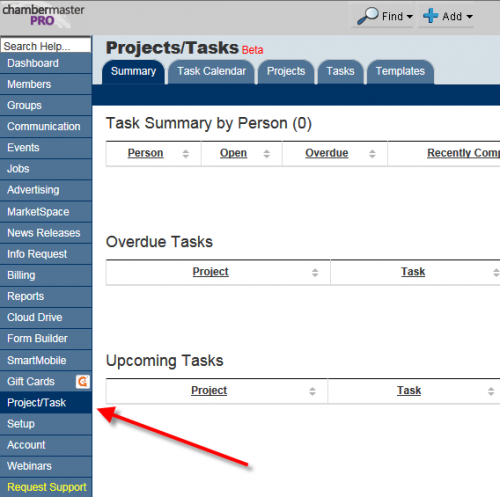
Project/Task Manager is easily accessible from your Backoffice Dashboard by clicking the Project/Task Manager link on the left navigation bar. (See figure 1). Currently, this tool is in the beta stage and is available on the Pro version of ChamberMaster and MemberZone.
Figure 1 Accessing the Project/Task Manager module
The Basics
While Project/Task Manager has many features to give you granular control over project management, the core of this application can be broken down into a few steps:
- Creating projects
- Creating the tasks necessary to complete those projects
- Checking off tasks and projects as they are completed.
Using Project/Task Manager will give you the ability to:
- Assign projects and tasks to your staff members
- Track their progress with a “percentage complete” value
- Set deadlines for projects and tasks
- Keep an eye on the “big picture” with the Summary and Task Calendar pages
- Create templates for recurring projects like bringing on a new member
Create a Project in 10 Steps
To get familiar with the Project/Task Manager, let’s create a very simple project with one task.
Step 1
Click the Projects tab near the top of the Project/Task Manager screen. (See figure 2).
Step 2: Click the New Project button near the upper right part of the Projects screen. (See figure 2).
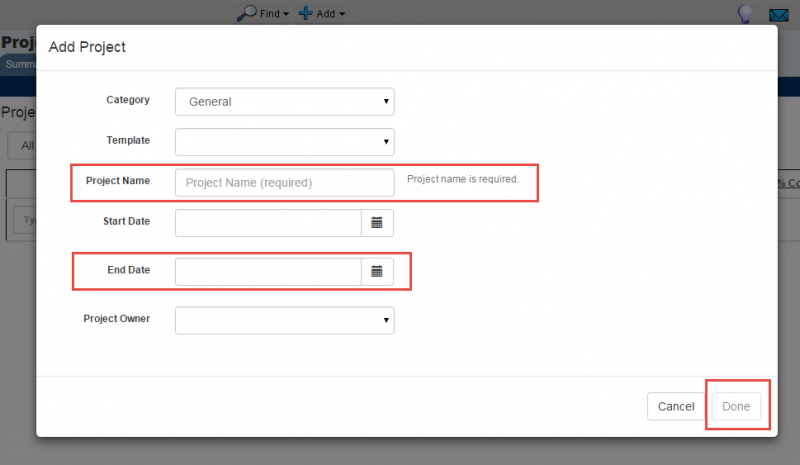
Step 3: Give your project a name and an end date. (These are the only two required fields on the Add Project screen. We will discuss the optional fields in another section). Click the Done button near the lower right part of the Add Project screen. (See figure 3).
Figure 3 The Add Projects popup screen
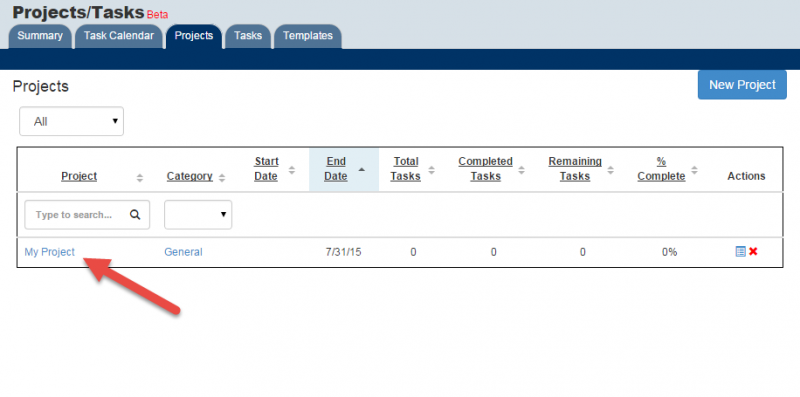
Step 4: After clicking Done, the Add Project popup screen will disappear and you will be back on the Projects screen with your new project listed at the top. (See figure 4).
Figure 4 Your first project
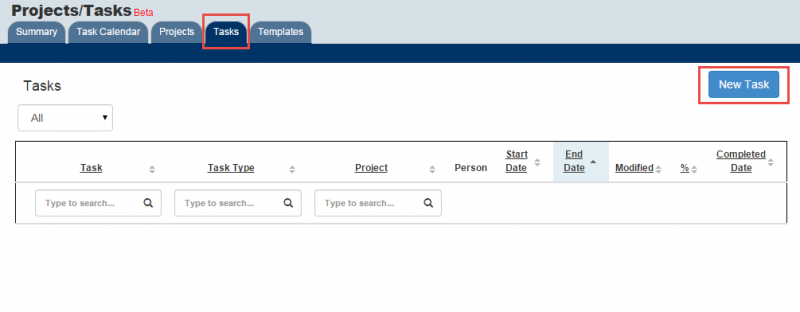
Step 5: Now to create a task for your new project. Go to the Tasks page by clicking the Tasks tab near the top of the screen. (See figure 5).
Figure 5 The Tasks page
Step 6: Create a new task by clicking the New Task button near the upper right corner. (See figure 5).
Step 7: This will bring up the Task Add/Edit popup screen. (See figure 6).
Figure 6 The Task Add/Edit
Step 8: Give your first task a name and an end date. (These are the only two required fields on the Task Add/Edit screen. We will discuss the optional fields in another section).
Step 9: In order to link this task to the project we just created, select that project from the Project dropdown list. (See figure 6).
Step 10: To save this task, click the Done button near the lower right part of the Task Add/Edit popup screen.
What’s Next?
Now that you have created your first project, let’s explore some of the more advanced features of Project/Task Manager. The next section will introduce you to assigning owners, creating types, using the Summary screen and how to get the most out of these features.


