Managing Billing
Contents
Setup Payment Terms
Add a Payment Term
- Click Setup in the left-hand menu.
- Click Payment Terms in the Billing area. The current list of Payment Terms will display.
- Click Add Payment Term. Type the name of the new term in the Name field (replacing –New Payment Term). Modify the Due Dates Offset if desired.
- Click Save Changes.
Remove a Payment Term
- Click Setup in the left-hand menu.
- Click Payment Terms in the Billing area. The current list of Payment Terms will display.
- Click the x at the end of the row of the desired Payment Term to be removed.
- Click Save Changes.
Rename a Payment Term
- Click Setup in the left-hand menu.
- Click Payment Terms in the Billing area. The current list of Payment Terms will display.
- Click within the Name or the Due Date Offset of the desired Payment Term. Make desired changes.
- Click Save Changes. Note: All previously recorded entries that used this Payment Term will now have the new Name and new Due Date Offset.
Manage Billing Templates
Default templates for them emails sent for invoices, statements, credit memos, receipts, payments, notification letters, thank you letters and collection letters are available in your database. You may use these templates as designed or customize them to meet your business needs.
View/Edit Invoice Templates
Within in your database, the Default with Logo invoice has been provided for use in creating your invoices. You can edit this template to meet your needs in needed.
- Select Setup in the left-hand navigation panel.
- Click Template Manager in the Billing section. By default the Transaction type will display Invoice. The loaded template lists the name of the template currently displayed.
- From the loaded template drop-down list, select the template you wish to view/modify.
- Edit the template as desired. Rich Text Editor functions are available to customize the template. See Working with the Rich Text Editor for instructions.
- Insert the desired field by clicking Add Database Field, open the Billing Template Fields, scroll to and click the desired field.
- Type a new name for this edited template in the Template Name field and click Save As (so not to modify the original in case you need to return to the old template).
- Make sure to select this new template when creating your invoices.
| NOTE: The database field titled [invoice_compact_lineitems] generates a unique output when used and is not commonly included on templates except in rare occasions. This database field will take all individual line items billed to the customer and compact them into a single item on the invoice that is displayed to the customer. The line item total will include the total of all individual line items. The line item description for the first item on the invoice is the only item that will display to the customer. In your software, you will still see all individual line items but the customer is kept from getting bogged down with all the items that make up that single item that you’d like to bill them. |
View/Edit Statement Templates
- Select Setup in the left-hand navigation panel.
- Click Template Manager in the Billing section.
- Select Statement from the Transaction Type list.
- From the Loaded Template drop-down list, select the template you wish to view/modify.
- Edit the template as desired. Rich Text Editor functions are available to customize the template. See Working with the Rich Text Editor for instructions.
- Type a new name for this edited template in the Template Name field.
- Click Save As (so not to modify the original in case you need to return to the old template).
- Click Close.
View/Edit Credit Memo Templates
- Select Setup in the left-hand navigation panel.
- Click Template Manager in the Billing section.
- Select Credit Memos from the Transaction Type list.
- From the Loaded Template drop-down list, select the template you wish to view/modify.
- Edit the template as desired. Rich Text Editor functions are available to customize the template. See
- Insert the desired field by clicking Add Database Field, open the Billing Template Fields, scroll to and click the desired field.
- Type a new name for this edited template in the Template Name field.
- Click Save As (so as not to modify the original in case you need to return to the old template).
- Click Close.
View/Edit Payment Templates
- Select Setup in the left-hand navigation panel.
- Click Template Manager in the Billing section.
- Select Payments from the Transaction Type list.
- From the Loaded Template drop-down list, select the template you wish to view/modify.
- Edit the template as desired. Rich Text Editor functions are available to customize the template. See Working with the Rich Text Editor for instructions.
- Insert the desired field by clicking Add Database Field, open the Billing Template Fields, scroll to and click the desired field.
- Type a new name for this edited template in the Template Name field.
- Click Save As (so as not to modify the original in case you need to return to the old template).
- Click Close.
View/Edit Collection Letter Templates
- Select Setup in the left-hand navigation panel.
- Click Template Manager in the Billing section.
- Select Collection Letter from the Transaction Type list.
- From the Loaded Template drop-down list, select the template you wish to view/modify.
- Edit the template as desired. Rich Text Editor functions are available to customize the template. See Working with the Rich Text Editor for instructions.
- Insert the desired field by clicking Add Database Field, open the Billing Template Fields, scroll to and click the desired field.
- Type a new name for this edited template in the Template Name field.
- Click Save As (so as not to modify the original in case you need to return to the old template).
- Click Close.
View/Edit Notification Letter Templates
- Select Setup in the left-hand navigation panel.
- Click Template Manager in the Billing section.
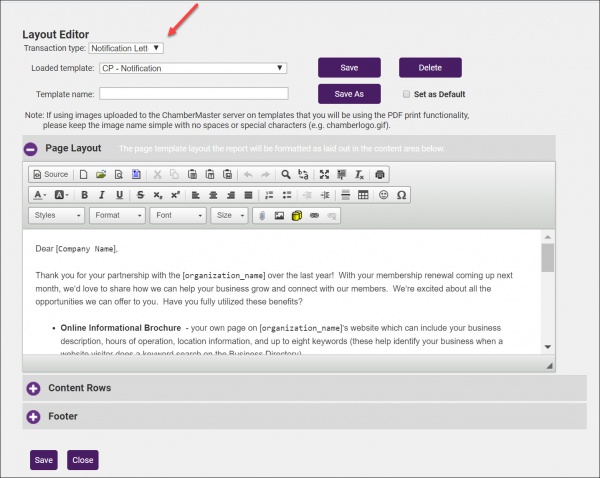
- Select Notification Letter from the Transaction Type list.
- From the Loaded Template drop-down list, select the template you wish to view/modify.
- Edit the template as desired. Rich Text Editor functions are available to customize the template. See Working with the Rich Text Editor for instructions.
- Insert the desired field by clicking Add Database Field, open the Billing Template Fields, scroll to and click the desired field.
- Type a new name for this edited template in the Template Name field.
- Click Save As (so as not to modify the original in case you need to return to the old template).
- Click Close.
| IMPORTANT Make sure not to modify the items in [] brackets. These items contain custom programming that will automatically populate with specific information from your member’s account. If you accidentally modify/delete these fields, do not save but close the window. If the accidental modification was already saved, click the Add Database field icon to replace the item and save your updates. |
View/Edit Thank You Letter Templates
- Select Setup in the left-hand navigation panel.
- Click Template Manager in the Billing section.
- Select Thank You Letter from the Transaction Type list.
- From the Loaded Template drop-down list, select the template you wish to view/modify.
- Edit the template as desired. Rich Text Editor functions are available to customize the template. See
- Insert the desired field by clicking Add Database Field, open the Billing Template Fields, scroll to and click the desired field.
- Type a new name for this edited template in the Template Name field.
- Click Save As (so as not to modify the original in case you need to return to the old template).
- Click Close.
Manage Cover Letter Templates
Cover Letter Templates can be created to be included as the email sent along with your invoices. You may, for example, have a cover letter that is used when you initially send out your renewal invoices, and then a separate email template that is used when you send reminder invoices.
View/Edit Invoice Cover Letter Templates
To view/edit your invoice cover letter templates:
- Click Setup in the left-hand navigation panel.
- Click Template Manager - Cover Letters in the Billing Section. The Layout Editor screen will, by default, display Invoice cover letters, but this screen can be used for updating cover letters for statements, credits, receipts and payments.
- Select the cover letter that you wish to view and edit from the Loaded Cover Letter drop-down list.
- Edit the template as desired. Rich Text Editor functions are available to customize the template. See Working with the Rich Text Editor for instructions.
- To save the changes to an existing template, simply click Save OR To save the cover letter as a new template, enter the Cover Letter name and click Save As.
- If you wish to set this cover letter as your system default, click the Save as default check-box.
- Click Close
View/Edit Statement Cover Letter Templates
- Click Setup in the left-hand navigation panel.
- Click Template Manager - Cover Letters in the Billing Section.
- Select Statement Cover Letter (Statement attached as PDF) or Statement embedded in E-mail from the Loaded Cover Letter list. When sending out your statements, you will choose whether to attach the statement or embed, so be sure to select the cover letter type that matches your process.
- Select the cover letter that you wish to view and edit from the Loaded Cover Letter drop-down list.
- Edit the template as desired. Rich Text Editor functions are available to customize the template.
- To save the changes to an existing template, simply click Save OR to save the cover letter as a new template, enter the Cover Letter name and click Save As.
- If you wish to set this cover letter as your system default, click the Save as default check-box.
- Click Close.
View/Edit Credit Memo Cover Letter Templates
View/Edit Payment Cover Letter Templates
View/Edit Sales Receipt Cover Letter Templates
Manage Customer Messages for Invoices
When sending out invoices, you can add a customized message on the invoice. You may create as many customer messages as you wish, then use them as appropriate. For Example, you may have one message that you use for membership invoices and another that you use for event invoices.
Create a Customer Message for Invoice
- Click Setup in the left-hand navigation panel.
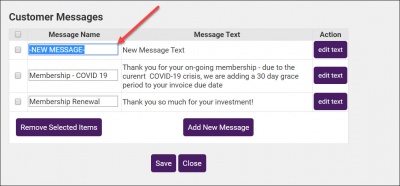
- Click Customer Messages in the Billing section. A list of all messages you have previously be created will be displayed.
- Click the Add New Message button. -New Message- will be displayed in the Message Name column.
- Type in the name of the message over -New Message-.
- Click the edit text button.
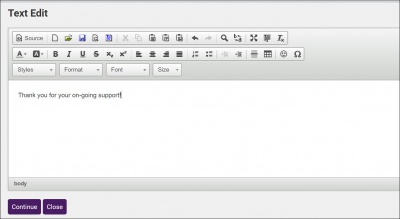
- Enter your message. Use the Rich Text Editor icons to customize as needed.
- Click Continue.
- Click Close.
| Did you know...Customer messages may also be created "on the fly" when generating invoices. |
Edit a Customer Message for Invoice
- Click Setup in the left-hand navigation panel.
- Click Customer Messages in the Billing section. A list of all messages you have previously be created will be displayed.
- Click the edit text button for the message that you wish to change.
- Change the message text as desired.
- Click Continue.
| NOTE: Customer messages may also be edited "on the fly" when generating invoices. |


