View History Communication History
(Redirected from Emails Letters and Mailing Lists-View history communication history)
Jump to navigation
Jump to search
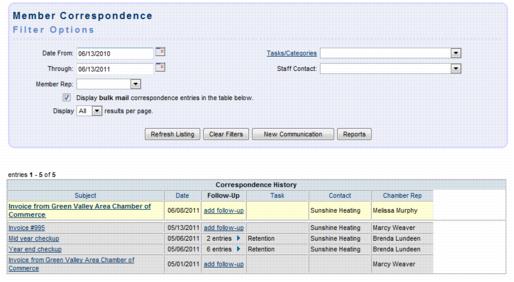
Communication history can be viewed for a single member or viewed for the entire membership at once. See more on how to create the entries in the history.
View history for a single member
1. |
Select the desired member in the Members module. |
2. |
Click the Communication tab. |
Figure 3-1 Viewing member communication history
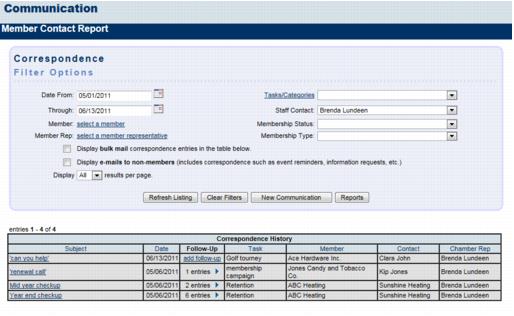
View history for all members
1. |
Click Communication in the left-hand menu. |
2. |
Click Member Contact Report. |
3. |
Select desired filters and click Refresh Listing. |
Figure 3-2 Contact Report Listing
“Display bulk mail correspondence…”: When selected the history will include emails that were sent to multiple individuals at one time. This would include even those that had been sent to only 2 or more individuals.
Task Categories: Tasks are created by you; create your own Task Categories to assist in organizing your communication. Communication may be sorted and filtered by Task Categories. A staff person with Admin permissions can create these under Setup->Correspondence Categories.
View a entry
1. |
Find the communication history using one of the ways listed above. |
2. |
Hover over the Subject title of the entry that you wish to view. |
3. |
The contents of the entry will display immediately in a pop-over window. |
Delete a Communication History item
1. |
Find the communication history using one of the ways listed above. |
2. |
Click the title of the desired item in the Subject column. |
3. |
Click Delete. |
Print the Communication History entries
1. |
When viewing the communication history, click Reports and select Print Summary Report or click Print Detailed Report. |
2. |
Follow the on-screen steps to print the output. |
Export the Communication History entries
1. |
When viewing the communication history, filter the history as desired. |
2. |
Click Reports and select Download Detail Report. |
3. |
Follow the prompts on your screen to either open or save the Comma Separated Value (.csv) file. If the data is displayed immediately, you may wish to select Save from the File menu to ensure this data is available for viewing at a later time. |
See more on how to create the entries in the history.

