Difference between revisions of "Job Postings"
Cpetterson (talk | contribs) |
Cpetterson (talk | contribs) |
||
| (26 intermediate revisions by 2 users not shown) | |||
| Line 1: | Line 1: | ||
| − | ==Overview== | + | |
| + | =='''<span style="color:#800080">Overview'''</span>== | ||
| + | ---- | ||
| + | |||
Job Postings are job openings that your members would like to advertise to other members and to the general public. Members may submit a job posting when logged in to the Member Information Center (MIC). As an association staff member, you may add a job posting on behalf of a member. If you choose, you can allow job submissions by anyone on your public website. | Job Postings are job openings that your members would like to advertise to other members and to the general public. Members may submit a job posting when logged in to the Member Information Center (MIC). As an association staff member, you may add a job posting on behalf of a member. If you choose, you can allow job submissions by anyone on your public website. | ||
| − | ==Job | + | =='''<span style="color:#800080">Configure Fees for Job Postings'''</span>== |
| + | ---- | ||
In the Job Posting Settings you will be able to configure your fees for job postings, as well as configure credit card processing options. | In the Job Posting Settings you will be able to configure your fees for job postings, as well as configure credit card processing options. | ||
| Line 8: | Line 12: | ||
#Click '''Setup''' in the left-hand menu. | #Click '''Setup''' in the left-hand menu. | ||
#Click '''Job Posting Settings''' in the "Association Information" section. | #Click '''Job Posting Settings''' in the "Association Information" section. | ||
| − | #:[[File: | + | #:[[File:Job Post Settings CP.JPG|700px|Center]] |
#Configure the following: | #Configure the following: | ||
#:*'''Notification Email''' - enter the email of the individual who should receive a notification when a new job posting is entered. | #:*'''Notification Email''' - enter the email of the individual who should receive a notification when a new job posting is entered. | ||
| − | #:*'''Fee Item''' - Select the fee item to which the job posting will be associated. The fee item (Member Due) must be created in the Billing or QuickBooks module in order to have the Fee Item selection available here. Fees for jobs are charged on a week by week basis only. [[Modify_or_Create_Fees_and_Dues_Items|Click here]] for instructions on setting up fee items. If the '''Fee Item''' option is left blank, members and the general public will | + | #:*'''Fee Item''' - Select the fee item to which the job posting will be associated. The fee item (Member Due) must be created in the Billing or QuickBooks module in order to have the Fee Item selection available here. Fees for jobs are charged on a week by week basis only. [[Modify_or_Create_Fees_and_Dues_Items|Click here]] for instructions on setting up fee items. If the '''Fee Item''' option is left blank, members and the general public will '''NOT''' be charged for job postings. If a fee '''IS''' entered, it will only apply to those that submit through the MIC (e.g. typically members). See note below for public job posting submissions. |
#:*'''Item Price''' - enter the price for the job postings, this is a per week price. '''NOTE:''' You may setup pricing for both basic packages and enhanced packages by clicking the '''More Pricing Options''' button. The Enhanced Package option will only apply if you have purchased the Marketing Package | #:*'''Item Price''' - enter the price for the job postings, this is a per week price. '''NOTE:''' You may setup pricing for both basic packages and enhanced packages by clicking the '''More Pricing Options''' button. The Enhanced Package option will only apply if you have purchased the Marketing Package | ||
#:*'''Invoicing Options''' '''NOTE:'''Cash payment is not available as a payment method for job postings. | #:*'''Invoicing Options''' '''NOTE:'''Cash payment is not available as a payment method for job postings. | ||
| Line 19: | Line 23: | ||
#:*'''RSS List Size''' - RSS List Size determines how many jobs will display at one time in the RSS feeds. RSS feeds are commonly used to display a easy-glance list on your website home page. | #:*'''RSS List Size''' - RSS List Size determines how many jobs will display at one time in the RSS feeds. RSS feeds are commonly used to display a easy-glance list on your website home page. | ||
#:*'''Jobs module title''' - This is the title displayed on your public web-page. | #:*'''Jobs module title''' - This is the title displayed on your public web-page. | ||
| − | #:*'''Edit Job Categories''' - if needed, click the Edit Job Categories button to add and/or edit your job categories. [ | + | #:*'''Edit Job Categories''' - if needed, click the Edit Job Categories button to add and/or edit your job categories. [http://supportwiki.micronetonline.com/Job_Postings#Setting_up_Job_Categories Click Here] for instruction on editing job categories. |
#:*'''Public Submission''' | #:*'''Public Submission''' | ||
#:**'''Allow public users to submit job postings (requires approval by staff before display)''' - Enable this option if you wish to allow the public to submit job postings. This selection will enable the link "Submit New Job Posting" that will display on the public job posting page. | #:**'''Allow public users to submit job postings (requires approval by staff before display)''' - Enable this option if you wish to allow the public to submit job postings. This selection will enable the link "Submit New Job Posting" that will display on the public job posting page. | ||
| Line 25: | Line 29: | ||
#:*'''Public Search''' | #:*'''Public Search''' | ||
#:**'''Enable job search by postal code/city''' - This selection will turn on the ability for job seekers to search for job postings based on the postal code and city that is entered in the Contact Information of the job posting. When enabled, this geographic search is available in the public job search page and also in the Member Information Center. '''Note:''' Geo-coding of the zip and/or city happens when jobs are entered from the MIC or the public page. If there is zip or city on the Contact Information of the job posting then the zip/postal information on the associated member record will be looked at. At the present time, updates to the zip and/or city on the Contact Information the job posting does NOT update the geo-coding. | #:**'''Enable job search by postal code/city''' - This selection will turn on the ability for job seekers to search for job postings based on the postal code and city that is entered in the Contact Information of the job posting. When enabled, this geographic search is available in the public job search page and also in the Member Information Center. '''Note:''' Geo-coding of the zip and/or city happens when jobs are entered from the MIC or the public page. If there is zip or city on the Contact Information of the job posting then the zip/postal information on the associated member record will be looked at. At the present time, updates to the zip and/or city on the Contact Information the job posting does NOT update the geo-coding. | ||
| − | #:**''' Enable custom search options''' - This settings allows you to include additional criteria for job seekers to use when searching job postings. '''NOTE:''' All custom criteria will display as options when a new job posting is being submitted. Only the custom criteria that are associated with the active jobs will display as search options when job seekers are searching for a job. | + | #:**''' Enable custom search options''' - This settings allows you to include additional criteria for job seekers to use when searching job postings. For example, you might include a Salary Range attribute. '''NOTE:''' All custom criteria will display as options when a new job posting is being submitted. Only the custom criteria that are associated with the active jobs will display as search options when job seekers are searching for a job. Click the '''add/edit custom search attributes''' link to add and/or edit attribute groups. |
#Click '''Save'''. | #Click '''Save'''. | ||
| − | ''' | + | {| class="wikitable" |
| + | |- | ||
| + | | | ||
| + | [[File:One Row.png|25px]] | ||
| + | | style="width: 100%"| '''Note:'''When allowing jobs to be submitted from the public, if any job posting fees are being assessed, they will not be collected during that public submission. Instead the job will be displayed in your Task List as "Pending". You will then be able to invoice the individual or contact them for payment. Future releases may integrate payment into the public job posting but is not available at this time. Jobs submitted from the Member Information Center will collect payment. | ||
| + | |} | ||
| − | === | + | ==='''<span style="color:#800080">Setup Job Categories'''</span>=== |
| + | ---- | ||
Job categories will allow for easily searching your job postings. A default list of job categories in seeded in the database, and you may add additional categories to suit your business needs. You can update Job Categories either from the '''Job Posting Settings''' screen, or within the '''Jobs''' Module. | Job categories will allow for easily searching your job postings. A default list of job categories in seeded in the database, and you may add additional categories to suit your business needs. You can update Job Categories either from the '''Job Posting Settings''' screen, or within the '''Jobs''' Module. | ||
| Line 38: | Line 48: | ||
#Click '''Jobs''' in the left hand navigation panel. | #Click '''Jobs''' in the left hand navigation panel. | ||
#Click '''Job Categories'''. | #Click '''Job Categories'''. | ||
| − | #:[[File:Edit Job | + | #:[[File:Edit Job Posting CP.JPG|700px|Center]] |
#'''New Job Category Name''' - Enter a name for the new category. | #'''New Job Category Name''' - Enter a name for the new category. | ||
#Click '''Add Job Category''' | #Click '''Add Job Category''' | ||
| Line 46: | Line 56: | ||
#Click '''Jobs''' in the left hand navigation panel. | #Click '''Jobs''' in the left hand navigation panel. | ||
#Click '''Job Categories'''. | #Click '''Job Categories'''. | ||
| − | #:[[File:Edit Job | + | #:[[File:Edit Job Posting CP.JPG|700px|Center]] |
#From the '''Edit Job Category''' drop-down list, select the category you wish to edit. | #From the '''Edit Job Category''' drop-down list, select the category you wish to edit. | ||
#In the '''Change Job Category Name To''' text box, make the needed edits. | #In the '''Change Job Category Name To''' text box, make the needed edits. | ||
#Click the '''Update Job Category''' button. | #Click the '''Update Job Category''' button. | ||
| + | =='''<span style="color:#800080">Setting up Job Postings from the Back Office'''</span>== | ||
| + | ---- | ||
| − | + | The following steps describe how to add, remove, edit, disable, and approve job posting submissions as a staff member: | |
| − | + | ==='''<span style="color:#800080">Add a Job Posting for a Member'''</span>=== | |
| + | ---- | ||
| − | + | #On a Member's page, click the '''Advanced''' tab. | |
| − | #Click ''' | + | #:[[File:Job Posting CP.JPG|700px|center]] |
| − | # | + | #Click '''New Job Posting''' in the '''Job Postings''' section. |
| − | # | + | #:[[File:New Job Posting CP.JPG|700px|center]] |
| − | #: | + | #Complete the form in the '''Job Specifications''' pop-up form: |
| − | #:[[ | + | #*'''Title''': This is the title of the job, displayed on your web-site. |
| − | #: | + | #*'''Image''': Click the '''Add Image''' button to upload an image. For best results, upload an image that is 400 x 400. A larger image may be uploaded but will maintain the 1 x 1 aspect ratio. This provides a uniform look for the deals/jobs on the public directory search results and fit in the space provided in all directory locations. |
| − | # | + | #*'''Description''': Enter the description of the job. You may use all of the Rich Text Editor options to customize. |
| + | #*'''Meta Description''': Enter a 1-2 sentence summary of this job posting. The characters entered in this new field are often visible in search engine results, social media posts and shares. This gives you the opportunity to better target your message and hopefully improve your click-through-rate. If this field is left blank, it will automatically populate with the first 160 characters of the Job Description. The field is limited to 320 characters overall. | ||
| + | #*'''Display Posting Date''': Version 4 public modules ONLY - COMING SOON. This is the date that a job was posted so visitors can tell how old/new a posting is. | ||
| + | #*'''Category''': Select a job category from the drop-down list. If needed, click the '''category''' hyper-link to add/edit categories. See '''[[Job_Postings#Setting_up_Job_Categories|Setting Up Job Categories]]''' for further instruction. | ||
| + | #*'''Contact Information''': The member contact information will be populated by default, but may be changed if needed. This will be displayed on your web-page with the job posting. | ||
| + | #*'''Active Dates''': Click the desired active dates. Click on the dates you want your job posting to run. All dates must be selected at this point, active dates cannot be changed once the job posting has been submitted. Job Postings are run on a week by week basis, beginning on Sunday of each week. | ||
#If you do not have job postings fee set up, click '''Save & Exit'''. The job posting will be automatically approved and active based on the dates you selected. If you do have a job postings fee setup, click '''Continue''' and complete the checkout process. | #If you do not have job postings fee set up, click '''Save & Exit'''. The job posting will be automatically approved and active based on the dates you selected. If you do have a job postings fee setup, click '''Continue''' and complete the checkout process. | ||
| + | #:[[File:Job Purchase.JPG|700px|center]] | ||
| + | {| class="wikitable" | ||
| + | |- | ||
| + | | | ||
| + | [[File:Smallest.png|25px]] | ||
| + | | style="width: 100%"| '''Note: '''Alternately, you can access job postings by clicking '''Jobs''' in the left-hand menu. | ||
| + | |} | ||
| − | + | ==='''<span style="color:#800080">Remove a Job Posting'''</span>=== | |
| − | + | ---- | |
| − | |||
| − | ''' | ||
| − | |||
#Click '''Members''' in the left-hand menu. | #Click '''Members''' in the left-hand menu. | ||
#Select the desired member from the dropdown list at the top of the page. | #Select the desired member from the dropdown list at the top of the page. | ||
| Line 78: | Line 100: | ||
#Click '''Delete Selected Job Postings'''. | #Click '''Delete Selected Job Postings'''. | ||
| − | ===Edit a Job Posting=== | + | ==='''<span style="color:#800080">Edit a Job Posting'''</span>=== |
| + | ---- | ||
| + | |||
:'''Note: '''Job posting dates may not be changed after the transaction has been completed if charges are associated with the job posting. You may, however, disable a job posting and create another job posting with the correct dates. Charges from the first job posting will still apply unless refunded separately. | :'''Note: '''Job posting dates may not be changed after the transaction has been completed if charges are associated with the job posting. You may, however, disable a job posting and create another job posting with the correct dates. Charges from the first job posting will still apply unless refunded separately. | ||
| Line 84: | Line 108: | ||
#Select the desired member from the dropdown list at the top of the page. | #Select the desired member from the dropdown list at the top of the page. | ||
#In the Job Postings section of the '''Advanced''' tab, select the name of the job posting you wish to edit. | #In the Job Postings section of the '''Advanced''' tab, select the name of the job posting you wish to edit. | ||
| + | #:[[File:Job Posting CP.JPG|700px|center]] | ||
#Make the desired edits and click '''Save'''. | #Make the desired edits and click '''Save'''. | ||
| − | ===Disable a Job Posting=== | + | ==='''<span style="color:#800080">Disable a Job Posting'''</span>=== |
| + | ---- | ||
| + | |||
#Click '''Members''' in the left-hand menu. | #Click '''Members''' in the left-hand menu. | ||
#Select the desired member from the dropdown list at the top of the page. | #Select the desired member from the dropdown list at the top of the page. | ||
#In the Job Postings section of the '''Advanced''' tab, select '''Disabled''' from the dropdown list in the '''Status''' column. | #In the Job Postings section of the '''Advanced''' tab, select '''Disabled''' from the dropdown list in the '''Status''' column. | ||
| − | ===Approve a Job Posting=== | + | ==='''<span style="color:#800080">Approve a Job Posting'''</span>=== |
| + | ---- | ||
| + | |||
| + | The '''Task List''' will indicate the number of pending job postings that need your approval. Job postings submitted in the MIC or public website will not be displayed on your public website until they have been approved. Staff who have subscribed to the '''Content (deal, job, event etc.) was submitted that may need approval''' notification will receive an email when a job posting is submitted for approval. | ||
| + | |||
| + | #Click the numbered Job Posting link in the '''Task List'''. | ||
| + | #:[[File:Pending Jobs CP.JPG|700px|center]] | ||
| + | #If needed, click the name of the job posting to view the details. '''NOTE''': The field '''Displayed Posting Date''' is not a field that can be populated via the MIC. You may wish to populate this field when approving the job posting. If this field is '''NOT''' filled in, it will be auto-populated with the current date. v4 Modules only. | ||
| + | When a job posting is '''Approved''', it will display on your public website and/or in the Member Information Center (depending on how you have it setup). This email is hard-coded and may not be altered. | ||
| + | |||
| + | =='''<span style="color:#800080">View All Job Postings'''</span>== | ||
| + | ---- | ||
| + | |||
| + | You can view a complete list of all job postings in the '''Jobs''' module. You will also be able to approve postings, add new postings, update your job categories, and preview your public page postings. | ||
| + | |||
| + | #Click '''Jobs''' in the left-hand navigation panel. | ||
| + | #Click '''View/Edit Job Postings'''. | ||
| + | [[File:View All Jobs CP.JPG|700px|center]] | ||
| + | |||
| + | ==Preview Public Job Postings== | ||
| + | |||
| + | The preview options allows you to view your job postings, as they are seen by the public. | ||
| + | |||
| + | #Click '''Jobs''' in the left-hand navigation panel. | ||
| + | #Click ''' Preview Public Job Postings'''. | ||
| + | [[File:Preview Jobs CP.JPG|1000px|center]] | ||
| + | |||
| + | =='''<span style="color:#800080">Job Posting Views - Web Statistics'''</span>== | ||
| + | ---- | ||
| + | |||
| + | #Click '''Jobs''' in the left-hand navigation panel. | ||
| + | #Click '''Job Posting Views'''. | ||
| + | |||
| + | [[File:Web Stats Job Views.JPG|600px|center]] | ||
| + | |||
| + | =Working with Job Postings in the MIC= | ||
| + | |||
| + | In the Member Information Center, members can add, edit and delete their own job postings as well as view job postings from other members. | ||
| + | |||
| + | :::[[File:jobs91715.png]] | ||
| + | |||
| + | ===The Job Postings Page=== | ||
| + | The Job Postings link appears on the left navigation for reps with the required permission level. Permissions are set by staff in the backoffice. | ||
| + | |||
| + | :::#The '''Job Postings''' link on the left navigation opens the Job Postings page | ||
| + | :::#The '''Narrow search by''' link expands to allow job searches by keyword, category and location. Click on '''Advanced Search''' to reveal any custom search options which are set in the backoffice: '''Setup''' > '''Job Posting Settings''' > '''Public Search''' > "add/edit custom search attributes". | ||
| + | :::#The '''Add Job Postings''' and '''Manage Job Postings''' buttons. | ||
| + | |||
| + | ==Add Job Posting in the MIC== | ||
| + | |||
| + | #Click the '''Job Postings''' link in the left navigation panel. | ||
| + | #Click '''Add Job Posting''' | ||
| + | #Configure the following: | ||
| + | #:*'''Title''' - This is the name of the job posting that will be displayed. | ||
| + | #:*'''Description''' - Enter the job description. | ||
| + | #:*'''Category''' - Select a job category from the drop down list. | ||
| + | #:*'''Contact Information''' - Review organization information and update any information as needed. | ||
| + | #:*'''Active Dates''' - Click the dates you would like to have this Job Posting active on the website. '''NOTE:''' All dates must be selected at this point, active dates cannot be changed once the Job Posting has been submitted. Job Postings are run on a week by week basis, beginning on Sunday of each week. | ||
| + | #:*'''Image''' – Click the '''Add Image''' icon to load in your business logo to show on the Job Posting. | ||
| + | #To submit for approval click the '''Submit for Approval''' button. | ||
| + | |||
| + | ==Manage Job Postings in the MIC== | ||
| − | Job | + | After a member has submitted a Job Posting, the member will be able to see if it has been approved or make updates to |
| + | any pending Job Postings *After your Job Posting has been approved you will need to contact your | ||
| + | chamber/association to make any updates or changes. | ||
| + | [[File:MIC Manage Job Postings.JPG|center]] | ||
| − | + | =Working with Job Postings on Your Public Website= | |
| − | |||
| − | |||
| − | |||
| − | |||
| − | + | If enabled, Job Postings can be viewed on your public website at www.yourwebsite.com/jobs. You also have the option of allowing people to submit their own job postings (pending your approval) on your website at www.yourwebsite.com/jobs/create. | |
| − | + | ==Job Search Page== | |
| + | If enabled, your job search page will be located at www.yourwebsite.com/jobs | ||
| − | + | ::[[File:jobpostingpage.png]] | |
| + | ==Job Posting Submission Form== | ||
| + | If enabled, your public website's job posting submission page will be at www.yourwebsite.com/jobs/create | ||
| − | + | ::[[File:jobs_public.png]] | |
| − | |||
Revision as of 13:22, 19 April 2019
Contents
Overview
Job Postings are job openings that your members would like to advertise to other members and to the general public. Members may submit a job posting when logged in to the Member Information Center (MIC). As an association staff member, you may add a job posting on behalf of a member. If you choose, you can allow job submissions by anyone on your public website.
Configure Fees for Job Postings
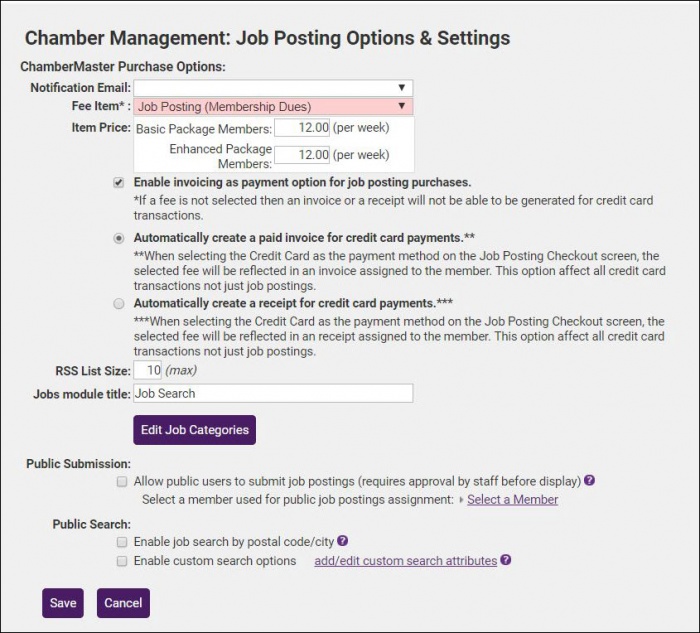
In the Job Posting Settings you will be able to configure your fees for job postings, as well as configure credit card processing options.
- Click Setup in the left-hand menu.
- Click Job Posting Settings in the "Association Information" section.
- Configure the following:
- Notification Email - enter the email of the individual who should receive a notification when a new job posting is entered.
- Fee Item - Select the fee item to which the job posting will be associated. The fee item (Member Due) must be created in the Billing or QuickBooks module in order to have the Fee Item selection available here. Fees for jobs are charged on a week by week basis only. Click here for instructions on setting up fee items. If the Fee Item option is left blank, members and the general public will NOT be charged for job postings. If a fee IS entered, it will only apply to those that submit through the MIC (e.g. typically members). See note below for public job posting submissions.
- Item Price - enter the price for the job postings, this is a per week price. NOTE: You may setup pricing for both basic packages and enhanced packages by clicking the More Pricing Options button. The Enhanced Package option will only apply if you have purchased the Marketing Package
- Invoicing Options NOTE:Cash payment is not available as a payment method for job postings.
- Enable invoicing as payment option for job posting purchases - select this option if you wish to allow members to be invoiced when they enter a job posting on-line. NOTE: The check-box is only available if you have selected a fee item.
- Automatically create a paid invoice for credit card payments - select this option if you want to automatically create a paid invoice when a job posting is purchased by credit card.
- Automatically create a receipt for credit card payments - select this option if you want to automatically create a receipt when a job posting is purchased by credit card.
- RSS List Size - RSS List Size determines how many jobs will display at one time in the RSS feeds. RSS feeds are commonly used to display a easy-glance list on your website home page.
- Jobs module title - This is the title displayed on your public web-page.
- Edit Job Categories - if needed, click the Edit Job Categories button to add and/or edit your job categories. Click Here for instruction on editing job categories.
- Public Submission
- Allow public users to submit job postings (requires approval by staff before display) - Enable this option if you wish to allow the public to submit job postings. This selection will enable the link "Submit New Job Posting" that will display on the public job posting page.
- Selected member used for public job postings assignment - Because there is no member record associated with the submission, you will need to connect a member record to the job posting after the submission comes in. Click the Non-Member Transactions link to select the desired member to be used by default.
- Public Search
- Enable job search by postal code/city - This selection will turn on the ability for job seekers to search for job postings based on the postal code and city that is entered in the Contact Information of the job posting. When enabled, this geographic search is available in the public job search page and also in the Member Information Center. Note: Geo-coding of the zip and/or city happens when jobs are entered from the MIC or the public page. If there is zip or city on the Contact Information of the job posting then the zip/postal information on the associated member record will be looked at. At the present time, updates to the zip and/or city on the Contact Information the job posting does NOT update the geo-coding.
- Enable custom search options - This settings allows you to include additional criteria for job seekers to use when searching job postings. For example, you might include a Salary Range attribute. NOTE: All custom criteria will display as options when a new job posting is being submitted. Only the custom criteria that are associated with the active jobs will display as search options when job seekers are searching for a job. Click the add/edit custom search attributes link to add and/or edit attribute groups.
- Click Save.
| Note:When allowing jobs to be submitted from the public, if any job posting fees are being assessed, they will not be collected during that public submission. Instead the job will be displayed in your Task List as "Pending". You will then be able to invoice the individual or contact them for payment. Future releases may integrate payment into the public job posting but is not available at this time. Jobs submitted from the Member Information Center will collect payment. |
Setup Job Categories
Job categories will allow for easily searching your job postings. A default list of job categories in seeded in the database, and you may add additional categories to suit your business needs. You can update Job Categories either from the Job Posting Settings screen, or within the Jobs Module.
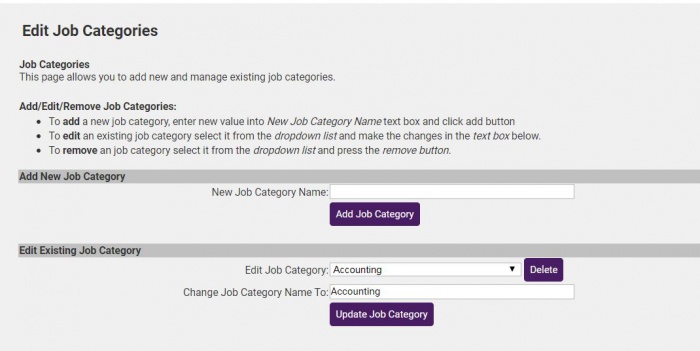
Add a Job Category
- Click Jobs in the left hand navigation panel.
- Click Job Categories.
- New Job Category Name - Enter a name for the new category.
- Click Add Job Category
Edit a Job Category
- Click Jobs in the left hand navigation panel.
- Click Job Categories.
- From the Edit Job Category drop-down list, select the category you wish to edit.
- In the Change Job Category Name To text box, make the needed edits.
- Click the Update Job Category button.
Setting up Job Postings from the Back Office
The following steps describe how to add, remove, edit, disable, and approve job posting submissions as a staff member:
Add a Job Posting for a Member
- On a Member's page, click the Advanced tab.
- Click New Job Posting in the Job Postings section.
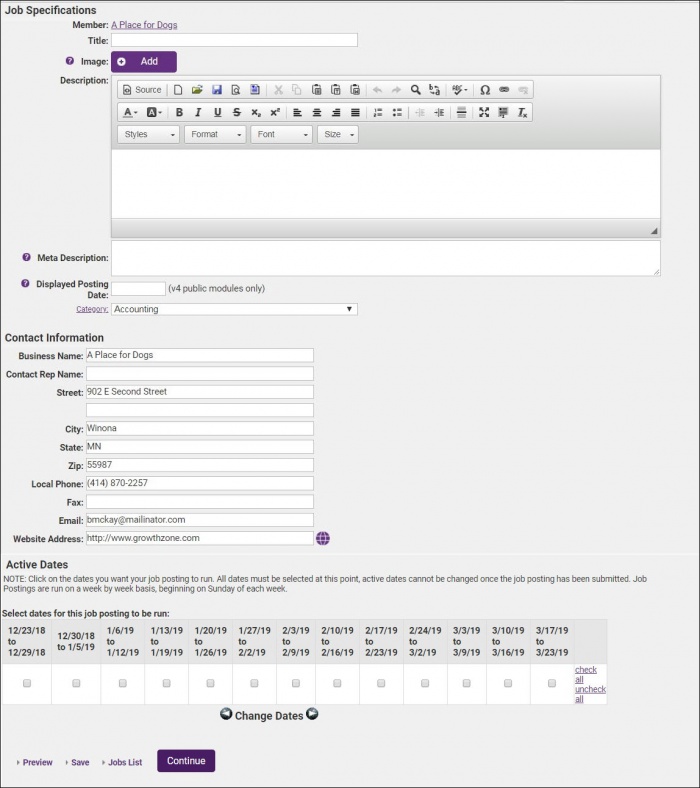
- Complete the form in the Job Specifications pop-up form:
- Title: This is the title of the job, displayed on your web-site.
- Image: Click the Add Image button to upload an image. For best results, upload an image that is 400 x 400. A larger image may be uploaded but will maintain the 1 x 1 aspect ratio. This provides a uniform look for the deals/jobs on the public directory search results and fit in the space provided in all directory locations.
- Description: Enter the description of the job. You may use all of the Rich Text Editor options to customize.
- Meta Description: Enter a 1-2 sentence summary of this job posting. The characters entered in this new field are often visible in search engine results, social media posts and shares. This gives you the opportunity to better target your message and hopefully improve your click-through-rate. If this field is left blank, it will automatically populate with the first 160 characters of the Job Description. The field is limited to 320 characters overall.
- Display Posting Date: Version 4 public modules ONLY - COMING SOON. This is the date that a job was posted so visitors can tell how old/new a posting is.
- Category: Select a job category from the drop-down list. If needed, click the category hyper-link to add/edit categories. See Setting Up Job Categories for further instruction.
- Contact Information: The member contact information will be populated by default, but may be changed if needed. This will be displayed on your web-page with the job posting.
- Active Dates: Click the desired active dates. Click on the dates you want your job posting to run. All dates must be selected at this point, active dates cannot be changed once the job posting has been submitted. Job Postings are run on a week by week basis, beginning on Sunday of each week.
- If you do not have job postings fee set up, click Save & Exit. The job posting will be automatically approved and active based on the dates you selected. If you do have a job postings fee setup, click Continue and complete the checkout process.
| Note: Alternately, you can access job postings by clicking Jobs in the left-hand menu. |
Remove a Job Posting
- Click Members in the left-hand menu.
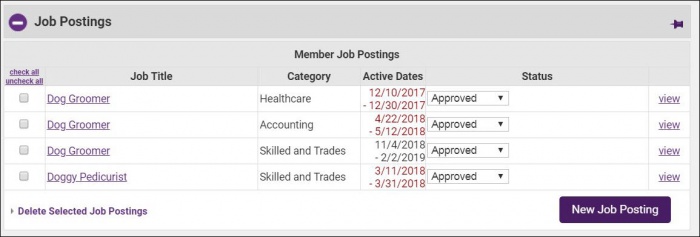
- Select the desired member from the dropdown list at the top of the page.
- In the Job Postings section of the Advanced tab, select the checkbox next to the job posting you wish to remove.
- Click Delete Selected Job Postings.
Edit a Job Posting
- Note: Job posting dates may not be changed after the transaction has been completed if charges are associated with the job posting. You may, however, disable a job posting and create another job posting with the correct dates. Charges from the first job posting will still apply unless refunded separately.
- Click Members in the left-hand menu.
- Select the desired member from the dropdown list at the top of the page.
- In the Job Postings section of the Advanced tab, select the name of the job posting you wish to edit.
- Make the desired edits and click Save.
Disable a Job Posting
- Click Members in the left-hand menu.
- Select the desired member from the dropdown list at the top of the page.
- In the Job Postings section of the Advanced tab, select Disabled from the dropdown list in the Status column.
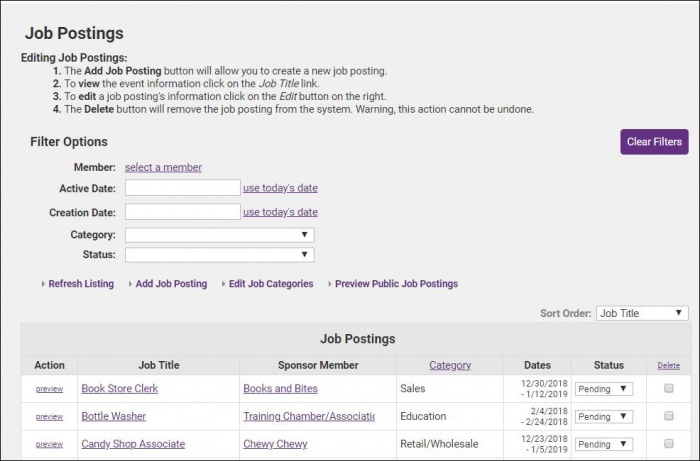
Approve a Job Posting
The Task List will indicate the number of pending job postings that need your approval. Job postings submitted in the MIC or public website will not be displayed on your public website until they have been approved. Staff who have subscribed to the Content (deal, job, event etc.) was submitted that may need approval notification will receive an email when a job posting is submitted for approval.
- Click the numbered Job Posting link in the Task List.
- If needed, click the name of the job posting to view the details. NOTE: The field Displayed Posting Date is not a field that can be populated via the MIC. You may wish to populate this field when approving the job posting. If this field is NOT filled in, it will be auto-populated with the current date. v4 Modules only.
When a job posting is Approved, it will display on your public website and/or in the Member Information Center (depending on how you have it setup). This email is hard-coded and may not be altered.
View All Job Postings
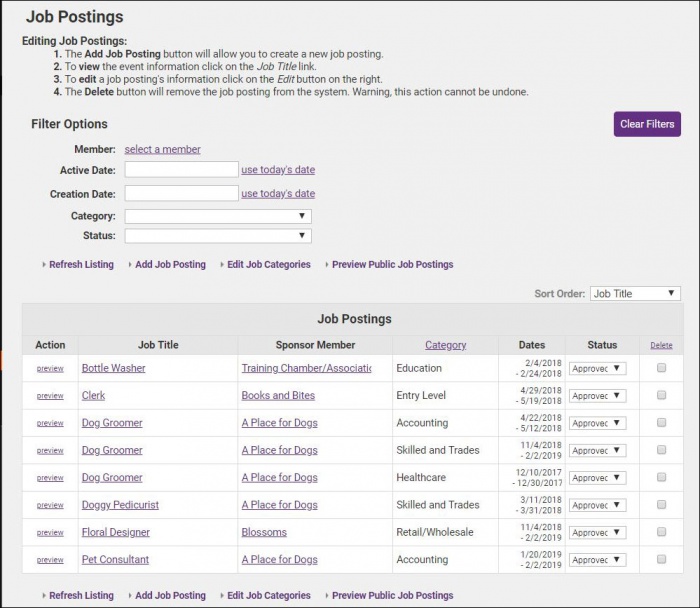
You can view a complete list of all job postings in the Jobs module. You will also be able to approve postings, add new postings, update your job categories, and preview your public page postings.
- Click Jobs in the left-hand navigation panel.
- Click View/Edit Job Postings.
Preview Public Job Postings
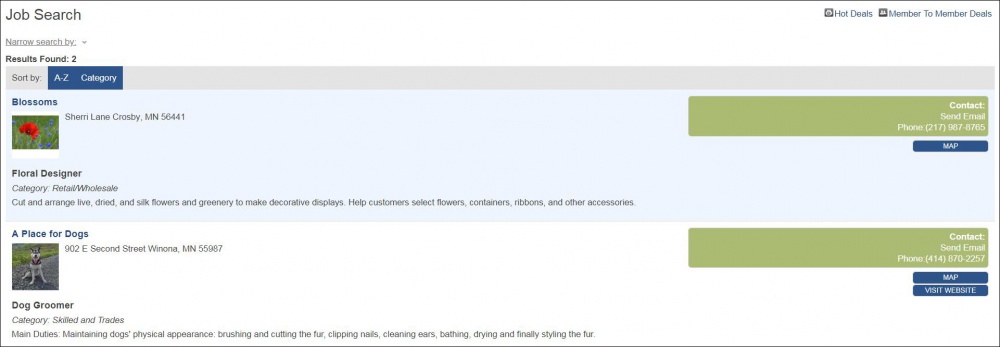
The preview options allows you to view your job postings, as they are seen by the public.
- Click Jobs in the left-hand navigation panel.
- Click Preview Public Job Postings.
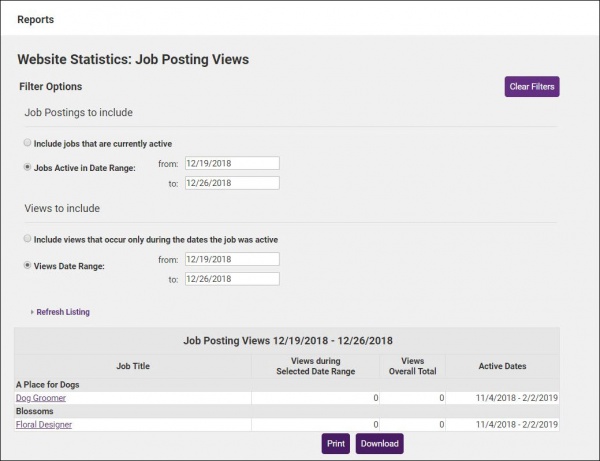
Job Posting Views - Web Statistics
- Click Jobs in the left-hand navigation panel.
- Click Job Posting Views.
Working with Job Postings in the MIC
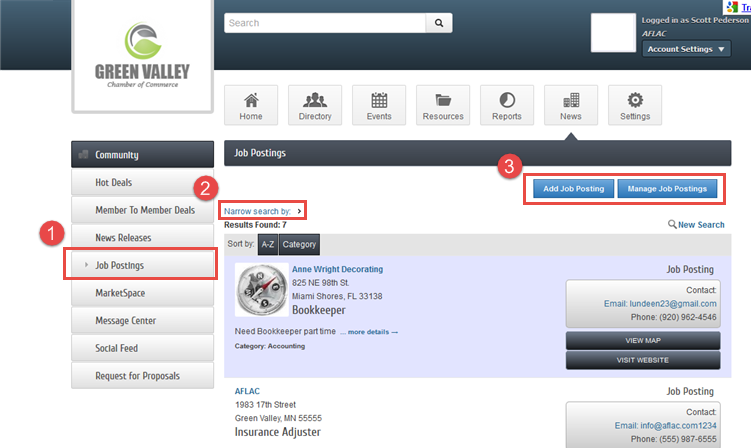
In the Member Information Center, members can add, edit and delete their own job postings as well as view job postings from other members.
The Job Postings Page
The Job Postings link appears on the left navigation for reps with the required permission level. Permissions are set by staff in the backoffice.
- The Job Postings link on the left navigation opens the Job Postings page
- The Narrow search by link expands to allow job searches by keyword, category and location. Click on Advanced Search to reveal any custom search options which are set in the backoffice: Setup > Job Posting Settings > Public Search > "add/edit custom search attributes".
- The Add Job Postings and Manage Job Postings buttons.
Add Job Posting in the MIC
- Click the Job Postings link in the left navigation panel.
- Click Add Job Posting
- Configure the following:
- Title - This is the name of the job posting that will be displayed.
- Description - Enter the job description.
- Category - Select a job category from the drop down list.
- Contact Information - Review organization information and update any information as needed.
- Active Dates - Click the dates you would like to have this Job Posting active on the website. NOTE: All dates must be selected at this point, active dates cannot be changed once the Job Posting has been submitted. Job Postings are run on a week by week basis, beginning on Sunday of each week.
- Image – Click the Add Image icon to load in your business logo to show on the Job Posting.
- To submit for approval click the Submit for Approval button.
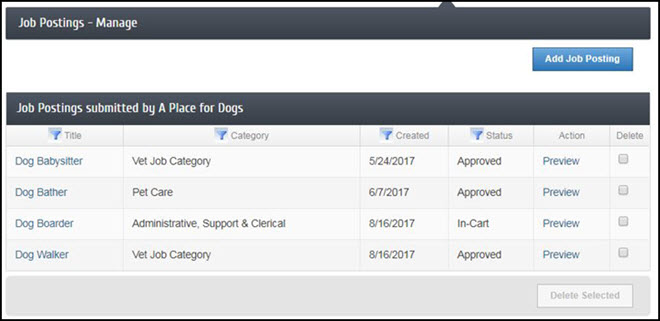
Manage Job Postings in the MIC
After a member has submitted a Job Posting, the member will be able to see if it has been approved or make updates to any pending Job Postings *After your Job Posting has been approved you will need to contact your chamber/association to make any updates or changes.
Working with Job Postings on Your Public Website
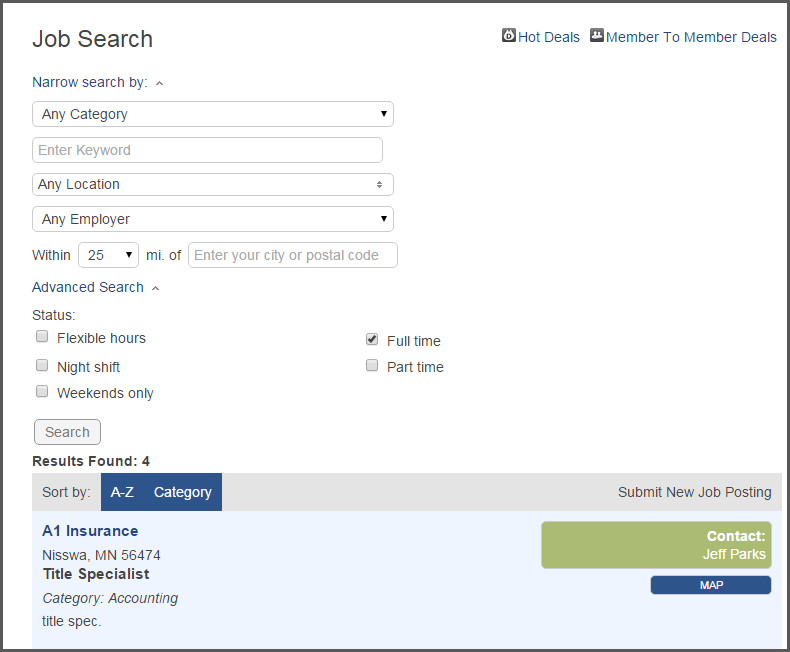
If enabled, Job Postings can be viewed on your public website at www.yourwebsite.com/jobs. You also have the option of allowing people to submit their own job postings (pending your approval) on your website at www.yourwebsite.com/jobs/create.
Job Search Page
If enabled, your job search page will be located at www.yourwebsite.com/jobs
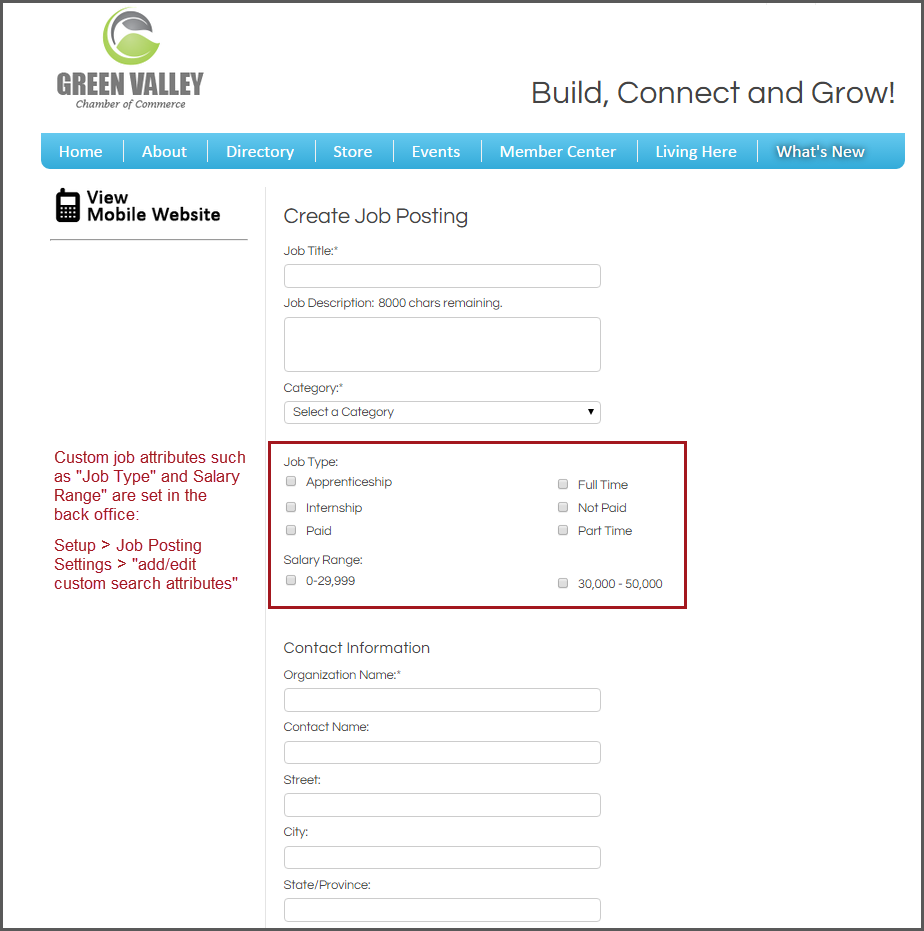
Job Posting Submission Form
If enabled, your public website's job posting submission page will be at www.yourwebsite.com/jobs/create
