Difference between revisions of "Association Information"

From Support Wiki
Jump to navigation Jump to search
m (SPederson moved page Organization Information to Association Information: name change)
 
(6 intermediate revisions by 2 users not shown)
Line 1: Line 1:
  <div style="font-family: Calibri; font-size: 11pt; margin-bottom: 12pt;"><span id="wwpID0E0UW0HA">Information in these fields will be the default business information displayed within your software and on certain integrated web pages.</span></div>
+
[[File:Organization_Info.png|framed|right]]
  <div style="margin-left: 36pt;margin-bottom: 12pt;">
+
Information in these fields will be the default business information displayed within your software and on certain integrated web pages.
    <table border="0" cellspacing="0" cellpadding="0" width="99%" summary="">
+
#Click Setup in the left-hand navigation bar.
      <tr valign="baseline">
+
#Click Association Information in the Association Options area.
        <td style="width: 18pt"><div style="font-family: Calibri; font-size: 11pt;"><span style="font-family: Calibri; font-size: 10pt;">1. </span></div></td>
+
#Edit the desired fields on the General Association Information screen.
        <td><div style="font-family: Calibri; font-size: 11pt;"><span id="wwpID0E0TW0HA">Click </span><span style="font-weight: bold;">Setup</span> in the left-hand navigation bar.</div></td>
+
#*Ensure your association's name and address is complete and accurate.
      </tr>
+
#*Select the correct country and time zone.
    </table>
+
#*Update your phone numbers and website.
  </div>
+
#*Enter in your association's generic email address.
  <div style="margin-left: 36pt;margin-bottom: 12pt;">
+
#::''This email is used when automatic emails are sent from the database as the from address''
    <table border="0" cellspacing="0" cellpadding="0" width="99%" summary="">
+
#*Upload your association's logo for display at various places through the software.
      <tr valign="baseline">
+
#::''See [[Upload Your Logo]] for details''
        <td style="width: 18pt"><div style="font-family: Calibri; font-size: 11pt;"><span style="font-family: Calibri; font-size: 10pt;">2. </span></div></td>
+
#Click Save.
        <td><div style="font-family: Calibri; font-size: 11pt;"><span id="wwpID0E0SW0HA">Click </span><span style="font-weight: bold;">Organization Information</span> in the <span style="font-weight: bold;">Information</span> area.</div></td>
 
      </tr>
 
    </table>
 
  </div>
 
  <div style="font-family: Calibri; font-size: 11pt; margin-bottom: 12pt; margin-left: 18pt; text-align: justify;"><span id="wwpID0E0RW0HA">[[Image:Administrator_Tasks-Set_Up_Organization_Information-AdminTasks.1.03.1.jpg]]</span></div>
 
  <div style="font-family: Calibri; font-size: 10pt; margin-bottom: 12pt; margin-left: 54pt; text-align: justify;"><span style="font-size: 10pt; text-transform: uppercase;"><span id="wwpID0E0QW0HA">Figure 1-1</span></span> Information section of the Setup menu</div>
 
  <div style="margin-left: 36pt;margin-bottom: 12pt;">
 
    <table border="0" cellspacing="0" cellpadding="0" width="99%" summary="">
 
      <tr valign="baseline">
 
        <td style="width: 18pt"><div style="font-family: Calibri; font-size: 11pt;"><span style="font-family: Calibri; font-size: 10pt;">3. </span></div></td>
 
        <td><div style="font-family: Calibri; font-size: 11pt;"><span id="wwpID0E0PW0HA">Edit the desired fields on the </span><span style="font-weight: bold;">General Business Information</span> screen.</div></td>
 
      </tr>
 
    </table>
 
  </div>
 
  <div style="margin-left: 36pt;margin-bottom: 12pt;">
 
    <table border="0" cellspacing="0" cellpadding="0" width="99%" summary="">
 
      <tr valign="baseline">
 
        <td style="width: 18pt"><div style="font-family: Calibri; font-size: 11pt;"><span style="font-family: Calibri; font-size: 10pt;">4. </span></div></td>
 
        <td><div style="font-family: Calibri; font-size: 11pt;"><span id="wwpID0E0OW0HA">Upload your organization logo here for display at various places through the software.</span></div></td>
 
      </tr>
 
    </table>
 
  </div>
 
  <div style="font-family: Calibri; font-size: 11pt; margin-bottom: 12pt; margin-left: 18pt; text-align: justify;"><span id="wwpID0E0NW0HA">[[Image:Administrator_Tasks-Set_Up_Organization_Information-AdminTasks.1.03.2.jpg]]</span></div>
 
  <div style="font-family: Calibri; font-size: 10pt; margin-bottom: 12pt; margin-left: 54pt; text-align: justify;"><span style="font-size: 10pt; text-transform: uppercase;"><span id="wwpID0E0MW0HA">Figure 1-2</span></span> Business Information screen</div>
 
  <div style="margin-left: 36pt;margin-bottom: 12pt;">
 
    <table border="0" cellspacing="0" cellpadding="0" width="99%" summary="">
 
      <tr valign="baseline">
 
        <td style="width: 18pt"><div style="font-family: Calibri; font-size: 11pt;"><span style="font-family: Calibri; font-size: 10pt;">5. </span></div></td>
 
        <td><div style="font-family: Calibri; font-size: 11pt;"><span id="wwpID0E0LW0HA">Click </span><span style="font-weight: bold;">Save</span>.</div></td>
 
      </tr>
 
    </table>
 
  </div>
 
  <div style="font-family: Calibri; font-size: 11pt;"><span id="wwpID0E0KW0HA"> </span></div>
 
  
[[Category:Setup]]
+
[[Category:Setup]][[Category:Getting Started]][[Category:Admin Tasks]]

Latest revision as of 16:31, 25 April 2016

Organization Info.png

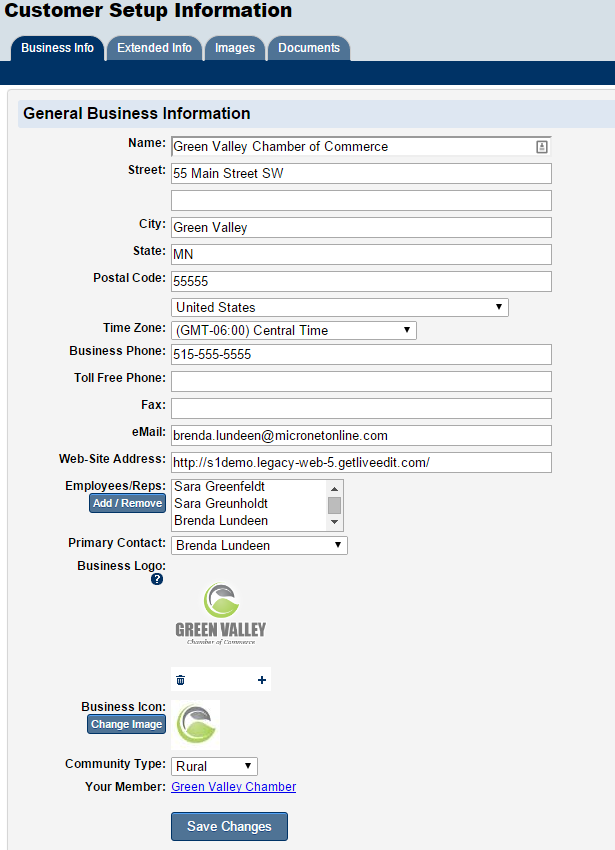
Information in these fields will be the default business information displayed within your software and on certain integrated web pages.

  1. Click Setup in the left-hand navigation bar.
  2. Click Association Information in the Association Options area.
  3. Edit the desired fields on the General Association Information screen.
    • Ensure your association's name and address is complete and accurate.
    • Select the correct country and time zone.
    • Update your phone numbers and website.
    • Enter in your association's generic email address.
    This email is used when automatic emails are sent from the database as the from address
    • Upload your association's logo for display at various places through the software.
    See Upload Your Logo for details
  4. Click Save.